Hi friends! First project on the blog for our new home reveal is our stenciled tile fireplace makeover! It’s been awhile, right?! Sorry the blog has been so quiet, but if you follow along with me on Instagram (if not, what are you waiting for? @ellerydesigns) then you would know that we recently moved into a “new” home! Well, new to us! We’ve been busy with so many renovations and projects! I can’t wait to share more with you here on the blog! I promise I won’t be so quiet anymore. 🙂
DETAILS
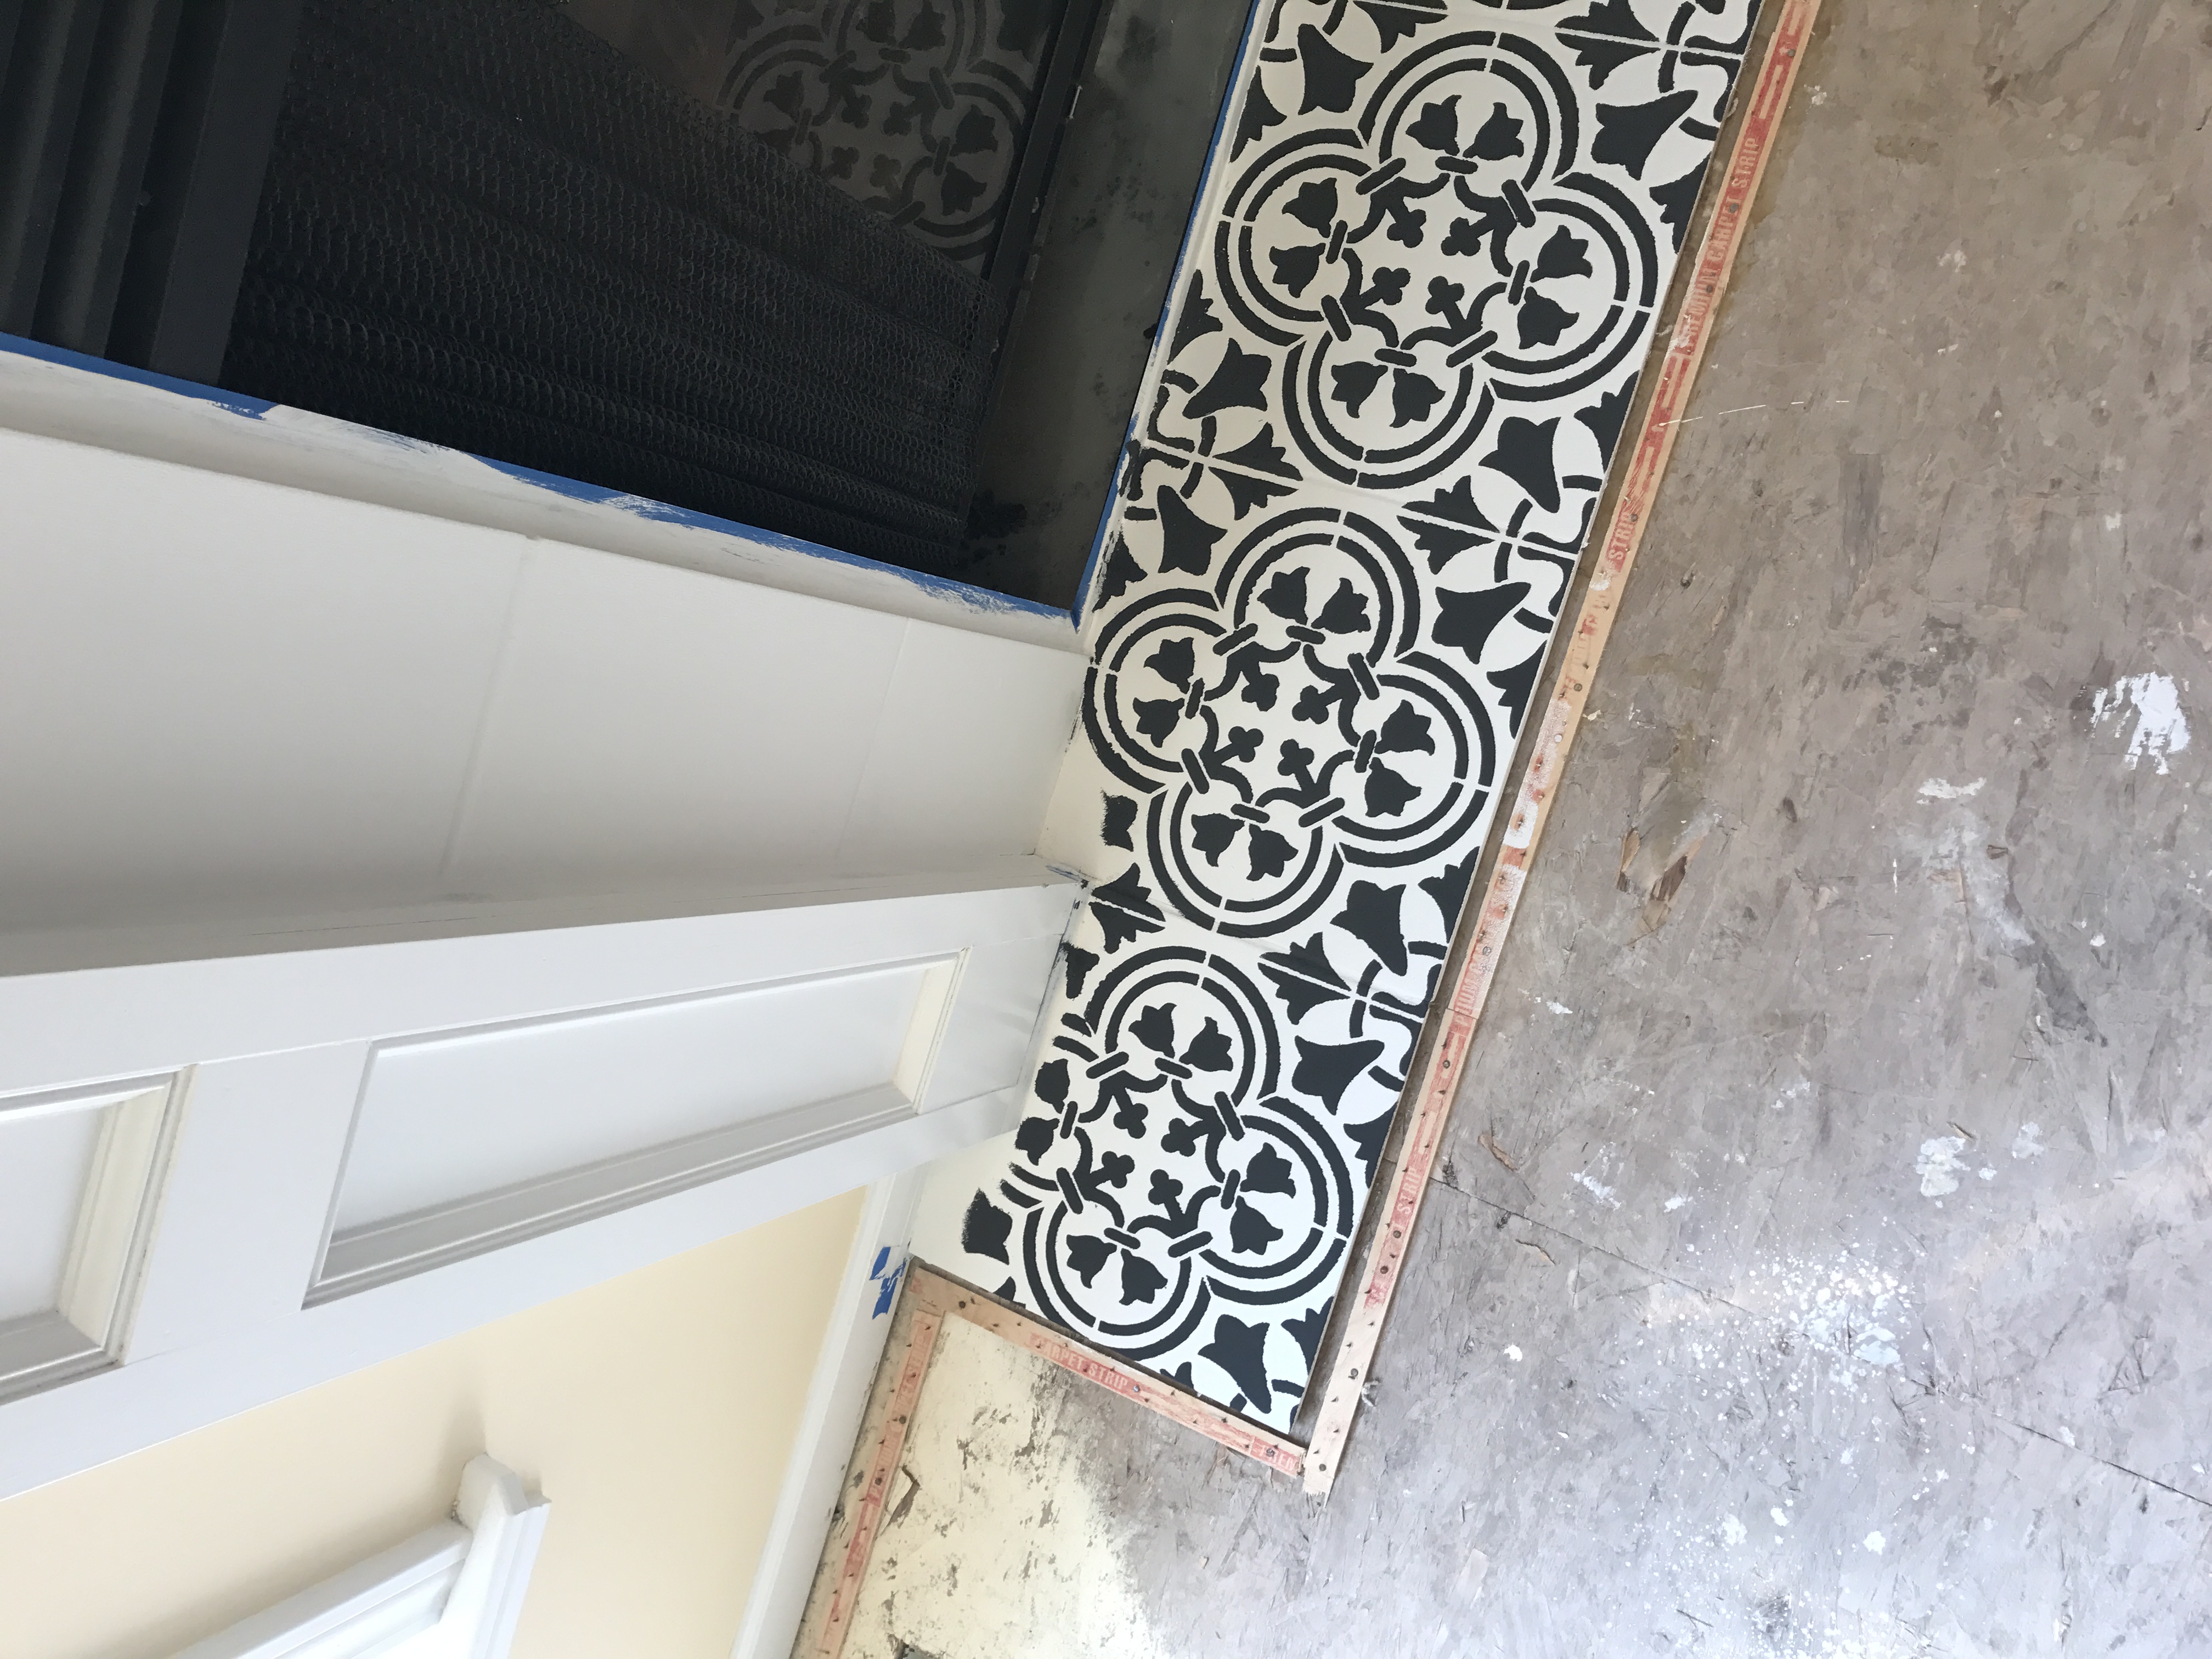
First up, on my DIY project list was a fireplace makeover and making this space a little more visually appealing. I’m so excited to have a REAL fireplace now! But the blah yellow-ish tiles were kind of an eye sore. I decided to paint the tiles white using Rust Oleum Chalk Paint in White Linen that I bought at Menards. I simply taped everything off and just painted the tiles using three coats of the white chalk paint, and I did not prime. I always paint using a brush and backroll using a small roller to eliminate brush strokes. I used the Charcoal color for the stencil part. It dries super fast so I only had to wait 5-10 minutes before moving the stencil. I bought a small/fat round brush and lightly dabbed on the stencil. I always blotted the brush on a paper towel first. I recommend not using a regular brush – you just want to lightly dab straight down so it doesn’t leak/run outside the stencil so I found the fat rounded brush, like these, worked great. Once you’re completely done, I sealed using the clear matte top coat.
I’ve seen a lot of stenciled tile DIY’s on Pinterest and Insta lately so wanted to give it a try! I will say, I hate painting and this wasn’t very easy since our tiles had odd cutouts so it was a little tricky using the stencil; so yes, that’s why I just stuck to stenciling the bottom tiles, BUT I love how it turned out! Well more like, it would have been too hard to do the rest and if I want to make a change in a few years, it will be easier to do so with just bottom ones stenciled. The stencil is from Cutting Edge Stencils. Here is the pattern I chose. There are so many cute options for your fireplace makeover!

STEP BY STEP: STENCILING YOUR TILE
Change is a good thing….
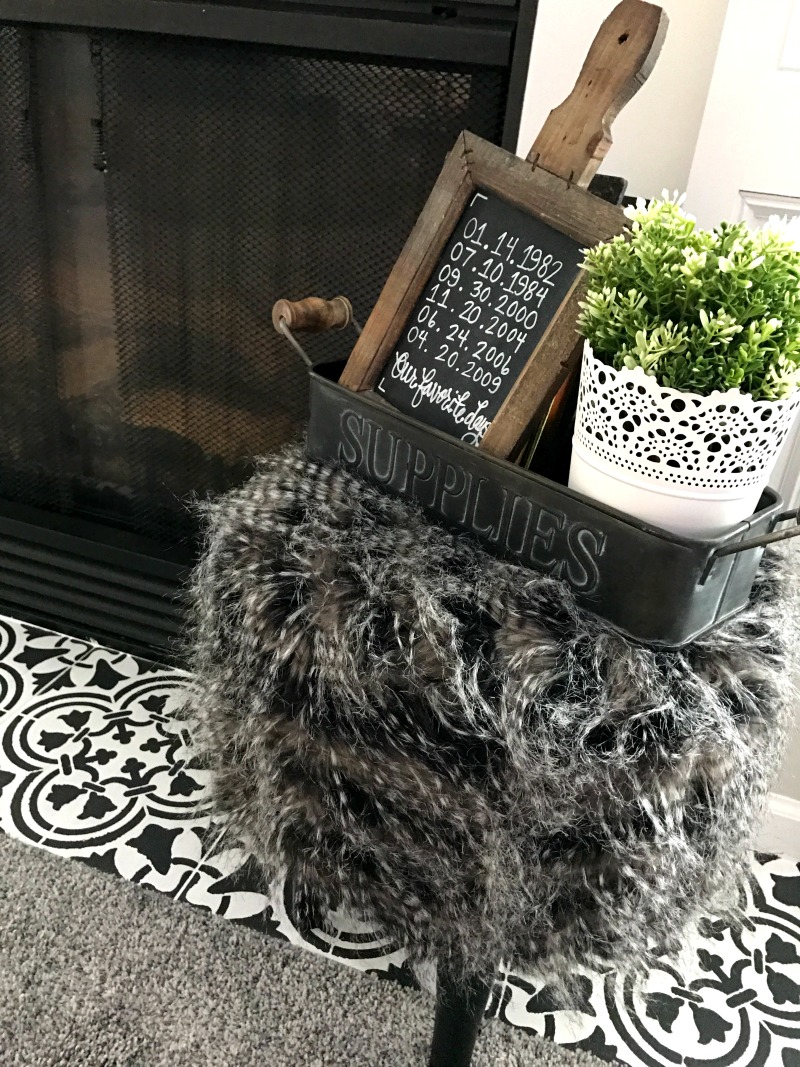
Loving the modern farmhouse vibes this update brings to our room! A quick, subtle change but makes all the difference, right?! If you don’t know, black and white is my favorite with touches of wood elements so this fits right in with my style and I’ve received SO many compliments already! As you can see we added new carpeting and fresh paint!
Once I was done stenciling the tile and the walls were painted, I was able to decorate. (Paint is Repose Gray by Sherwin Williams.) I was struggling with styling our new fireplace because our old faux fireplace had a big chunky mantel and this one is much smaller. After I roamed the aisles at Hobby Lobby, I wasn’t having as hard of a time. Hobby Lobby for the win! I found everything on the mantel there, except the two small arrangements on the edge of the mantel are from IKEA. The black and white striped pillows are also from IKEA. Black and white stripes are my absolute FAVORITE so I love the modern farmhouse-y look it gives to our updated space!
Let me know what you think! Have you stenciled tile before?! Would love to hear your experience in the comments. Don’t forget to order your stencils here. They are always having such great discounts, too! One project blogged. Many to go, so stay tuned!!
XO, Michelle











buy antibiotics online [url=https://biotpharm.shop/#]BiotPharm[/url] buy antibiotics
get antibiotics without seeing a doctor: buy antibiotics online uk – get antibiotics without seeing a doctor
Pharm Au24 [url=https://pharmau24.shop/#]Medications online Australia[/url] pharmacy online australia
pills for ed online: Ero Pharm Fast – Ero Pharm Fast
buy antibiotics for uti: buy antibiotics online uk – Over the counter antibiotics pills
Over the counter antibiotics for infection: BiotPharm – best online doctor for antibiotics
https://eropharmfast.shop/# Ero Pharm Fast
Ero Pharm Fast [url=https://eropharmfast.shop/#]buy ed meds online[/url] cheap ed medication
Ero Pharm Fast: Ero Pharm Fast – buying erectile dysfunction pills online
Ero Pharm Fast [url=https://eropharmfast.shop/#]ed doctor online[/url] best online ed meds
Ero Pharm Fast [url=http://eropharmfast.com/#]ed prescription online[/url] cheap ed meds
tadalafil brand name: TadalAccess – max dosage of cialis
cialis wikipedia [url=https://tadalaccess.com/#]Tadal Access[/url] cialis for prostate
cialis tablets [url=https://tadalaccess.com/#]cialis black[/url] cialis before and after pictures
generic cialis: Tadal Access – cialis online cheap
https://tadalaccess.com/# tamsulosin vs. tadalafil
buy cialis in toronto [url=https://tadalaccess.com/#]what happens if a woman takes cialis[/url] cialis 5 mg for sale
buying cialis without a prescription: Tadal Access – tadalafil (tadalis-ajanta) reviews
cialis strength [url=https://tadalaccess.com/#]cialis shipped from usa[/url] overnight cialis delivery usa
cialis leg pain: Tadal Access – letairis and tadalafil
cialis cheapest prices [url=https://tadalaccess.com/#]TadalAccess[/url] canada drugs cialis
what doe cialis look like: TadalAccess – cialis no perscription overnight delivery
cialis online without perscription [url=https://tadalaccess.com/#]cialis dosage reddit[/url] cheap cialis online tadalafil
where can i buy cialis online in australia: cialis street price – recreational cialis
tadalafil review forum: cialis generic 20 mg 30 pills – how much is cialis without insurance
cialis as generic [url=https://tadalaccess.com/#]cialis manufacturer[/url] cialis 10mg price
https://tadalaccess.com/# cialis free trial coupon
is tadalafil and cialis the same thing?: TadalAccess – cialis 5mg how long does it take to work
tadalafil 20mg canada: great white peptides tadalafil – cialis generics
what is cialis good for [url=https://tadalaccess.com/#]TadalAccess[/url] cialis dosages
comprar tadalafil 40 mg en walmart sin receta houston texas: cialis generic best price that accepts mastercard – cialis for sale over the counter
tadalafil dose for erectile dysfunction: TadalAccess – vardenafil vs tadalafil
cialis cost per pill [url=https://tadalaccess.com/#]difference between tadalafil and sildenafil[/url] best price on generic cialis
https://tadalaccess.com/# cialis brand no prescription 365
cialis tadalafil online paypal: Tadal Access – cialis meme
canada drug cialis [url=https://tadalaccess.com/#]tadalafil liquid review[/url] buy generic cialiss
cialis manufacturer coupon: cialis information – tadalafil (megalis-macleods) reviews
sildenafil and tadalafil: Tadal Access – cialis vs.levitra
active ingredient in cialis [url=https://tadalaccess.com/#]TadalAccess[/url] buying generic cialis online safe
dapoxetine and tadalafil: what is the use of tadalafil tablets – tadalafil tablets 40 mg
https://tadalaccess.com/# cialis online paypal
cialis manufacturer: overnight cialis – best place to get cialis without pesricption
cialis generic timeline 2018 [url=https://tadalaccess.com/#]cialis paypal[/url] where to buy generic cialis ?
how to buy tadalafil: cialis cheapest prices – maximum dose of cialis in 24 hours
price of cialis [url=https://tadalaccess.com/#]TadalAccess[/url] cialis alcohol
sanofi cialis otc: Tadal Access – cialis sample pack
cialis 5mg 10mg no prescription [url=https://tadalaccess.com/#]how long does cialis take to work 10mg[/url] what is cialis for
great white peptides tadalafil: TadalAccess – cialis pills pictures
cialis pills [url=https://tadalaccess.com/#]TadalAccess[/url] cheap cialis
https://tadalaccess.com/# black cialis
cialis reviews: Tadal Access – cialis 5mg daily how long before it works
tadalafil dose for erectile dysfunction [url=https://tadalaccess.com/#]Tadal Access[/url] buying cialis online
cialis usa: cheap cialis pills uk – cialis super active
cialis or levitra [url=https://tadalaccess.com/#]cialis drug[/url] best price on cialis 20mg
cialis is for daily use: Tadal Access – cialis las vegas
canadian pharmacy tadalafil 20mg [url=https://tadalaccess.com/#]tadalafil soft tabs[/url] cialis for bph reviews
most recommended online pharmacies cialis: TadalAccess – buy tadalafil no prescription
https://tadalaccess.com/# tadalafil without a doctor prescription
cialis online pharmacy australia [url=https://tadalaccess.com/#]cialis generic online[/url] ordering tadalafil online
does tadalafil lower blood pressure: buy cialis without doctor prescription – tadalafil online canadian pharmacy
cialis difficulty ejaculating [url=https://tadalaccess.com/#]tadalafil canada is it safe[/url] when will cialis be over the counter
canadian pharmacy ezzz cialis: TadalAccess – cialis prescription cost
buying cialis internet [url=https://tadalaccess.com/#]TadalAccess[/url] does medicare cover cialis for bph
when does cialis go off patent: buying cialis online canadian order – cialis priligy online australia
https://tadalaccess.com/# cheapest 10mg cialis
tadalafil liquid fda approval date [url=https://tadalaccess.com/#]buy tadalafil cheap[/url] price of cialis
online cialis no prescription: how to get cialis for free – vidalista tadalafil reviews
https://tadalaccess.com/# cialis dose
cialis 80 mg dosage: how much is cialis without insurance – buying cheap cialis online
pastilla cialis [url=https://tadalaccess.com/#]TadalAccess[/url] e20 pill cialis
cialis instructions [url=https://tadalaccess.com/#]cialis over the counter usa[/url] does medicare cover cialis for bph
buy cheapest cialis: Tadal Access – what is cialis tadalafil used for
cialis 80 mg dosage [url=https://tadalaccess.com/#]cialis uses[/url] what cialis
cialis generic overnite shipping: TadalAccess – buy cialis cheap fast delivery
cialis dosis [url=https://tadalaccess.com/#]Tadal Access[/url] cialis side effects
cialis street price: TadalAccess – tadalafil generico farmacias del ahorro
cialis mexico [url=https://tadalaccess.com/#]TadalAccess[/url] where to buy generic cialis
https://tadalaccess.com/# achats produit tadalafil pour femme en ligne
cialis stopped working: which is better cialis or levitra – tadalafil cialis
cialis insurance coverage blue cross [url=https://tadalaccess.com/#]cialis soft tabs[/url] tadalafil tablets erectafil 20
cialis 5mg daily how long before it works [url=https://tadalaccess.com/#]cheapest cialis[/url] cialis patent expiration 2016
comprar tadalafil 40 mg en walmart sin receta houston texas: TadalAccess – how much does cialis cost at walmart
cialis 40 mg reviews: TadalAccess – which is better cialis or levitra
vardenafil and tadalafil [url=https://tadalaccess.com/#]TadalAccess[/url] cialis dosage for bph
cialis tadalafil tablets: Tadal Access – paypal cialis payment
buy cialis canadian [url=https://tadalaccess.com/#]Tadal Access[/url] buying cialis online
cialis price per pill: TadalAccess – how long i have to wait to take tadalafil after antifugal
cialis experience reddit [url=https://tadalaccess.com/#]TadalAccess[/url] cialis vs sildenafil
cialis for blood pressure: Tadal Access – cialis usa
cialis side effects forum [url=https://tadalaccess.com/#]Tadal Access[/url] cialis 20 mg price walgreens
side effects of cialis daily: buy cialis in toronto – cialis before and after pictures
uses for cialis [url=https://tadalaccess.com/#]how much is cialis without insurance[/url] oryginal cialis
https://tadalaccess.com/# cialis canadian pharmacy ezzz
cialis 5mg cost per pill: Tadal Access – originalcialis
how many 5mg cialis can i take at once [url=https://tadalaccess.com/#]cialis 20mg price[/url] buying cialis without a prescription
cialis dosage for bph: cialis buy – best price for cialis
cialis doesnt work [url=https://tadalaccess.com/#]TadalAccess[/url] cialis tadalafil 20mg kaufen
cialis generics: Tadal Access – cialis 2.5 mg
cialis 10mg reviews [url=https://tadalaccess.com/#]how to get cialis prescription online[/url] cialis advertisement
tadalafil (tadalis-ajanta): taking cialis – free samples of cialis
tadalafil 20mg (generic equivalent to cialis): cialis instructions – cialis 80 mg dosage
walgreens cialis prices [url=https://tadalaccess.com/#]best price on generic cialis[/url] cheap cialis dapoxitine cheap online
cialis 10mg: Tadal Access – does cialis shrink the prostate
tadalafil citrate powder [url=https://tadalaccess.com/#]Tadal Access[/url] cialis effectiveness
how to buy generic clomid without rx [url=https://clomhealth.shop/#]cost clomid no prescription[/url] buying generic clomid tablets
amoxicillin buy canada: where to buy amoxicillin 500mg – amoxicillin 200 mg tablet
https://amohealthcare.store/# amoxicillin 500mg for sale uk
where buy cheap clomid without insurance [url=http://clomhealth.com/#]can you get generic clomid[/url] order clomid no prescription
clomid without rx: cheap clomid prices – cost of cheap clomid pills
PredniHealth [url=https://prednihealth.shop/#]order prednisone 100g online without prescription[/url] prednisone over the counter uk
how much is amoxicillin: can you buy amoxicillin uk – Amo Health Care
can you buy generic clomid no prescription: where to get cheap clomid prices – can i order cheap clomid
can you get generic clomid online [url=https://clomhealth.shop/#]Clom Health[/url] get generic clomid pills
20 mg of prednisone: PredniHealth – purchase prednisone no prescription
clomid without insurance: Clom Health – can i get cheap clomid online
where to buy clomid without prescription [url=https://clomhealth.shop/#]how to buy clomid without rx[/url] buy generic clomid without prescription
generic clomid: Clom Health – can i purchase cheap clomid no prescription
can you buy clomid without a prescription: where to get cheap clomid without a prescription – generic clomid for sale
Amo Health Care [url=https://amohealthcare.store/#]where can i get amoxicillin 500 mg[/url] Amo Health Care
PredniHealth: PredniHealth – 54 prednisone
how to get generic clomid for sale: Clom Health – can i get clomid
can i purchase clomid without rx [url=http://clomhealth.com/#]Clom Health[/url] get cheap clomid
Amo Health Care: can you buy amoxicillin over the counter in canada – Amo Health Care
buy 40 mg prednisone: no prescription prednisone canadian pharmacy – prednisone canada
Cialis without prescription [url=http://zipgenericmd.com/#]secure checkout ED drugs[/url] cheap Cialis online
http://modafinilmd.store/# safe modafinil purchase
doctor-reviewed advice: purchase Modafinil without prescription – legal Modafinil purchase
verified Modafinil vendors: doctor-reviewed advice – modafinil 2025
buy generic Cialis online [url=http://zipgenericmd.com/#]order Cialis online no prescription[/url] Cialis without prescription
secure checkout ED drugs: Cialis without prescription – affordable ED medication
safe online pharmacy: generic sildenafil 100mg – discreet shipping
Cialis without prescription: FDA approved generic Cialis – best price Cialis tablets
secure checkout Viagra [url=https://maxviagramd.com/#]cheap Viagra online[/url] discreet shipping
order Viagra discreetly: discreet shipping – generic sildenafil 100mg
reliable online pharmacy Cialis: affordable ED medication – buy generic Cialis online
fast Viagra delivery: safe online pharmacy – best price for Viagra
trusted Viagra suppliers: generic sildenafil 100mg – order Viagra discreetly
modafinil 2025: modafinil 2025 – safe modafinil purchase
no doctor visit required [url=https://maxviagramd.com/#]fast Viagra delivery[/url] Viagra without prescription
affordable ED medication: order Cialis online no prescription – generic tadalafil
buy generic Cialis online: FDA approved generic Cialis – online Cialis pharmacy
best price Cialis tablets [url=https://zipgenericmd.shop/#]discreet shipping ED pills[/url] FDA approved generic Cialis
buy modafinil online: modafinil 2025 – Modafinil for sale
me encantei com este site. Pra saber mais detalhes acesse o site e descubra mais. Todas as informações contidas são conteúdos relevantes e exclusivas. Tudo que você precisa saber está ta lá.
legit Viagra online: legit Viagra online – same-day Viagra shipping
buy modafinil online [url=http://modafinilmd.store/#]doctor-reviewed advice[/url] buy modafinil online
best price Cialis tablets: FDA approved generic Cialis – affordable ED medication
Modafinil for sale: buy modafinil online – doctor-reviewed advice
secure checkout Viagra: order Viagra discreetly – trusted Viagra suppliers
discreet shipping [url=https://maxviagramd.shop/#]generic sildenafil 100mg[/url] best price for Viagra
safe modafinil purchase: modafinil 2025 – legal Modafinil purchase
doctor-reviewed advice [url=https://modafinilmd.store/#]doctor-reviewed advice[/url] safe modafinil purchase
fast Viagra delivery: buy generic Viagra online – fast Viagra delivery
http://modafinilmd.store/# modafinil pharmacy
modafinil legality: buy modafinil online – purchase Modafinil without prescription
legal Modafinil purchase: verified Modafinil vendors – doctor-reviewed advice
secure checkout Viagra [url=https://maxviagramd.com/#]buy generic Viagra online[/url] same-day Viagra shipping
legal Modafinil purchase: Modafinil for sale – doctor-reviewed advice
reliable online pharmacy Cialis: affordable ED medication – Cialis without prescription
generic sildenafil 100mg: legit Viagra online – cheap Viagra online
http://maxviagramd.com/# trusted Viagra suppliers
modafinil pharmacy: verified Modafinil vendors – modafinil legality
Cialis without prescription [url=https://zipgenericmd.com/#]online Cialis pharmacy[/url] Cialis without prescription
FDA approved generic Cialis: FDA approved generic Cialis – Cialis without prescription
cheap Viagra online: trusted Viagra suppliers – Viagra without prescription
https://modafinilmd.store/# modafinil pharmacy
secure checkout ED drugs [url=https://zipgenericmd.com/#]affordable ED medication[/url] reliable online pharmacy Cialis
Cialis without prescription: reliable online pharmacy Cialis – buy generic Cialis online
http://modafinilmd.store/# modafinil pharmacy
https://pinupaz.top/# pin up azerbaycan
вавада официальный сайт: вавада – вавада казино
пин ап вход [url=http://pinuprus.pro/#]пин ап зеркало[/url] пин ап вход
https://pinupaz.top/# pin up azerbaycan
https://pinupaz.top/# pin up azerbaycan
vavada: вавада зеркало – вавада
http://vavadavhod.tech/# вавада зеркало
pin-up [url=https://pinupaz.top/#]pinup az[/url] pin-up
вавада: вавада зеркало – vavada casino
http://vavadavhod.tech/# вавада зеркало
пин ап зеркало [url=https://pinuprus.pro/#]пин ап казино официальный сайт[/url] пин ап зеркало
http://pinupaz.top/# pin up
пин ап вход: pin up вход – пин ап казино
pin-up casino giris [url=https://pinupaz.top/#]pin-up[/url] pin up az
пин ап зеркало: пин ап казино – пин ап казино официальный сайт
https://pinuprus.pro/# пин ап вход
вавада: vavada – vavada
вавада официальный сайт [url=https://vavadavhod.tech/#]vavada casino[/url] вавада
вавада: vavada casino – vavada
вавада зеркало [url=http://vavadavhod.tech/#]вавада зеркало[/url] вавада
https://pinupaz.top/# pin up azerbaycan
пин ап вход: пин ап казино – пин ап вход
пин ап вход [url=https://pinuprus.pro/#]пинап казино[/url] пин ап зеркало
http://pinuprus.pro/# пин ап казино
пин ап зеркало: пин ап казино – pin up вход
пин ап казино официальный сайт [url=http://pinuprus.pro/#]пин ап зеркало[/url] пин ап казино
vavada вход: vavada casino – vavada casino
http://pinuprus.pro/# пин ап казино
пин ап зеркало: pin up вход – pin up вход
vavada casino [url=https://vavadavhod.tech/#]вавада официальный сайт[/url] вавада казино
https://vavadavhod.tech/# vavada вход
pin up casino: pin up az – pin-up casino giris
https://pinuprus.pro/# пин ап казино официальный сайт
пин ап зеркало [url=https://pinuprus.pro/#]пин ап казино[/url] pin up вход
pin up: pin up – pin up
пинап казино [url=http://pinuprus.pro/#]пин ап зеркало[/url] пин ап казино официальный сайт
пинап казино: пин ап казино официальный сайт – пинап казино
https://vavadavhod.tech/# vavada
vavada [url=https://vavadavhod.tech/#]вавада зеркало[/url] vavada
пинап казино: pin up вход – пин ап вход
https://vavadavhod.tech/# vavada casino
пин ап казино [url=http://pinuprus.pro/#]пин ап вход[/url] пин ап казино
vavada: vavada – vavada casino
вавада [url=http://vavadavhod.tech/#]вавада зеркало[/url] vavada вход
vavada casino: vavada casino – vavada
http://pinupaz.top/# pin-up casino giris
пин ап казино [url=https://pinuprus.pro/#]пинап казино[/url] пин ап зеркало
http://vavadavhod.tech/# вавада
pin up azerbaycan: pin up casino – pin up casino
вавада [url=http://vavadavhod.tech/#]вавада официальный сайт[/url] vavada
http://pinupaz.top/# pin-up
пин ап зеркало: пин ап казино официальный сайт – пинап казино
vavada вход [url=http://vavadavhod.tech/#]вавада зеркало[/url] вавада
http://vavadavhod.tech/# вавада зеркало
vavada вход: vavada вход – vavada вход
pin-up casino giris [url=https://pinupaz.top/#]pin up az[/url] pin up
https://pinupaz.top/# pin up
пин ап казино официальный сайт: пин ап казино официальный сайт – пин ап казино официальный сайт
https://pinuprus.pro/# пин ап казино
pin up вход [url=https://pinuprus.pro/#]пин ап вход[/url] pin up вход
пин ап казино официальный сайт: пин ап казино – пин ап вход
вавада казино: vavada – вавада официальный сайт
https://pinupaz.top/# pin up az
pin up casino [url=http://pinupaz.top/#]pin up az[/url] pin-up casino giris
пин ап казино: пин ап зеркало – пин ап зеркало
пин ап зеркало [url=https://pinuprus.pro/#]пин ап казино[/url] пин ап казино
пин ап вход: pin up вход – пин ап казино официальный сайт
вавада: вавада официальный сайт – vavada casino
pin-up: pin up az – pinup az
http://pinuprus.pro/# пин ап зеркало
пин ап казино [url=http://pinuprus.pro/#]пин ап зеркало[/url] пин ап казино
пин ап зеркало: пин ап зеркало – пин ап казино официальный сайт
https://pinuprus.pro/# пинап казино
vavada: вавада официальный сайт – vavada casino
pinup az [url=http://pinupaz.top/#]pin-up casino giris[/url] pin up az
https://pinuprus.pro/# пин ап вход
pin-up: pin-up – pin up az
пинап казино [url=http://pinuprus.pro/#]пин ап зеркало[/url] pin up вход
https://pinupaz.top/# pin up
pin up az: pin up azerbaycan – pin-up casino giris
вавада казино: vavada – vavada
пин ап зеркало [url=http://pinuprus.pro/#]пин ап зеркало[/url] пин ап вход
http://pinupaz.top/# pin-up casino giris
pin-up casino giris: pin up az – pin-up
http://pinupaz.top/# pin up az
pin up az: pin-up casino giris – pin up
пин ап зеркало [url=http://pinuprus.pro/#]пин ап зеркало[/url] пин ап казино
http://pinuprus.pro/# пин ап казино
пин ап казино официальный сайт: пин ап казино официальный сайт – пинап казино
вавада: вавада казино – вавада зеркало
http://vavadavhod.tech/# вавада официальный сайт
pin up azerbaycan: pin up azerbaycan – pin up
pin up вход [url=http://pinuprus.pro/#]пин ап казино официальный сайт[/url] пин ап казино официальный сайт
pin up вход: пин ап вход – pin up вход
pin up: pin up – pin up azerbaycan
vavada [url=https://vavadavhod.tech/#]vavada casino[/url] вавада казино
pin-up: pin-up casino giris – pin up casino
https://pinupaz.top/# pin-up casino giris
пин ап казино официальный сайт [url=http://pinuprus.pro/#]пин ап вход[/url] пин ап казино
pin up: pin-up – pin up azerbaycan
vavada: вавада зеркало – vavada casino
https://pinuprus.pro/# пин ап казино официальный сайт
пинап казино [url=http://pinuprus.pro/#]пин ап вход[/url] пин ап казино
pin up casino: pin up az – pin up azerbaycan
http://pinuprus.pro/# pin up вход
pin-up casino giris: pin-up casino giris – pin-up
вавада [url=http://vavadavhod.tech/#]вавада[/url] vavada вход
http://vavadavhod.tech/# vavada вход
пин ап зеркало: пин ап казино официальный сайт – пин ап казино официальный сайт
вавада казино [url=http://vavadavhod.tech/#]vavada casino[/url] вавада зеркало
https://vavadavhod.tech/# vavada
vavada casino: vavada casino – вавада зеркало
vavada casino [url=http://vavadavhod.tech/#]вавада казино[/url] вавада официальный сайт
https://pinuprus.pro/# пин ап казино
пинап казино: пин ап зеркало – pin up вход
mexico drug stores pharmacies [url=https://rxexpressmexico.com/#]Rx Express Mexico[/url] mexican border pharmacies shipping to usa
http://expressrxcanada.com/# online pharmacy canada
best canadian pharmacy online: Express Rx Canada – online canadian pharmacy reviews
RxExpressMexico: buying prescription drugs in mexico online – Rx Express Mexico
http://medicinefromindia.com/# Medicine From India
mexico pharmacy order online [url=https://rxexpressmexico.shop/#]mexico pharmacies prescription drugs[/url] mexico drug stores pharmacies
medicine courier from India to USA: Medicine From India – medicine courier from India to USA
certified canadian pharmacy: Buy medicine from Canada – canadian pharmacies that deliver to the us
http://expressrxcanada.com/# canadian pharmacy checker
Rx Express Mexico [url=https://rxexpressmexico.com/#]mexico pharmacies prescription drugs[/url] Rx Express Mexico
mexican rx online: mexico pharmacy order online – Rx Express Mexico
mexico drug stores pharmacies: RxExpressMexico – mexico pharmacies prescription drugs
https://rxexpressmexico.com/# mexican rx online
mexican online pharmacy: mexican border pharmacies shipping to usa – Rx Express Mexico
mexico pharmacy order online [url=https://rxexpressmexico.com/#]mexican online pharmacy[/url] mexico pharmacy order online
indian pharmacy online shopping: Medicine From India – indian pharmacy online
https://medicinefromindia.com/# Medicine From India
canadian pharmacy ltd: Generic drugs from Canada – best canadian pharmacy online
Rx Express Mexico [url=https://rxexpressmexico.shop/#]mexican rx online[/url] mexico drug stores pharmacies
canadian pharmacy antibiotics: Express Rx Canada – buy drugs from canada
http://rxexpressmexico.com/# mexican mail order pharmacies
mexico pharmacies prescription drugs: mexican online pharmacy – mexico drug stores pharmacies
prescription drugs canada buy online [url=https://expressrxcanada.com/#]Buy medicine from Canada[/url] medication canadian pharmacy
Rx Express Mexico: reputable mexican pharmacies online – RxExpressMexico
https://medicinefromindia.shop/# indian pharmacy online shopping
Online medicine home delivery: Medicine From India – medicine courier from India to USA
RxExpressMexico: mexican drugstore online – medicine in mexico pharmacies
indian pharmacy [url=http://medicinefromindia.com/#]indian pharmacy online[/url] medicine courier from India to USA
http://medicinefromindia.com/# Medicine From India
canada drug pharmacy: Canadian pharmacy shipping to USA – canadian pharmacy cheap
best canadian online pharmacy: canadian pharmacy in canada – www canadianonlinepharmacy
https://rxexpressmexico.shop/# mexico drug stores pharmacies
canadian mail order pharmacy [url=http://expressrxcanada.com/#]Express Rx Canada[/url] www canadianonlinepharmacy
Kamagra pharmacie en ligne: kamagra pas cher – Acheter Kamagra site fiable
kamagra oral jelly: Kamagra Commander maintenant – Acheter Kamagra site fiable
Pharmacie en ligne livraison Europe [url=https://pharmafst.shop/#]pharmacie en ligne[/url] Achat mГ©dicament en ligne fiable pharmafst.shop
http://kamagraprix.com/# Kamagra Oral Jelly pas cher
kamagra oral jelly: kamagra oral jelly – acheter kamagra site fiable
pharmacie en ligne france livraison belgique: Medicaments en ligne livres en 24h – pharmacie en ligne france livraison internationale pharmafst.com
Cialis sans ordonnance pas cher: cialis prix – Acheter Viagra Cialis sans ordonnance tadalmed.shop
https://kamagraprix.shop/# Kamagra pharmacie en ligne
pharmacie en ligne livraison europe: Medicaments en ligne livres en 24h – pharmacie en ligne pharmafst.com
acheter kamagra site fiable: kamagra livraison 24h – Kamagra Commander maintenant
https://kamagraprix.shop/# achat kamagra
pharmacie en ligne avec ordonnance: Meilleure pharmacie en ligne – pharmacie en ligne sans ordonnance pharmafst.com
http://tadalmed.com/# Cialis sans ordonnance 24h
kamagra livraison 24h: kamagra 100mg prix – Achetez vos kamagra medicaments
https://kamagraprix.com/# kamagra livraison 24h
Tadalafil 20 mg prix en pharmacie: Cialis generique prix – Cialis en ligne tadalmed.shop
pharmacie en ligne livraison europe [url=https://pharmafst.shop/#]pharmacie en ligne[/url] acheter mГ©dicament en ligne sans ordonnance pharmafst.shop
https://kamagraprix.shop/# Acheter Kamagra site fiable
Kamagra pharmacie en ligne: Kamagra pharmacie en ligne – Achetez vos kamagra medicaments
Tadalafil achat en ligne: Cialis sans ordonnance pas cher – Tadalafil 20 mg prix sans ordonnance tadalmed.shop
https://kamagraprix.shop/# kamagra oral jelly
kamagra en ligne [url=https://kamagraprix.com/#]Kamagra pharmacie en ligne[/url] Kamagra Oral Jelly pas cher
Acheter Kamagra site fiable: Kamagra Oral Jelly pas cher – kamagra oral jelly
Cialis sans ordonnance 24h: Cialis sans ordonnance 24h – Tadalafil 20 mg prix en pharmacie tadalmed.shop
http://kamagraprix.com/# Kamagra Commander maintenant
kamagra 100mg prix: Acheter Kamagra site fiable – kamagra gel
cialis prix [url=https://tadalmed.shop/#]Cialis generique prix[/url] Acheter Cialis tadalmed.com
Acheter Kamagra site fiable: achat kamagra – kamagra oral jelly
kamagra en ligne: Achetez vos kamagra medicaments – kamagra livraison 24h
https://kamagraprix.com/# kamagra 100mg prix
acheter kamagra site fiable [url=https://kamagraprix.shop/#]Kamagra Oral Jelly pas cher[/url] Kamagra Commander maintenant
Pharmacie en ligne livraison Europe: Livraison rapide – Pharmacie en ligne livraison Europe pharmafst.com
Cialis sans ordonnance 24h: Tadalafil 20 mg prix sans ordonnance – Pharmacie en ligne Cialis sans ordonnance tadalmed.shop
https://kamagraprix.shop/# kamagra en ligne
п»їpharmacie en ligne france [url=https://pharmafst.shop/#]Medicaments en ligne livres en 24h[/url] Pharmacie sans ordonnance pharmafst.shop
Cialis sans ordonnance 24h: Cialis en ligne – Acheter Cialis tadalmed.shop
Achat Cialis en ligne fiable: Tadalafil achat en ligne – Cialis sans ordonnance 24h tadalmed.shop
https://pharmafst.com/# pharmacie en ligne france pas cher
Kamagra Commander maintenant [url=http://kamagraprix.com/#]Kamagra Oral Jelly pas cher[/url] kamagra livraison 24h
Kamagra Oral Jelly pas cher: kamagra oral jelly – Kamagra pharmacie en ligne
pharmacie en ligne france fiable: Meilleure pharmacie en ligne – Achat mГ©dicament en ligne fiable pharmafst.com
https://tadalmed.com/# Tadalafil sans ordonnance en ligne
kamagra gel: achat kamagra – kamagra livraison 24h
pharmacie en ligne livraison europe [url=https://pharmafst.shop/#]Pharmacie en ligne France[/url] trouver un mГ©dicament en pharmacie pharmafst.shop
Pharmacie Internationale en ligne: Medicaments en ligne livres en 24h – pharmacie en ligne sans ordonnance pharmafst.com
https://kamagraprix.shop/# kamagra gel
Pharmacie sans ordonnance: pharmacie en ligne france livraison belgique – pharmacies en ligne certifiГ©es pharmafst.com
pharmacie en ligne sans ordonnance: Pharmacie en ligne France – pharmacie en ligne pas cher pharmafst.com
http://kamagraprix.com/# Achetez vos kamagra medicaments
pharmacie en ligne livraison europe: Meilleure pharmacie en ligne – pharmacie en ligne france fiable pharmafst.com
kamagra pas cher: Acheter Kamagra site fiable – kamagra 100mg prix
o2oico
sh19ec
It is really a nice and useful piece of info. I’m glad that you shared this useful information with us. Please keep us up to date like this. Thanks for sharing.
This is really interesting, You are a very skilled blogger. I have joined your rss feed and look forward to seeking more of your fantastic post. Also, I’ve shared your web site in my social networks!
Greetings! Very helpful advice on this article! It is the little changes that make the biggest changes. Thanks a lot for sharing!
n4acc4
Хотите учиться легче и продуктивнее?
Лучшие лайфхаки для написания работы — [url=https://zigry.net/pochemu-stoit-poluchit-vtoroe-vysshee-obrazovanie-v-ekonomicheskom-universitete-moskvy/ ]здесь[/url]
k43ql3
Great post. http://Boyarka-Inform.com/
Hello, I loved how your new fireplace turned out! I’m using yours as inspiration for mine, my question is we have white tile already, do I need to paint it with chalk paint again before I stencil it?