Ellery Designs

Decor, Design & DIY

  • Email
  • Facebook
  • Instagram
  • Pinterest
  • Home
  • Shop
  • Blog
  • Home Projects
    • New Home: Before + Afters
    • New Home: Organized Farmhouse Pantry
    • New Home: Linen Closet Makeover
    • New Home: Black + White Stripes Mantel Refresh
    • New Home: Stenciled Tile Fireplace Makeover
    • New Home: Cozy Glam Master Bedroom
    • Townhome Kitchen Remodel
    • Townhome DIY Pallet Wall
    • Townhome Faux Fireplace + Mantel Decor
    • Townhome Finished Basement
  • Party Ideas
    • Chevron Halloween Party
    • Curious George Party
    • Disney Princess Party
    • Elmo Party
    • Merry & Bright Party
    • Monster Bash
    • Monster High Party
    • Nautical Baby Girl Shower
    • Rainbow Dash Party
    • Rainbow Party
    • Watermelon Party
    • XOXO Valentine’s Party
  • e-design
  • About
    • Michelle + Ryan
    • Contact/Disclosure

May 5, 2016 by: Michelle

Toddler Girl Room & Gallery Wall

Girl Toddler Room & Gallery Wall

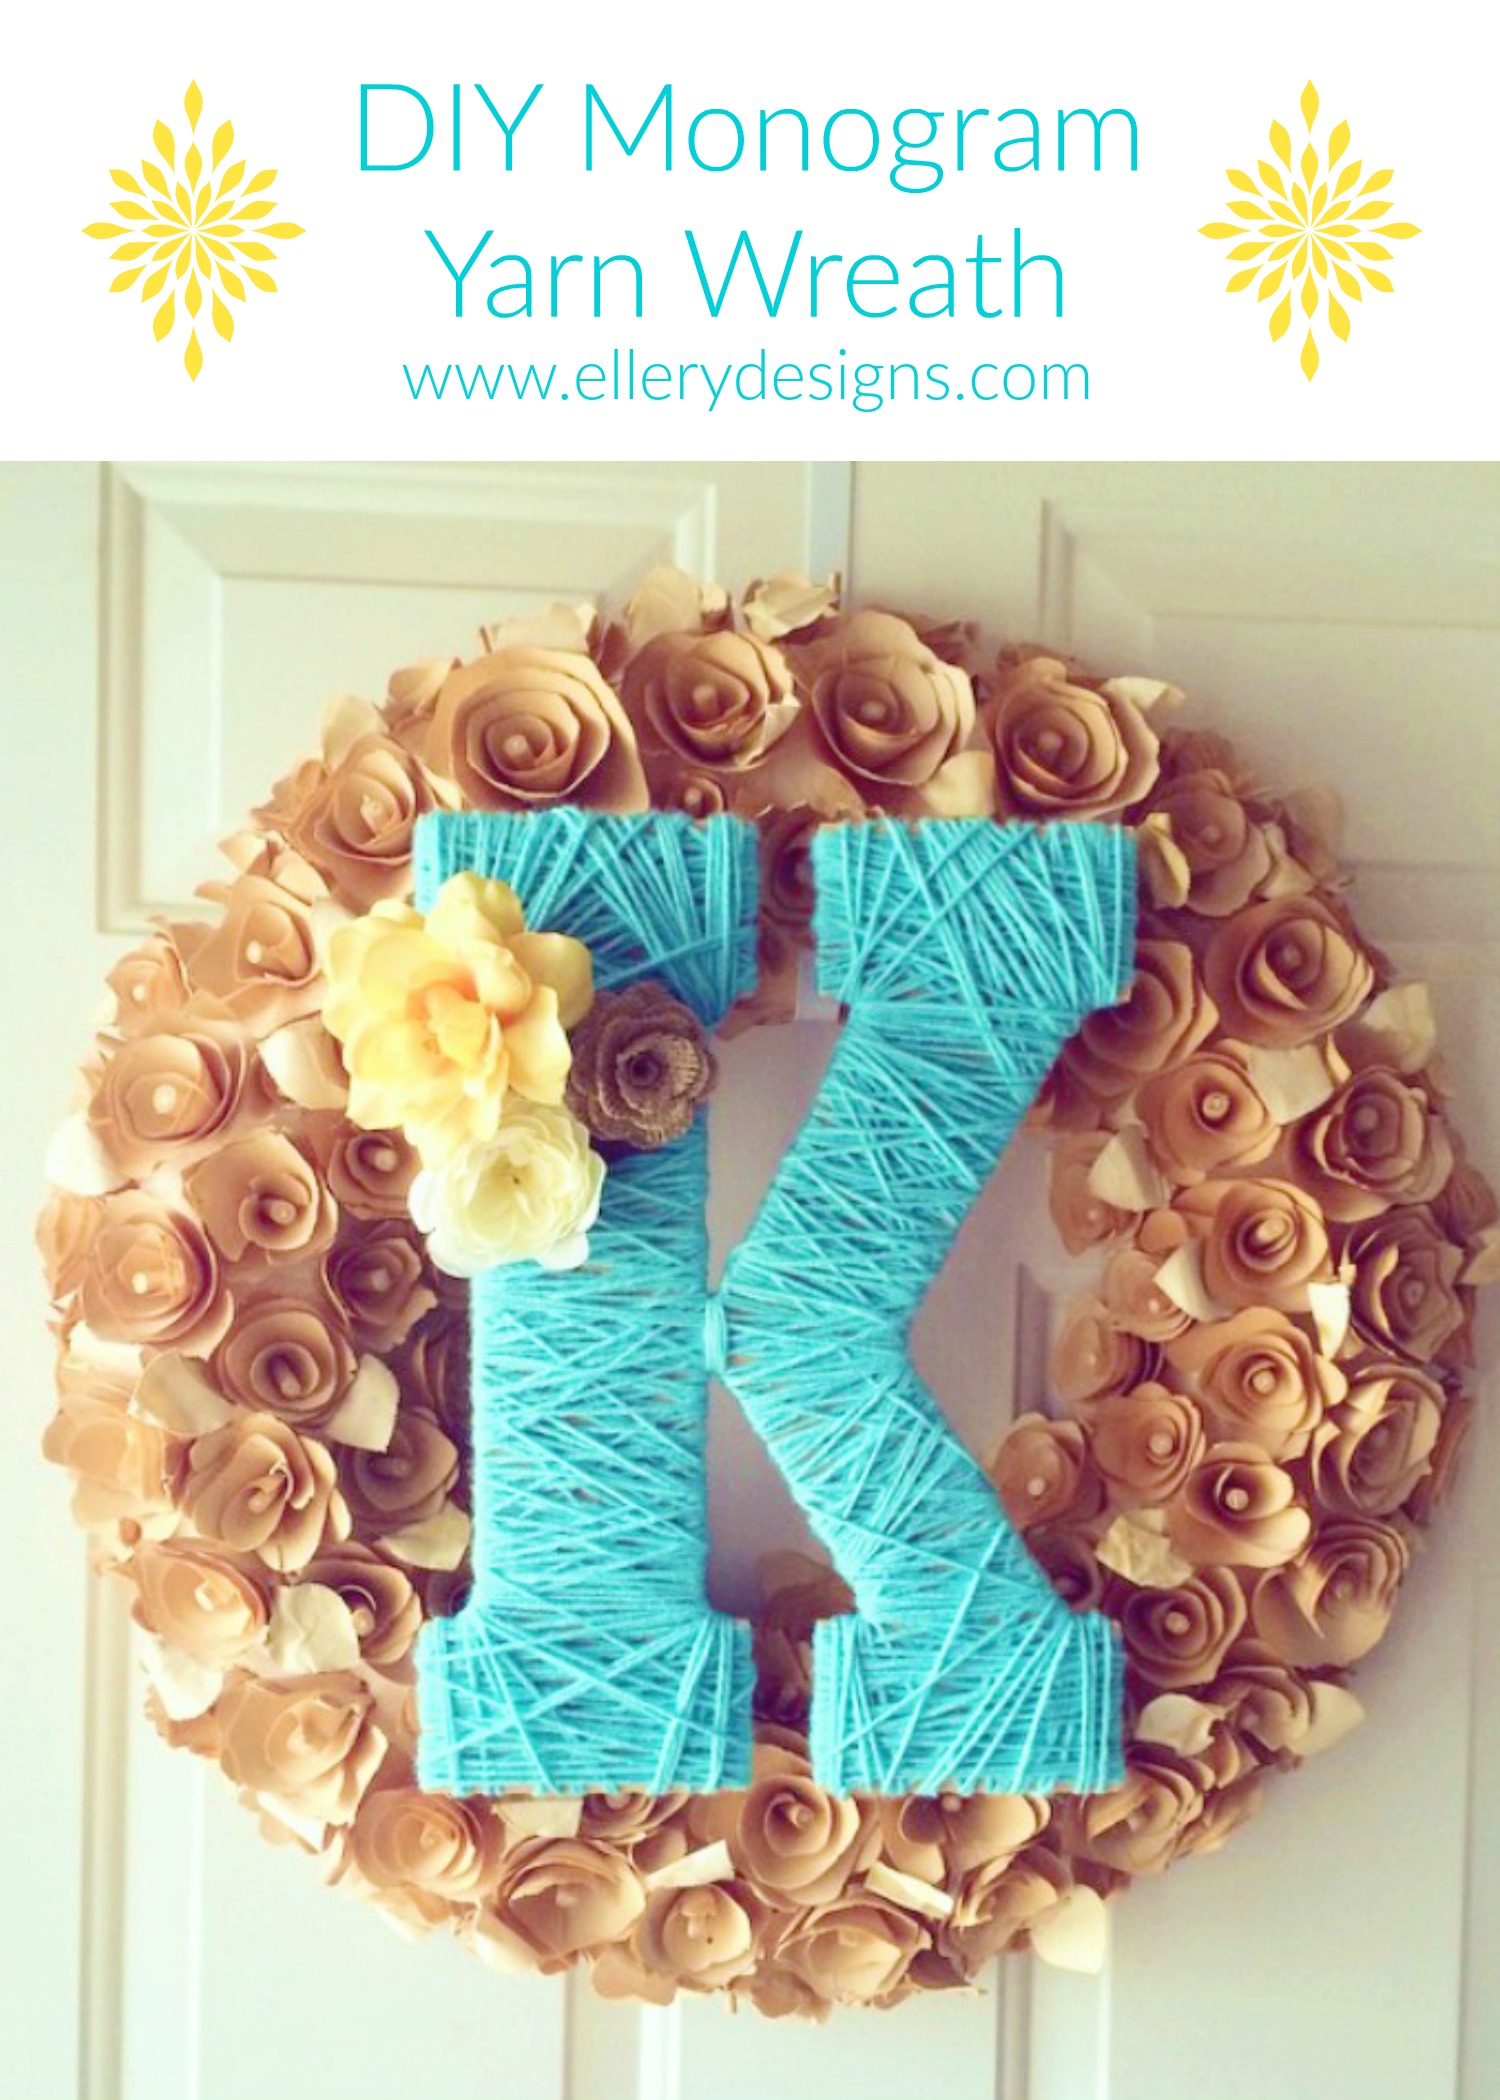
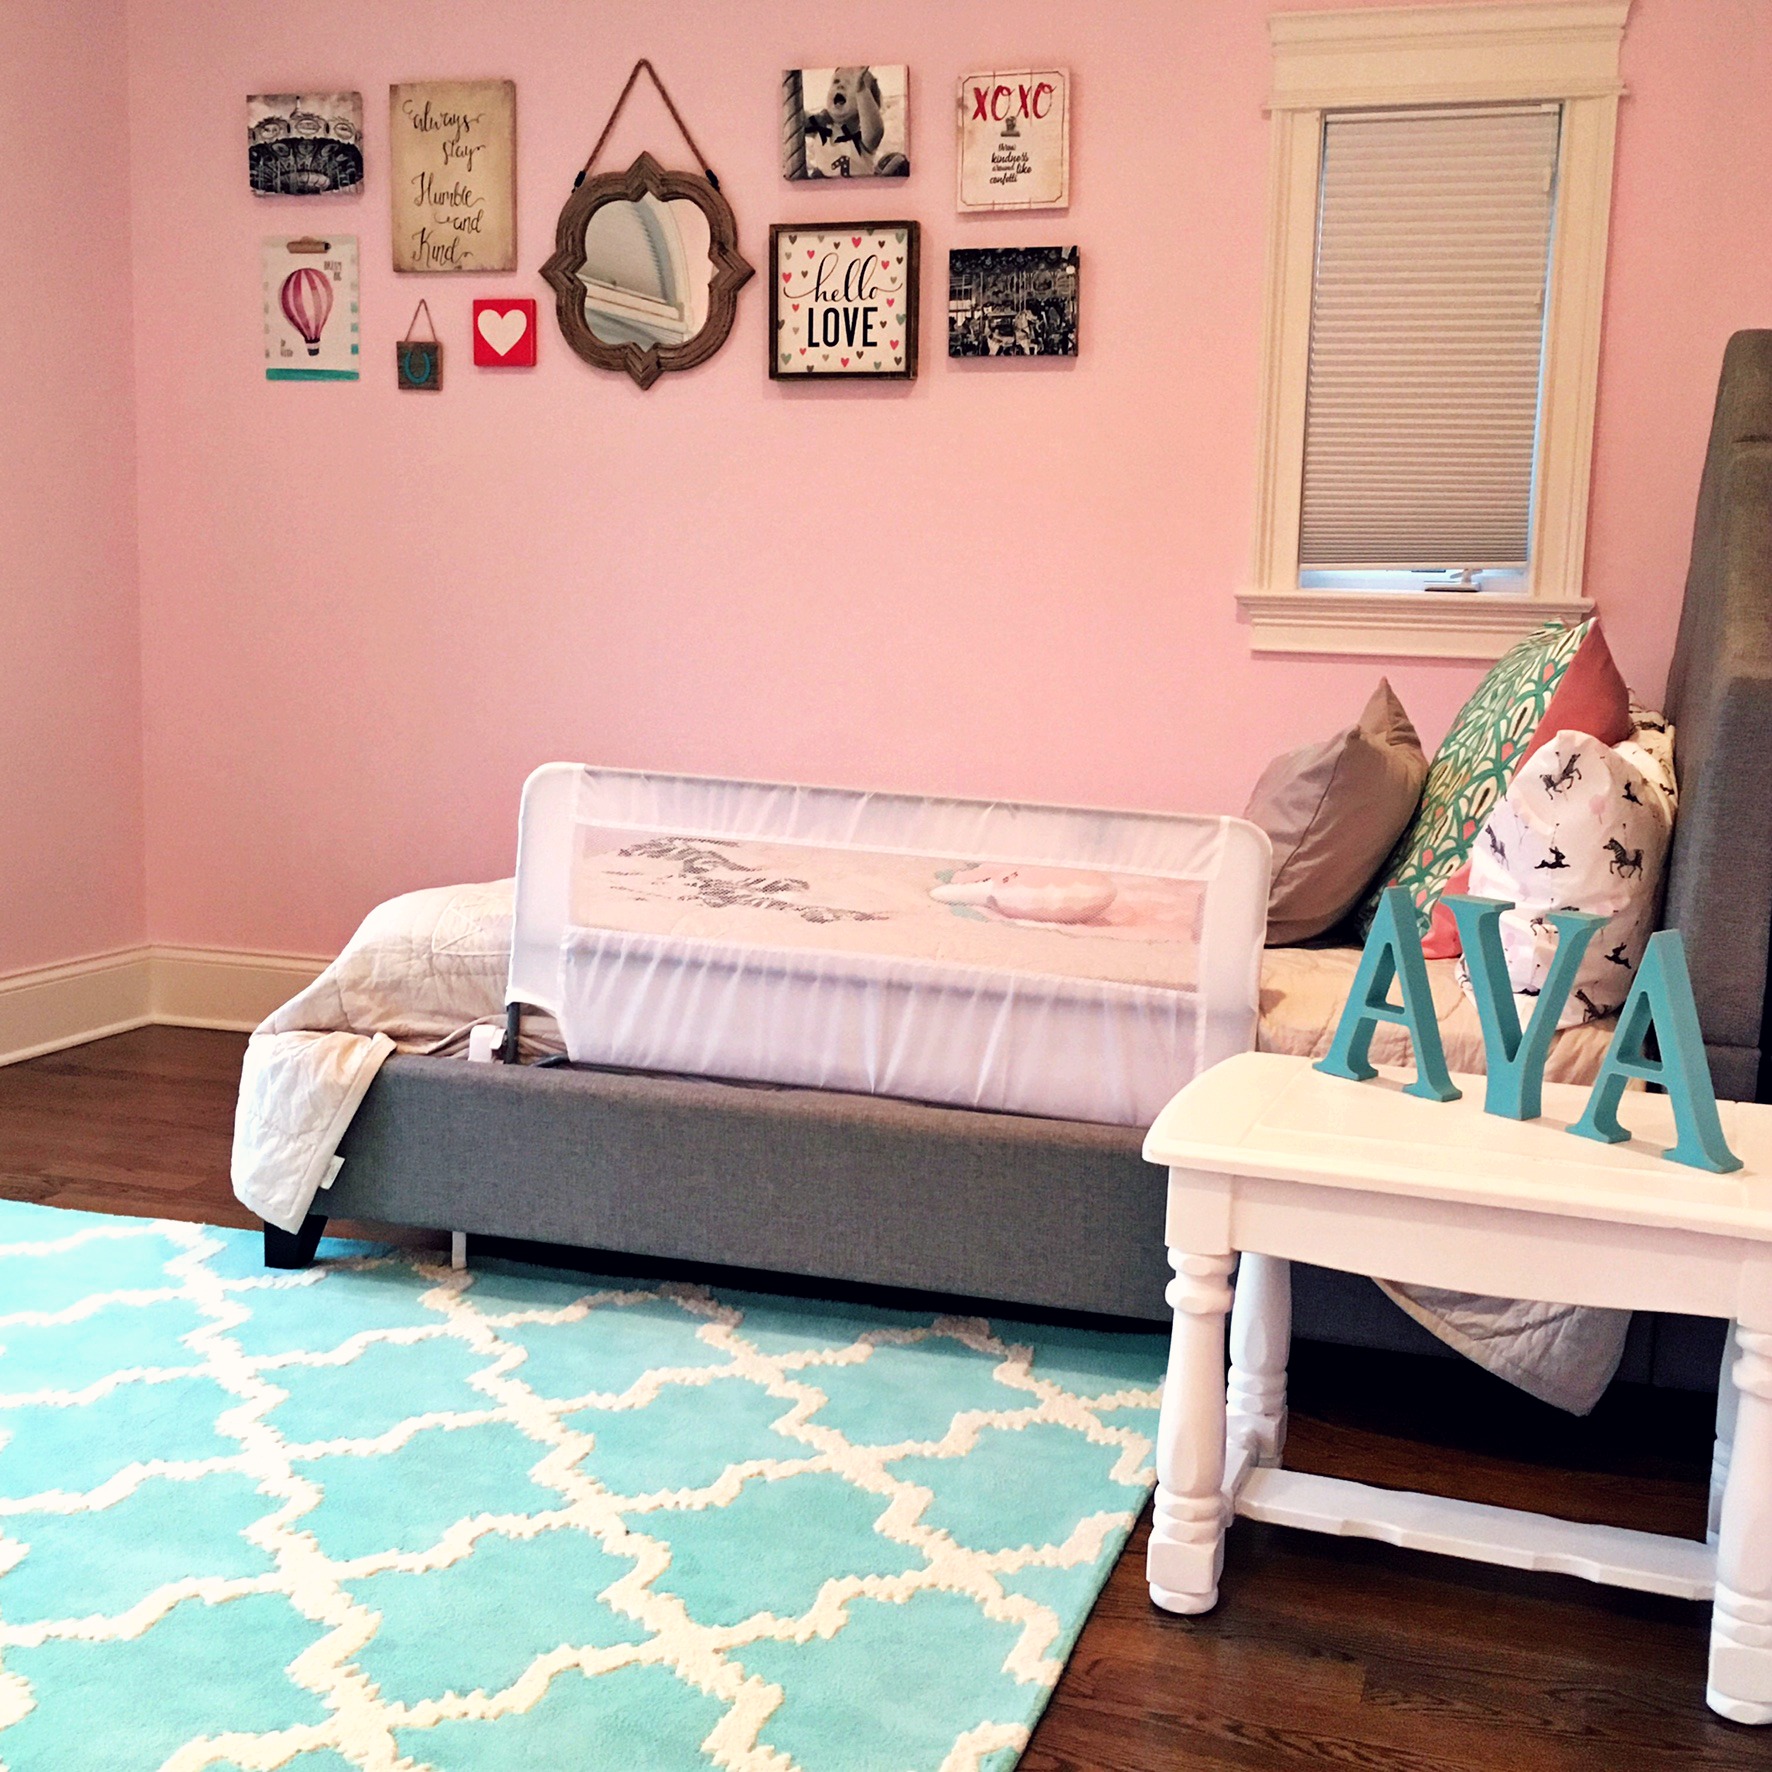
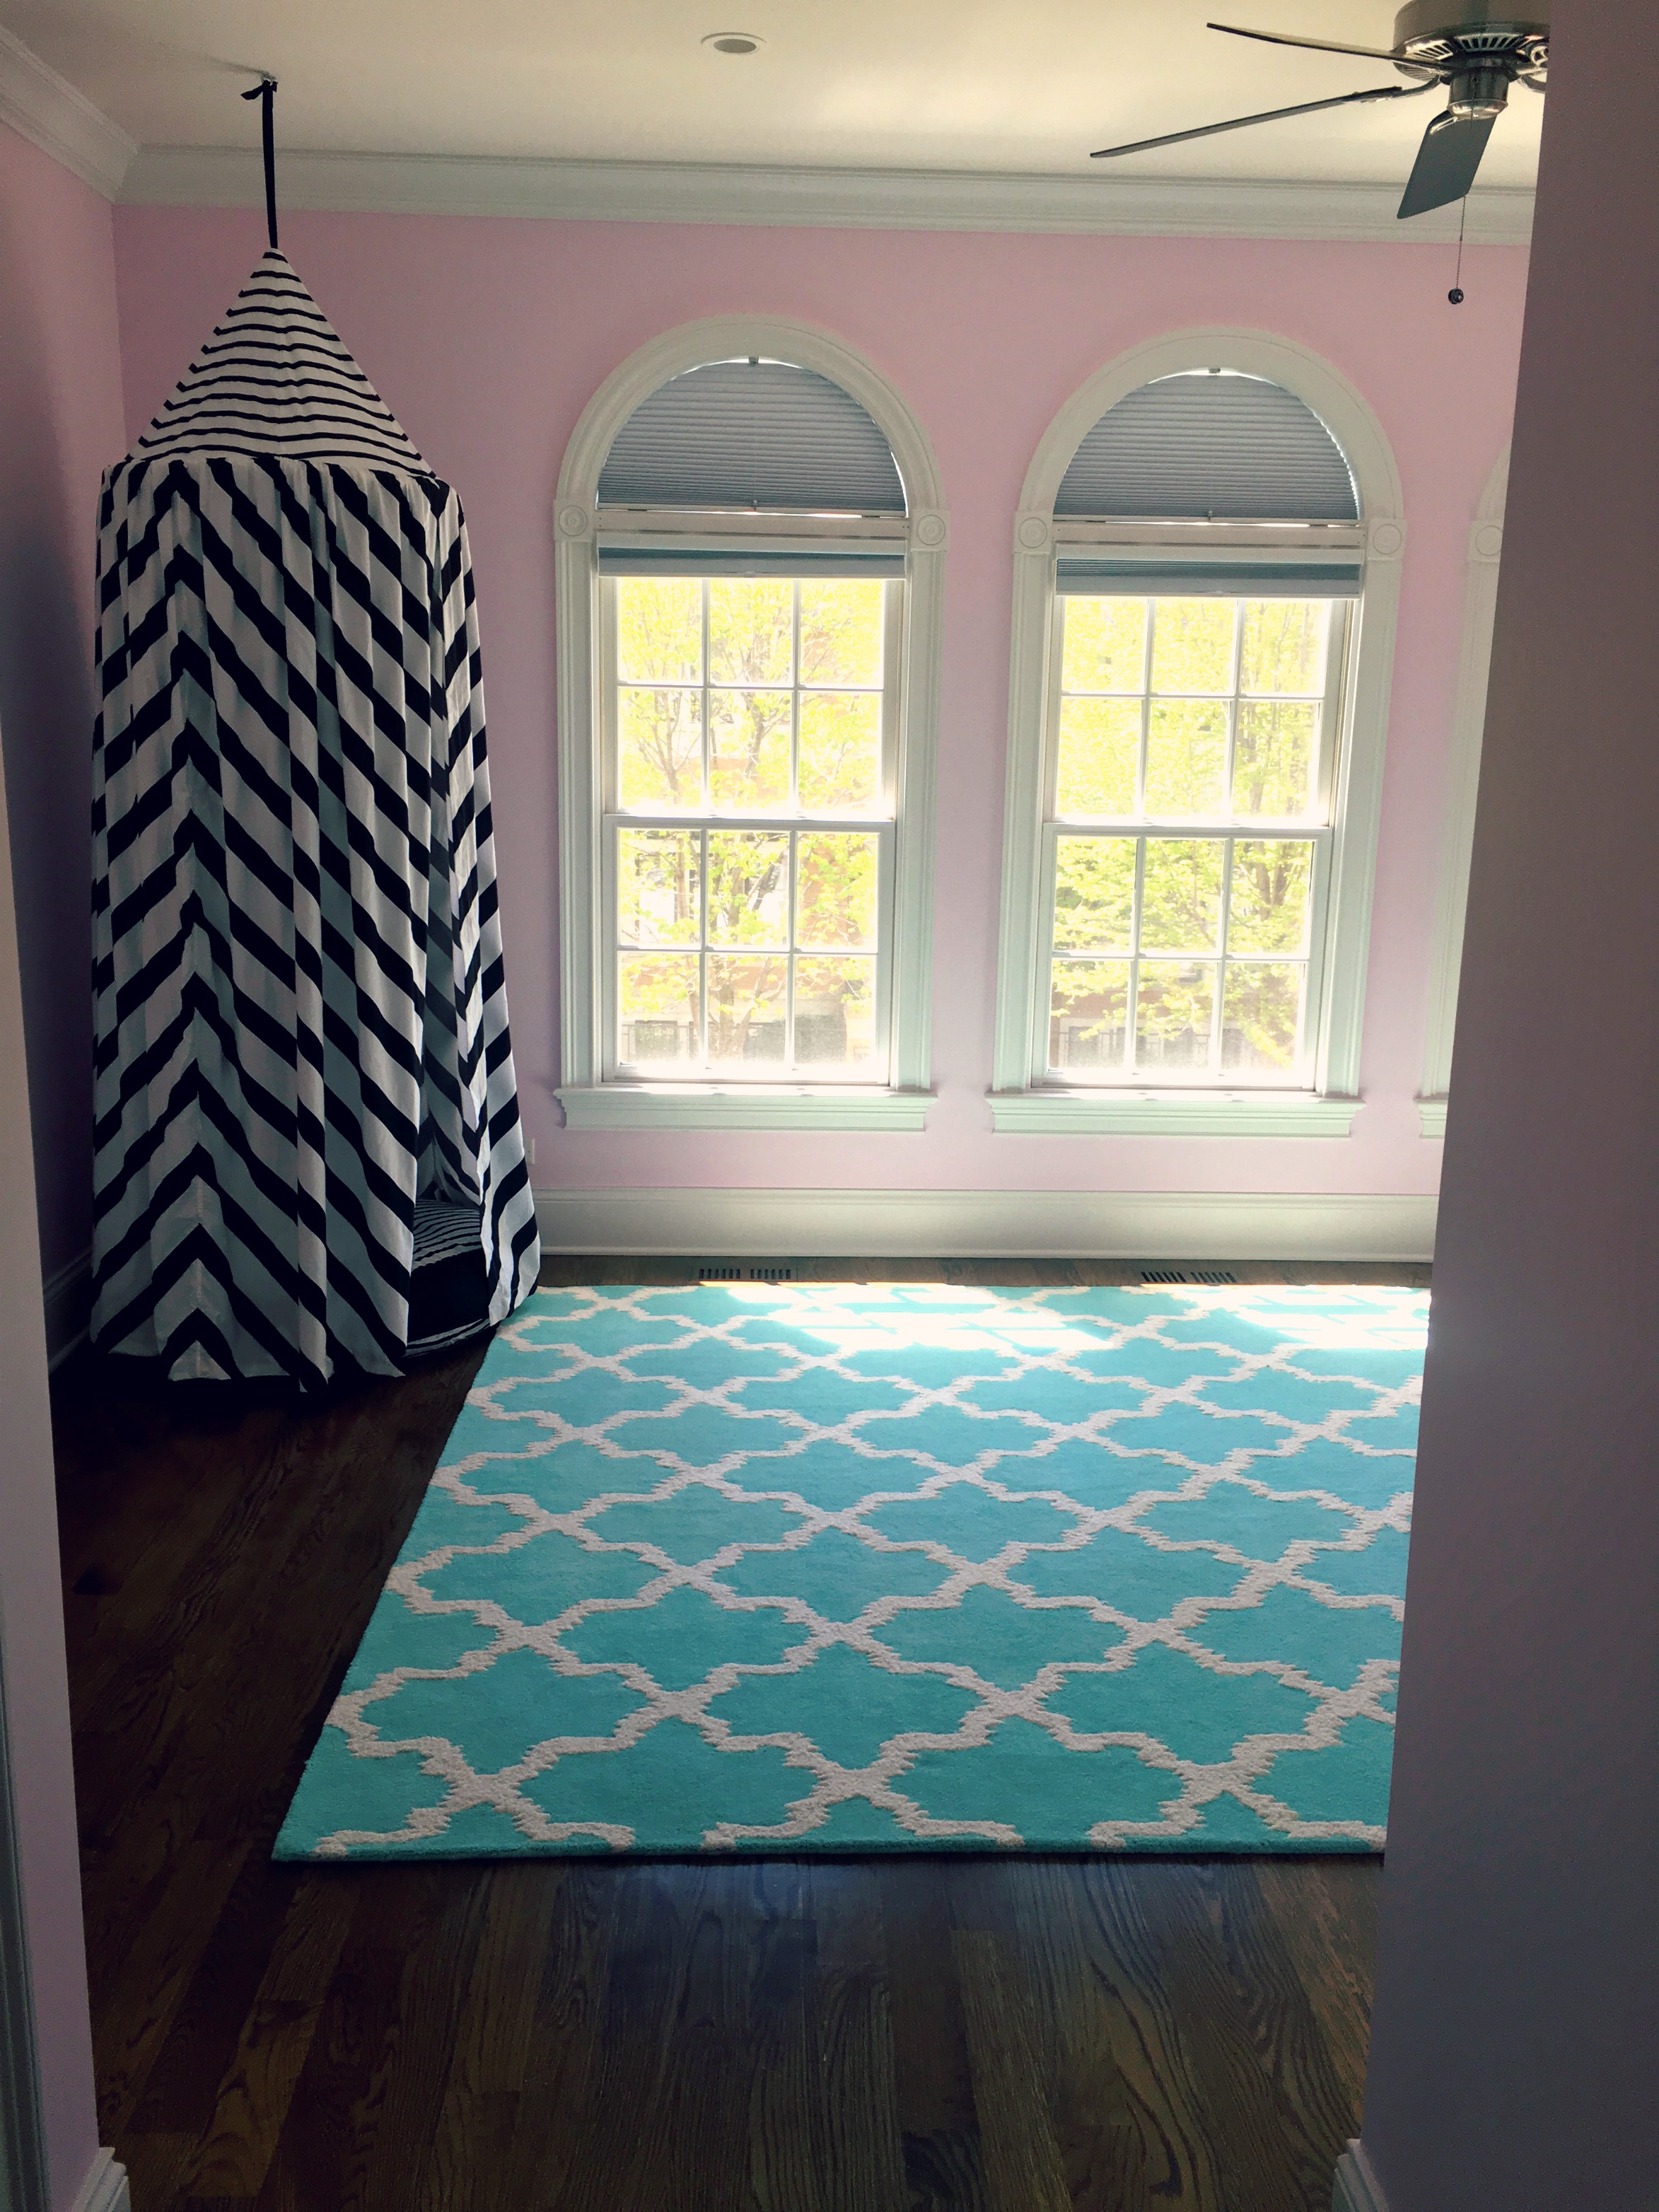
I had the pleasure of putting together this cute gallery wall in my favorite little client’s room who is almost two. The room was painted a pretty cotton candy pink that is the perfect accent for the adorable Carousel bedding purchased at The Land of Nod along with the matching canopy. The darling gray tufted panel bed was purchased at Wayfair.com. I love the girly touches but especially adore the black and white stripes throughout the room that will grow perfectly as she gets older. I’m obsessed with this aqua lattice patterned rug from PB Teen.

Here are a few of the things I picked out from Hobby Lobby and brought in. You can see we didn’t use everything but I like to have a bigger selection to choose from when designing a gallery wall. I am obsessed with that pennant banner but the colors were too bold for the room so unfortunately had to pass on that.

Toddler Girl Room & Gallery Wall by Ellery Designs

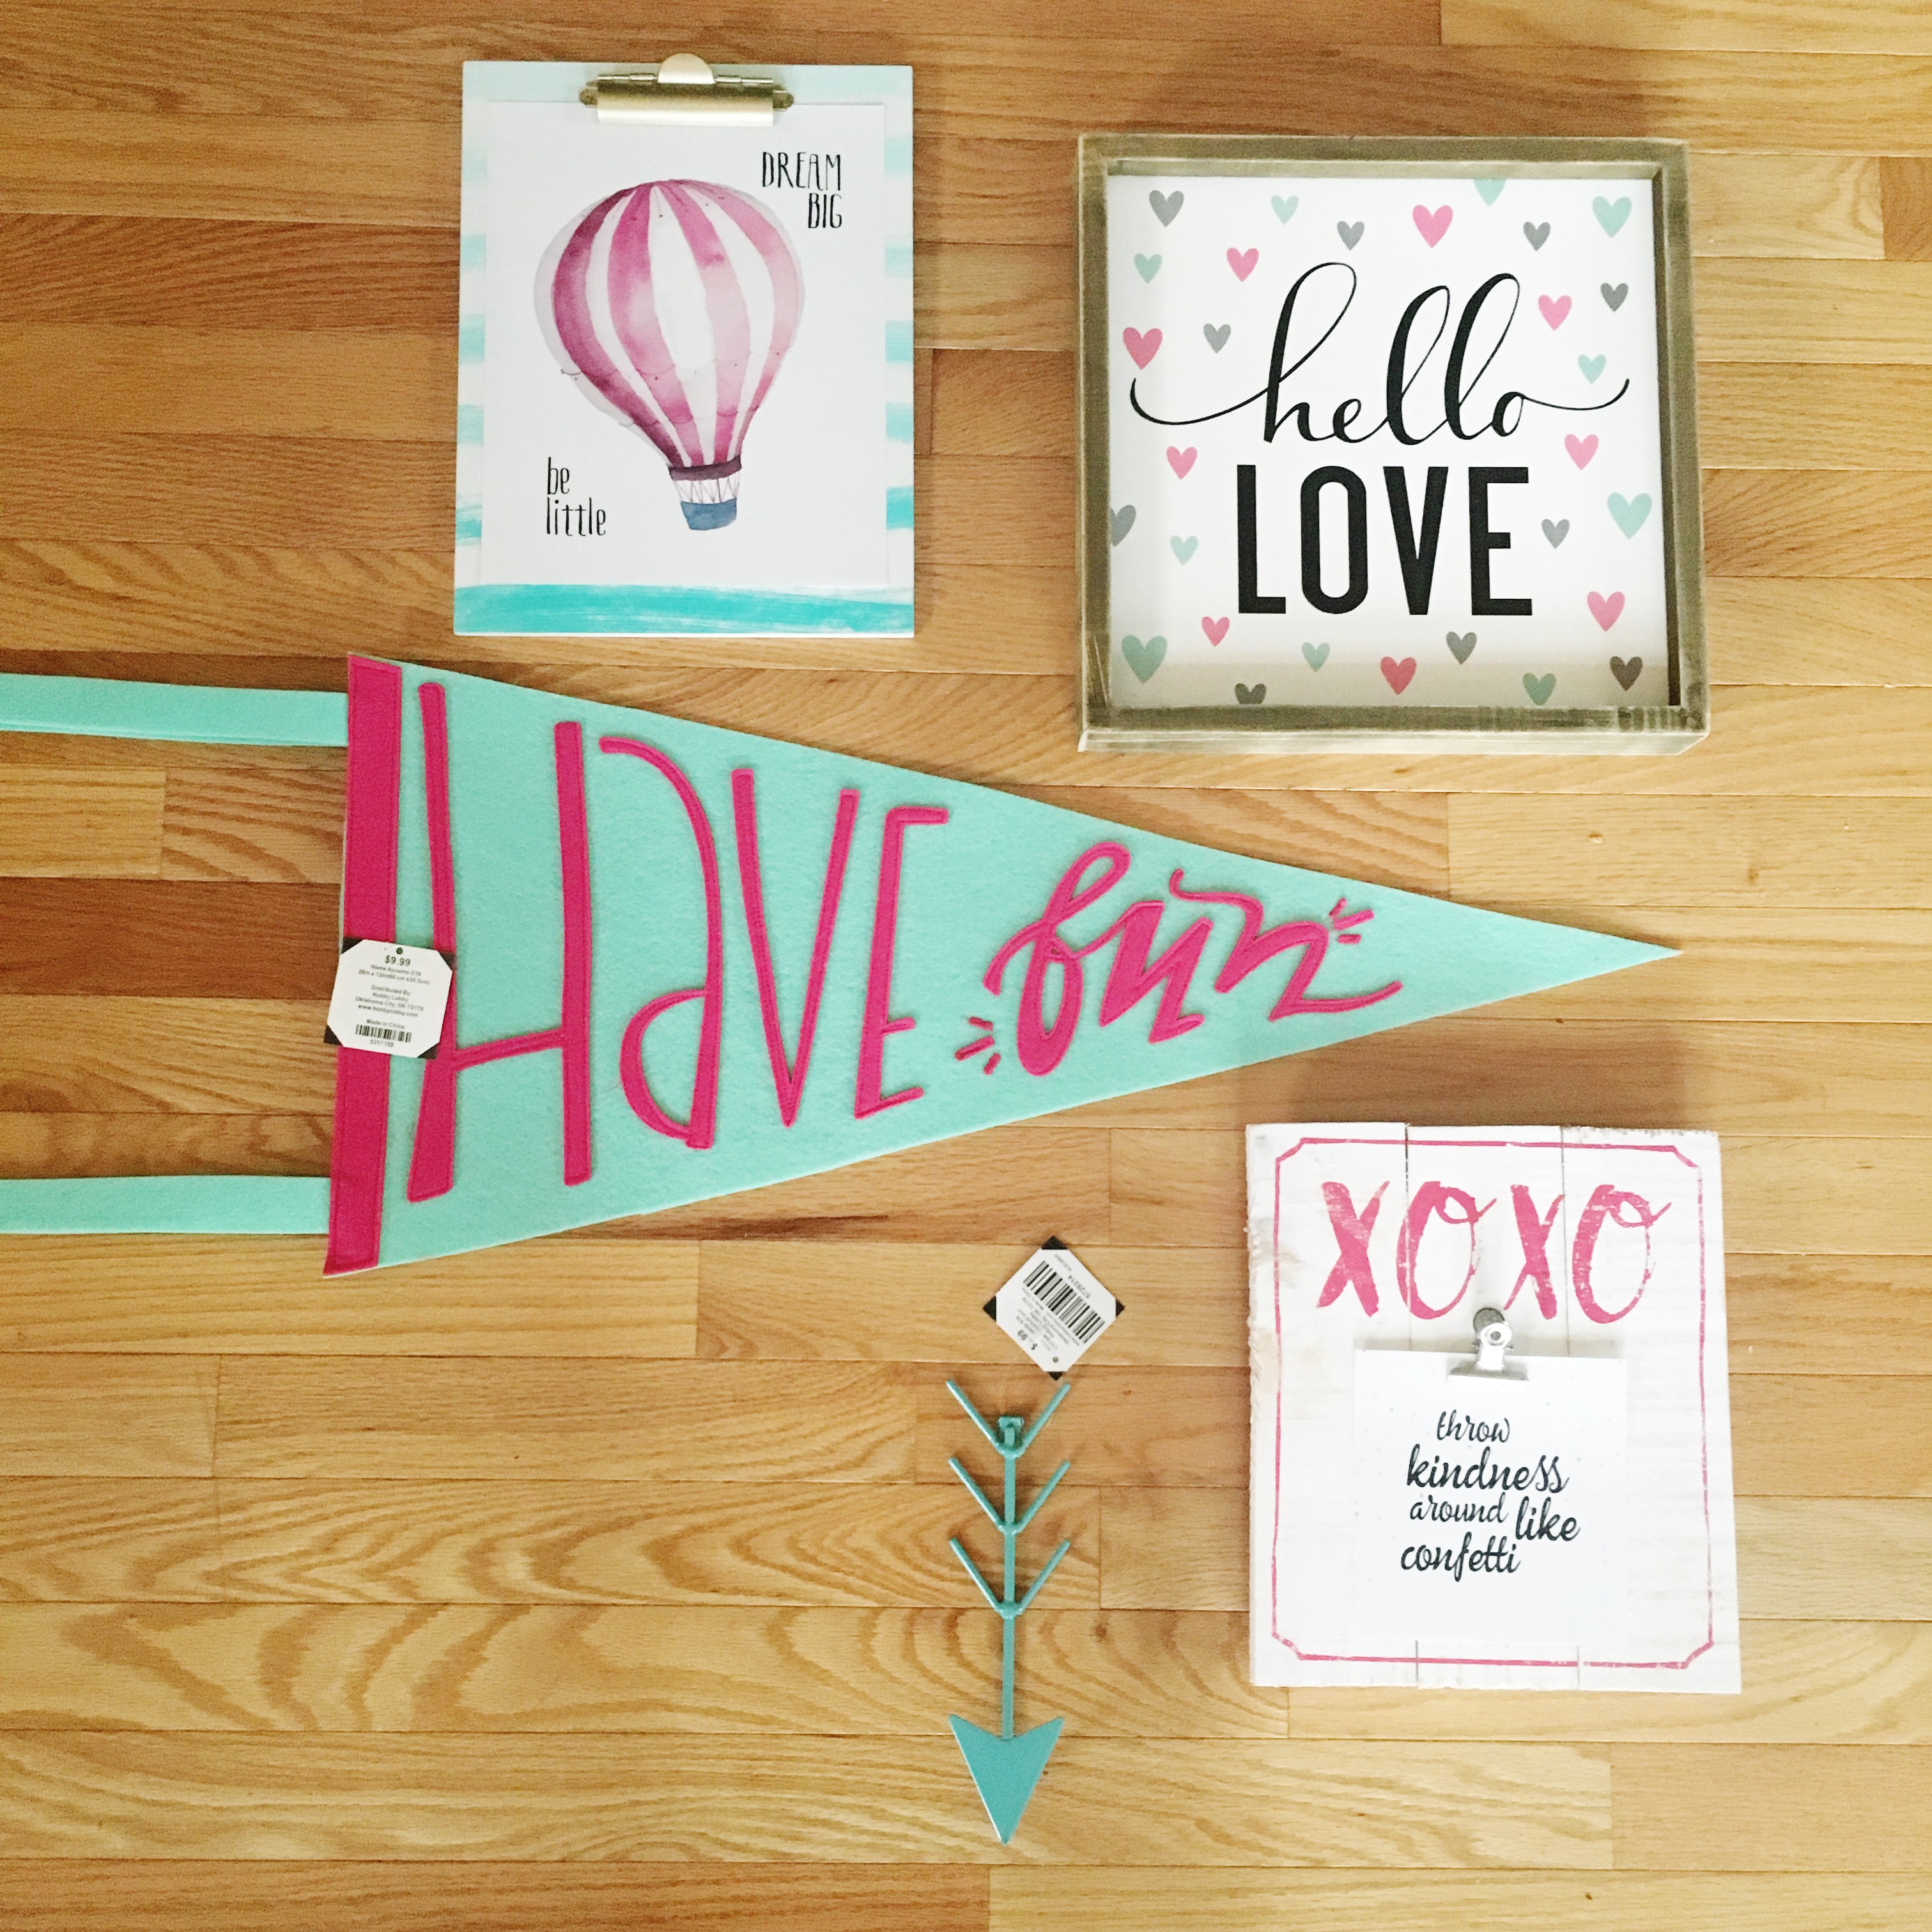
Her mom ordered the darling carousel canvases on the wall that fits perfectly with the theme. The Dream Big, Be Little and Throw Kindness Around Like Confetti prints are from These Bare Walls. Mirror was from HomeGoods and Humble & Kind sign is from etsy.

Girl Toddler Room & Gallery Wall Girl Toddler Room & Gallery Wall

Toddler Girl Room & Gallery Wall

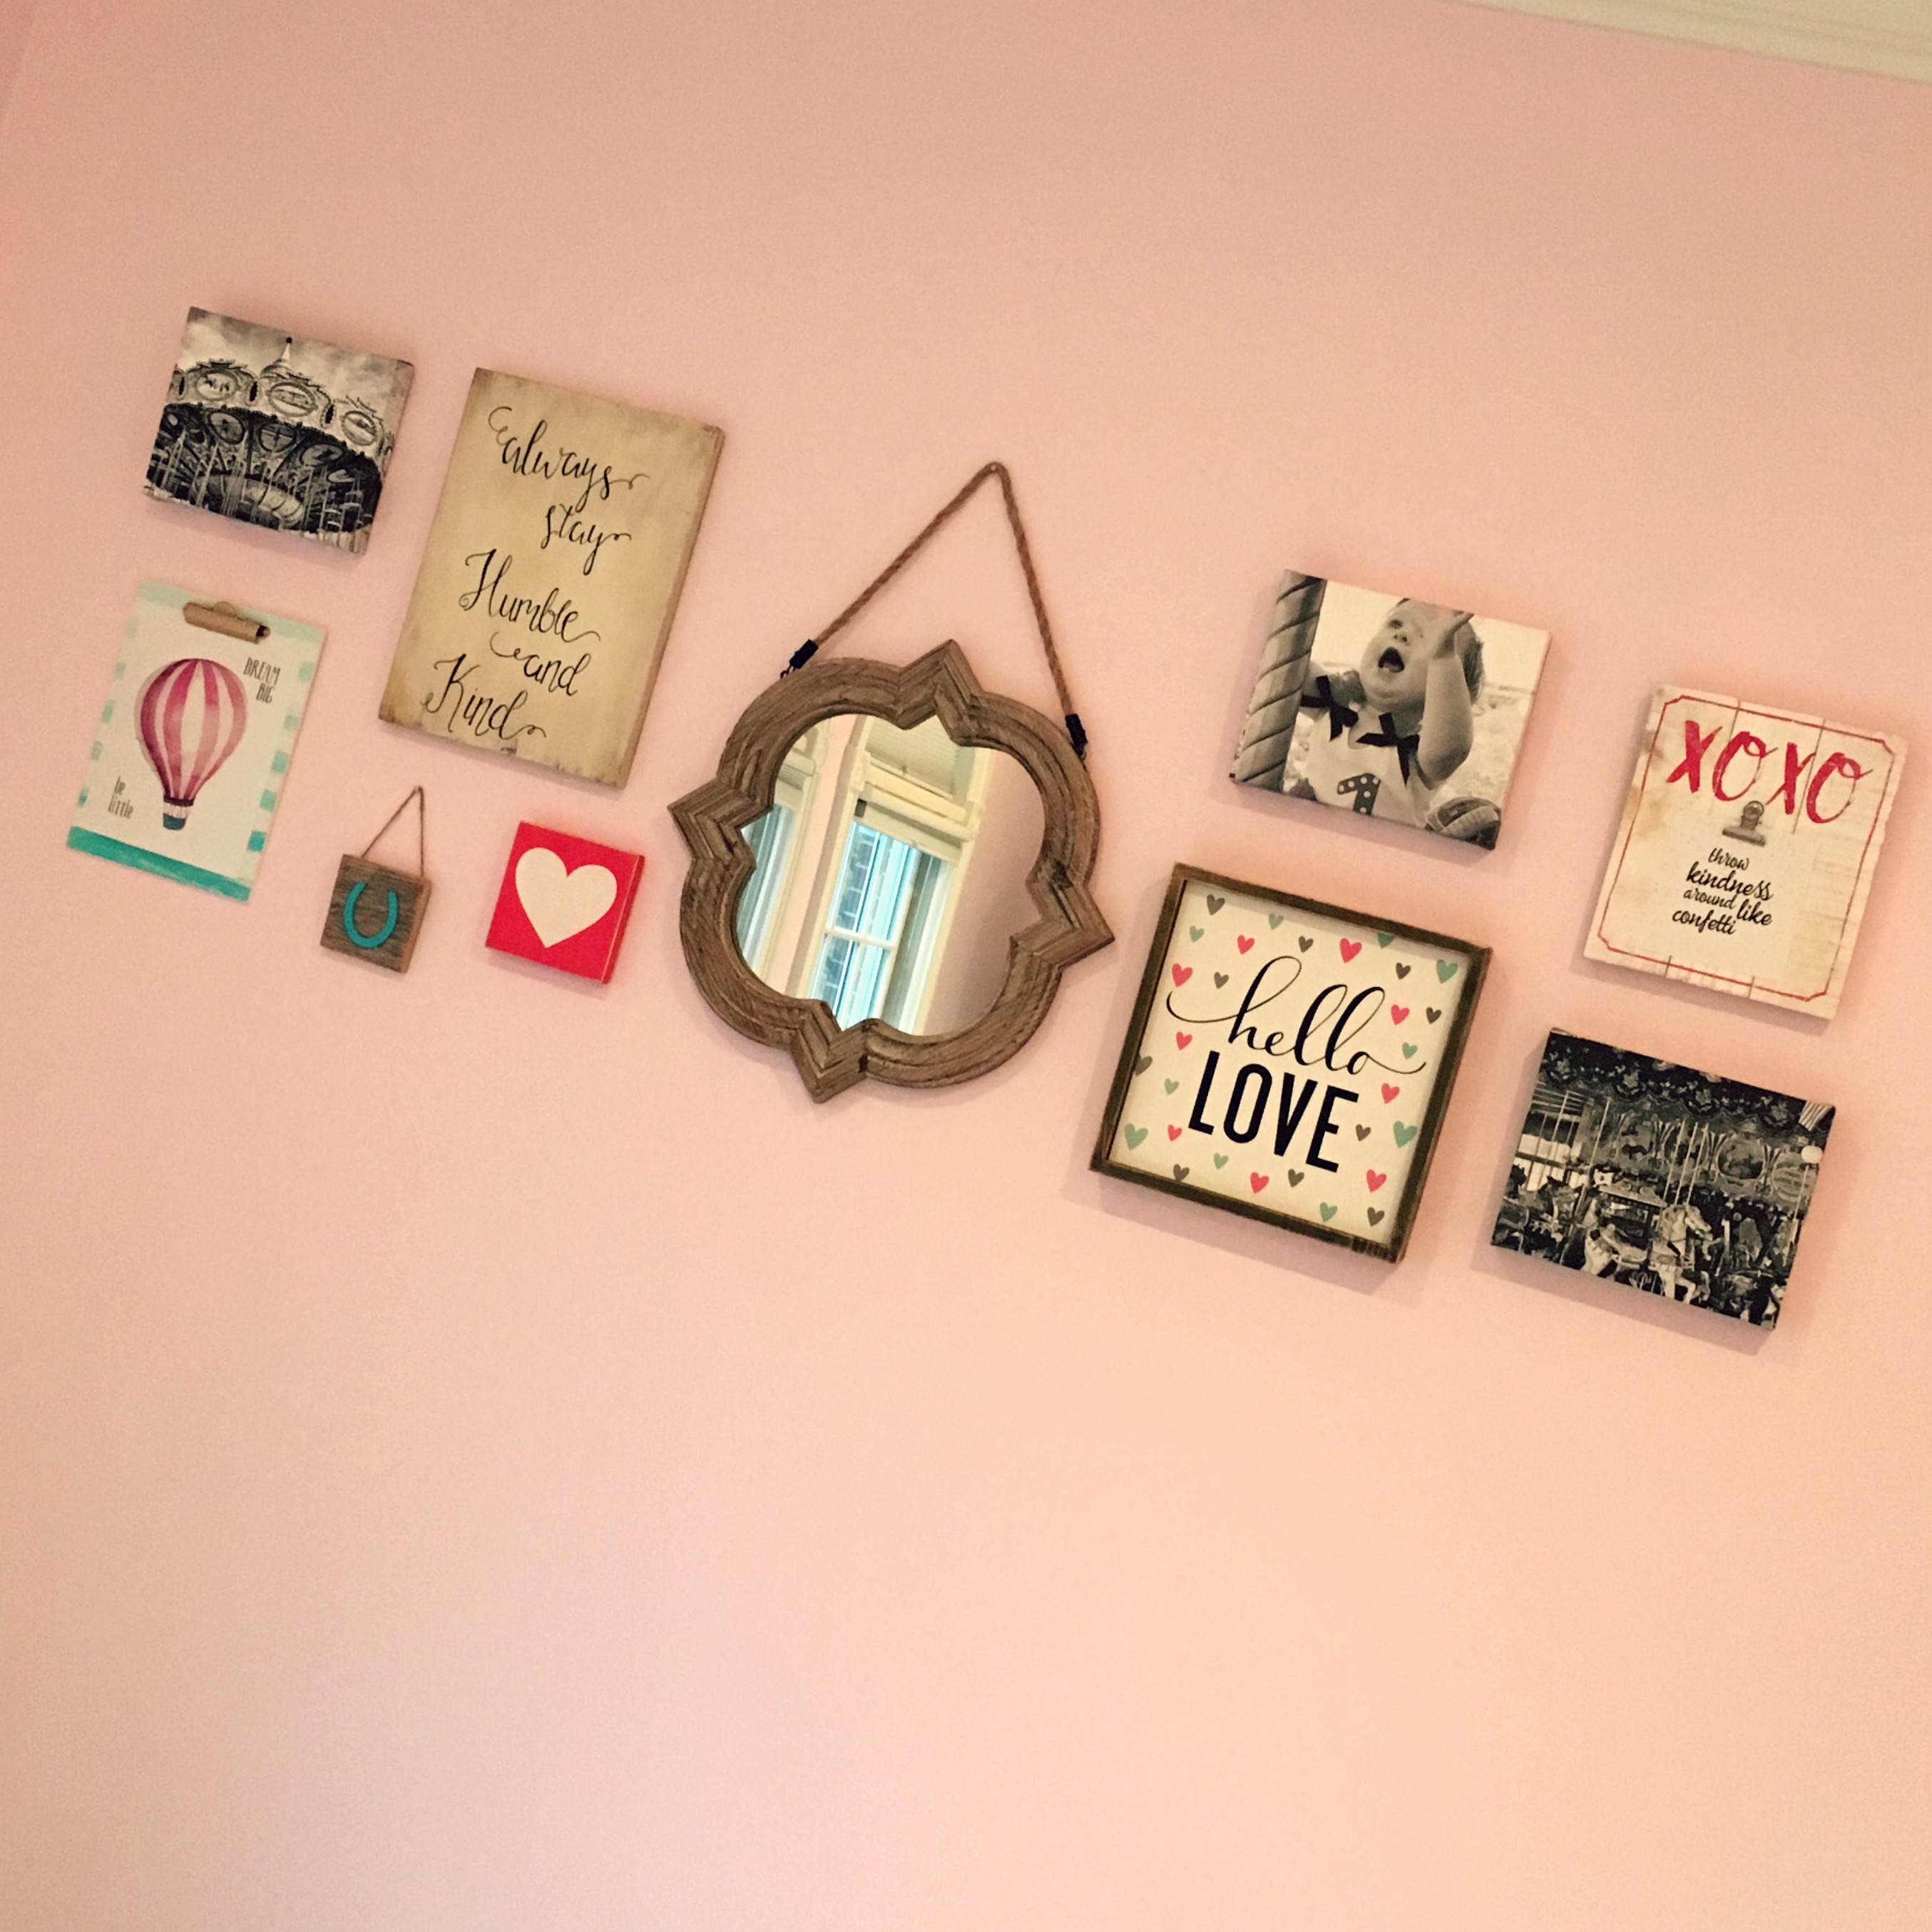
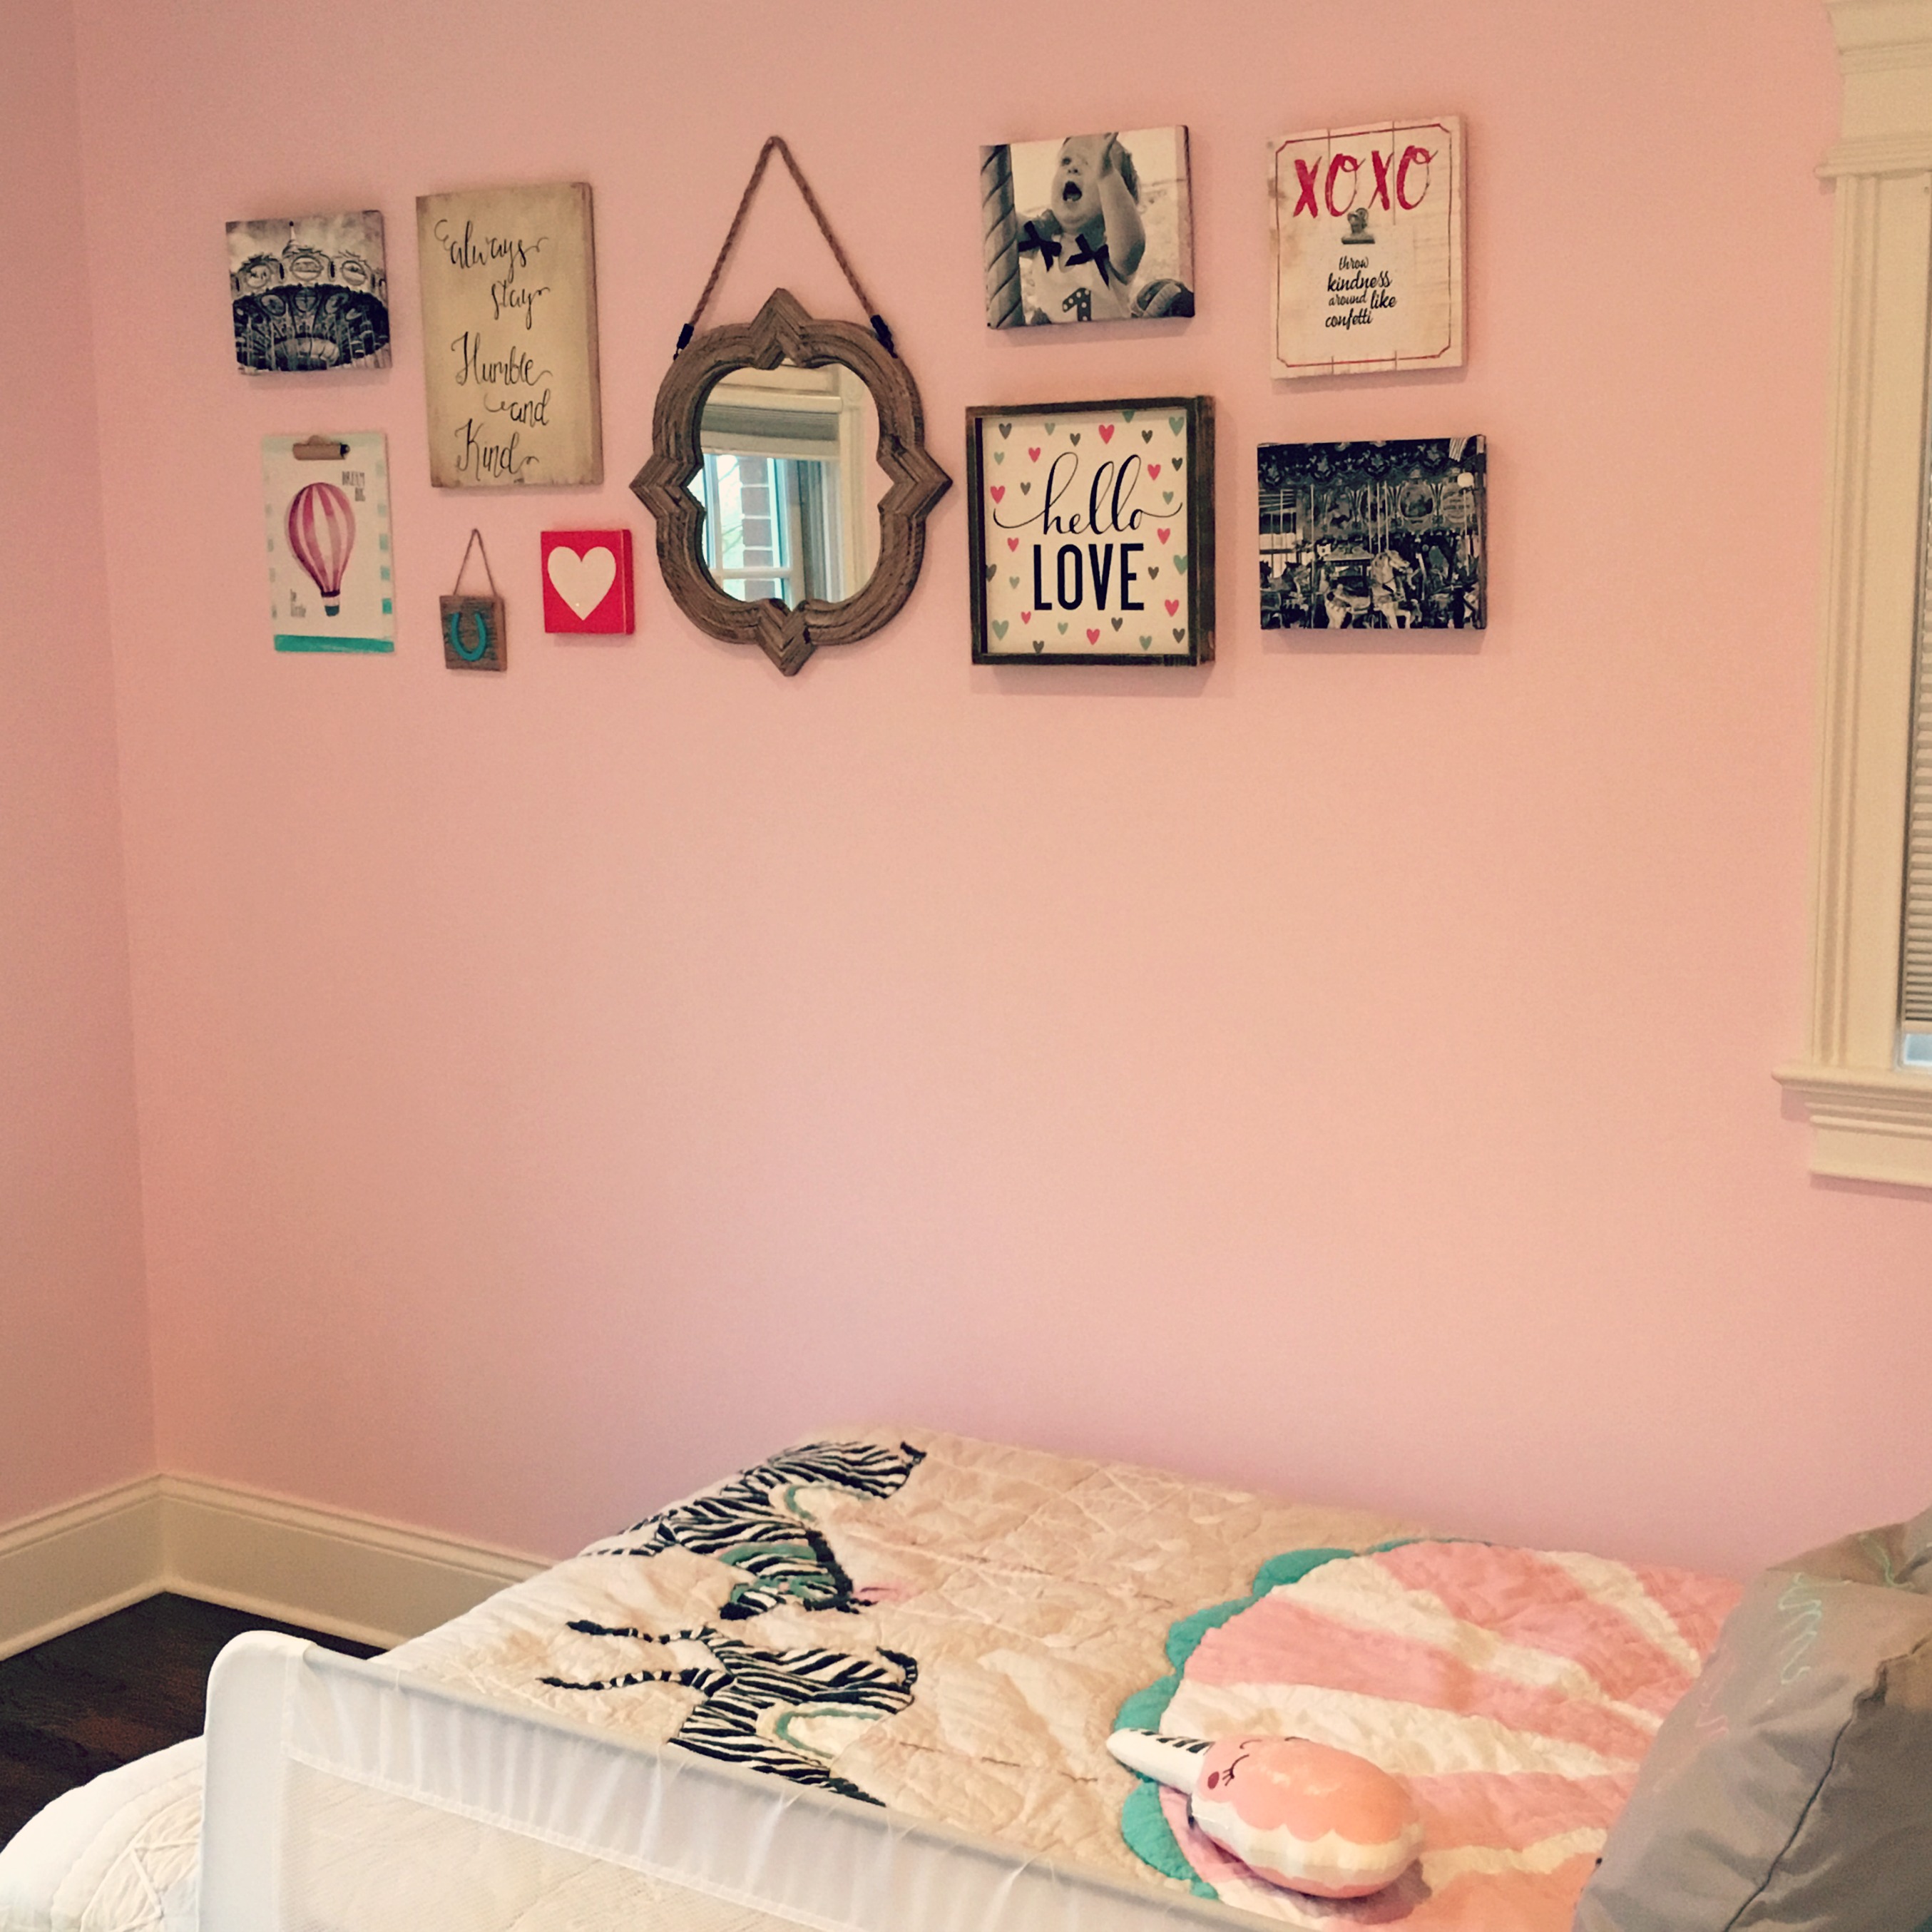
My personal favorite piece on the gallery wall is the Hello Love sign I found at Hobby Lobby. I also found the ombre clipboard and XOXO sign there. Hot Pink Glitter Heart is from Just Add Sunshine Inc. Love how it all turned out and just can’t get over that rug!! With a mix of things her mom already purchased and a few things I brought in, the gallery wall is complete and the little customer is more than pleased! Her mom told me she says “Wow!” every time she walks in! How cute is that?! Hope you’re left inspired – what piece is your favorite on the gallery wall?

May 4, 2016 by: Michelle

Put a Little Spring on Your Step

Front Porch Decor Ideas for Spring by Sweet Threads for ElleryDesigns.com

Michele here with Sweet Threads! Spring is finally here which means sunnier skies, fresh blooms and new front porch decor. Ditch the winter blues and add a bit of spring to your front porch with these quick few tips!

1. Dress up your front door with a new wreath ~ Out with the old and in with the new is a great motto for spring! A bright and cheery wreath adds a touch of color to your front door and welcomes guests in a warm way!

5 Spring Front Porch Decor Ideas by Sweet Threads for ElleryDesigns.com
 source

2. Spring for a new welcome mat ~ Welcome your guests with a new door mat! Let’s face it, they get the brunt of winter with snow, mud and more.
4 Front Porch Decor Ideas by Sweet Threads for ElleryDesigns.com
source

3. Add some greenery or fresh blooms ~ Add a pop of color to your front step with some fresh greenery. Be sure and pick some flowers that are hardy enough for your climate zone during April and May.
4 Spring Porch Decor Ideas by Sweet Threads for ElleryDesigns.com
source

4. Secure a spot to stash those rain boots ~ April showers do bring May flowers! Have a spot on your front porch to store rain boots and umbrellas. No one wants mud tracked through their house and this is a great excuse to get your DIY on.
4 Front Porch Decor Ideas by Sweet Threads for ElleryDesigns.com
source

Thanks so much for sharing Michele, so many inspiring ideas!! Now I need to get my front porch Spring ready!

April 21, 2016 by: Michelle

Scroll Without Comparing

Scroll Without Comparing - Be inspired but do not compare!
THIS. This phrase is a tough one to swallow but so true. Do you find yourself sometimes feeling down when scrolling instagram, facebook, pinterest? Well, DON’T! It’s so easy to compare these tiny squares we see in the blink of an eye. I have made some awesome friendships on social media but in all reality most of you really don’t know me and I don’t really know you. I don’t know about your busy ass day where you didn’t even sit down once, I don’t know about your health issues, I don’t know about your infertility….I don’t know about your bills….the list is endless.
My life IS busy, but come on…who’s isn’t? I’m tired! I’m busy! Life is hard! Yes, those words are all so true for everyone but those words are taking a toll on the path of our lives. Those ugly words we whisper to ourselves. What if we just stopped that? The words BE HAPPY are so small but so hard to truly BE. I smile when I think back to when our parents were our age – they didn’t have cell phones and texting to see what their besties are doing. Now it’s like in one little button you can see what everyone did that day.
I am by far no expert on this but my advice is to take a break….take a breather. I no longer scroll on the weekends. I feel like I miss out on a lot but who cares? Does anyone even notice I’m not liking their photo? NO. I could ramble on this subject for hours but let’s stop comparing and just simply like what other people are doing. Don’t judge them for it, don’t compare what they have to what you have or don’t have. I DREAM of having a 5 acre lot with a wrap around porch and a red front door but in reality I live in a small town home that barely even has a yard and I can’t pull my car in the garage…..BUT, I LOVE it and wouldn’t have it any other way. It’s great to like what you see or be inspired but DO NOT COMPARE. Love YOUR life. Let’s stop the glorification of perfection, b/c it’s just not reality.
The Jake Owen Song, We All Want What We Ain’t Got, really hits home.
“We ain’t happy where we are, there’s greener grass in the neighbors yard. A bigger house and a faster car, we ain’t happy where we are.”
How sad, am I right? Let’s all be happy with what we HAVE. We only HAVE one life and if we spend most of it comparing, it couldn’t be more wasted. Easier said than done, I know but let’s all try to fix this area in our lives. Be kind, choose joy, and don’t compare! The end. 🙂
 The weekend is almost here you guys and I’m so excited!! XOXO, m

April 19, 2016 by: Michelle

DIY Wall Art for less than $5

DIY Wall Art Tutorial
Hello! Katy here with some DIY to spruce up your walls! I’m making a gallery wall in our office space. Although I am terrible about deciding a color scheme and will probably change it soon after, I’m currently going with black, gold, and white! I would love to buy everything I see in stores to decorate my home. But the reality is I can’t always afford brand new items and I like the feeling of hanging something I made on the wall.
So here is a DIY project for adding some handmade items to your walls!
First I bought 3 small clipboards from Walmart. They were about $1.30 each. I hand painted them with gold metallic and black paint. (already had from other projects)
20160331_144752.jpg

I am no perfectionist and like the more relaxed look. But you could definitely use some painters tape or a stencil for straighter lines. I plan to re-paint one line again because it is a little wonky the more I look at it….but that’s the joy of DIY!


20391.jpeg
Next, I was searching Hobby Lobby one day for any Easter decorations left and found their St. Patrick’s decor was 90% off. So I got this little block for $0.50! Not a huge Patrick’s Day decorator so I decided to re-use it.
20402.jpeg
I sanded off the glitter and re-painted it and added a simple printable with Mod Podge matte to the front.
DIY Hand Painted Block
So now I have 4 items to begin my gallery wall! I’m still in the process of collecting more items to hang, but now I have 4 items to begin with for less than $5! Also if I decide to change color schemes down the road, it will be inexpensive to switch things up!
Happy DIY’ing!!
DIY Wall Art Clipboards and Decor

April 6, 2016 by: Michelle

How to make your grout look and STAY new!

Make your dirty grout look and STAY new! ellerydesigns.com

Raise of hands who has dirty looking grout? Come on, we all do! Go look around I bet you never thought it was “that bad” until you really looked at it. Well, guess what? I have a solution for you!  I’ve tried everything from grout cleaners to using foam carpet cleaner to all of the suggestions I’m sure you’ve seen online and nothing seemed to keep my grout lines clean for long. I came across the product Grout Renew by Polyblend and the rest is history. Here is the exact product I purchased: Grout Renew (Snow White). Grout Renew by Polyblend is a colorant AND sealer so you can recolor your grout lines and it’s stain and fade resistant! BOOM!

There are many colors to choose from, I went with a traditional white b/c I like the clean lines and wanted a clean, fresh look. Our tile is pretty almond-like so wanted something that brightened up the space. I bought two bottles and still have some left! It goes a long way!

Make your dirty grout look and STAY new! ellerydesigns.com

Now, here’s the deets. The bottle says to apply the paint using a toothbrush and to wipe away the left over on the tile as you go. I found this not to be possible, for me at least. As I would wipe away the access grout renew as I went, if I even moved a little it would wipe it off the grout lines and then I would have to start over or keep going back to fix which was sooo time consuming. After trying many things here is what I did and recommend for a clean finish:

  1.  I used a paintbrush. Just a tiny little paintbrush I had laying around from my daughter’s paint book. Seriously. Nothing fancy. I used one that had a neutral bristles, as I used one that was black but it was shedding and obviously that wasn’t a good mix with my new white grout.  Towards the end I did get a bit bigger brush which worked way faster but it did waste more of the grout renew.
  2.  Disclaimer: I did not pre-clean my grout very well. I would probably advise to do what it tells you on the back of the bottle but I’m just letting you know I didn’t do much besides mop and vacuum before I started and it’s holding up great.
  3.  I used painter’s tape to tape all of my grout lines. I know this seems super tedious but it is what worked best for me. You can wipe away the excess paint as you go along, like the directions on the bottle says but it just didn’t work that well for me. I’m a perfectionist and that may have been most of my problem. Taping is like anything else, once you figure it out on how to do it quickly and most efficiently, it goes by super fast. It took me several times to get the hang of it and just be sure not to tape any part of our grout lines or you’ll have to go back and touch up a lot). I taped all of my lines in one direction, painted the lines, then removed the tape after about 20 minutes and then started taping going in the other direction about a half hour later.
  4.  This stuff dries FAST. Don’t worry if you have some grout renew on the tile, I just used the other end of my paintbrush to chip away the areas that left excess grout renew and voila!

Here are some before and after photos that really show what a difference this product made! The best part is, if I spill something on the grout it easily wipes up! YAY!!

Make your dirty grout look and STAY new! ellerydesigns.comMake your dirty grout look and STAY new! ellerydesigns.com

We did the whole first floor. I still need to tackle the closets and pantry but I figure no one really sees that except me, so I can give myself a little break. My hard work paid off and I’m so happy with the outcome! It’s a long process but well worth it, don’t you think?! My dear friend came over and helped me finish the dining room and it is amazing how quickly it goes with a little help! Grout painting party anyone?!

Make your dirty grout look and STAY new! ellerydesigns.comMake your dirty grout look and STAY new! ellerydesigns.com

It’s a game changer!! My husband wasn’t sure how the white would look but now agrees it looks great and seriously makes our tile look brand new! While this post does contain affiliate links, I was not given this product for review. I just love it so much and highly recommend. Happy grout painting!

April 4, 2016 by: Michelle

DIY Copper Planter

DIY Copper Planter by Monograms and Moscato for ElleryDesigns.comHello Ellery Designs readers! It’s me again, Laura, from the blog Monograms and Moscato. It’s officially spring and Iowa has been slacking on the sunshine and warm temperatures but I’m determined to get ready for spring anyways! Do any of you have a green thumb? I do not BUT I’m determined to try! I’m starting out small… I would love to have a garden some day but I’m worried nothing would survive. Today I’m sharing with you a fun little DIY so if you’re like me you can take baby steps to get something to grow! Also, I have a slight obsession with copper right now, which is why I chose the copper spray paint but you could use any color of spray paint! Disclaimer: I did not grow this cilantro plant from a seed 😔 ….but a picture of dirt would not have been as pretty. 😉 #realtalk

DIY Copper Planter by Monograms and Moscato for ElleryDesigns.com
Supplies:

  • Tin can(s) (I used one from leftover pasta sauce!)
  • if you want to make more then one planter you’ll need more then one can!
  • Copper spray paint (My favorite brands are Krylon or Valspar)
  • Twine (or string, or yarn!)
  • Tag/Label (wooden, or paper – I used wooden.)
  • Chalk paint (optional)
  • Chalk (optional)
  • Soil
  • Seeds (cilantro, oregano, basil)

DIY Copper Planter by Monograms and Moscato for ElleryDesigns.com
To get started you’ll want to spray paint your can(s). I spray painted my can with 3 layers.

DIY Copper Planter by Monograms and Moscato for ElleryDesigns.com

While your spray paint is drying, make a tag so you know which plant is which! If you’re going to use tags of some sort, like I did….paint it with chalk paint or you could use regular paint too and write on it with paint pens! I had chalk paint in the closet so that’s what I used.

DIY Copper Planter by Monograms and Moscato for ElleryDesigns.com

Next, tie on your twine, write on your chalk and ta-da….easy peasy! Now, I cheated because I didn’t have soil or seeds but I am planning to make more so I can actually plant some spices! 🙌🏽 You could fill your can with dirt and seeds and wait for those babies to grow!!
DIY Copper Planter by Monograms and Moscato for ElleryDesigns.com
I would love to see yours if you try it! Find me on Facebook, Instragram, or Twitter and use the hashtag #monogramsandmoscato to share and see what else I’m up to! Happy planting!!

xo,
Laura

March 18, 2016 by: Michelle

Five Entertaining Ideas for Easter

Five Easter Entertaining Ideas

Hi, Michele here with Sweet Threads. Whether hosting a meal for 20 or a small intimate gathering, nothing says welcome like a few simple gestures to make your guests feel right at home. This Easter give your guests a warm welcome with these five simple inspiring tips. Click on the photos below for more details!

  1. Have a cocktail on hand for their arrival ~ Get the party started with a themed cocktail {or mocktail} for the occasion. I just love this simple Easter cocktail made with fresh carrot juice.

Easter Entertaining Ideas Frank the Rabbit Cocktail by 10th Kitchen

  1. A simple and charming centerpiece for your table that will get your guests talking ~ Skip the traditional bouquet of flowers in a vase and add a bit of charm to your tablescape. I love the simplicity of this wire basket filled with eggs and some baby’s breath.

Five Easter Entertaining Ideas Easter Floral Arrangment by The Casual Craftlete

  1. Guide them to their seats ~ Nothing dulls the sparkle out of a party than figuring out where to sit. Help your guests out by doing seating arrangements ahead of time. How cute is this mini basket place setting with chocolate candies.

Five Easter Entertaining Ideas 
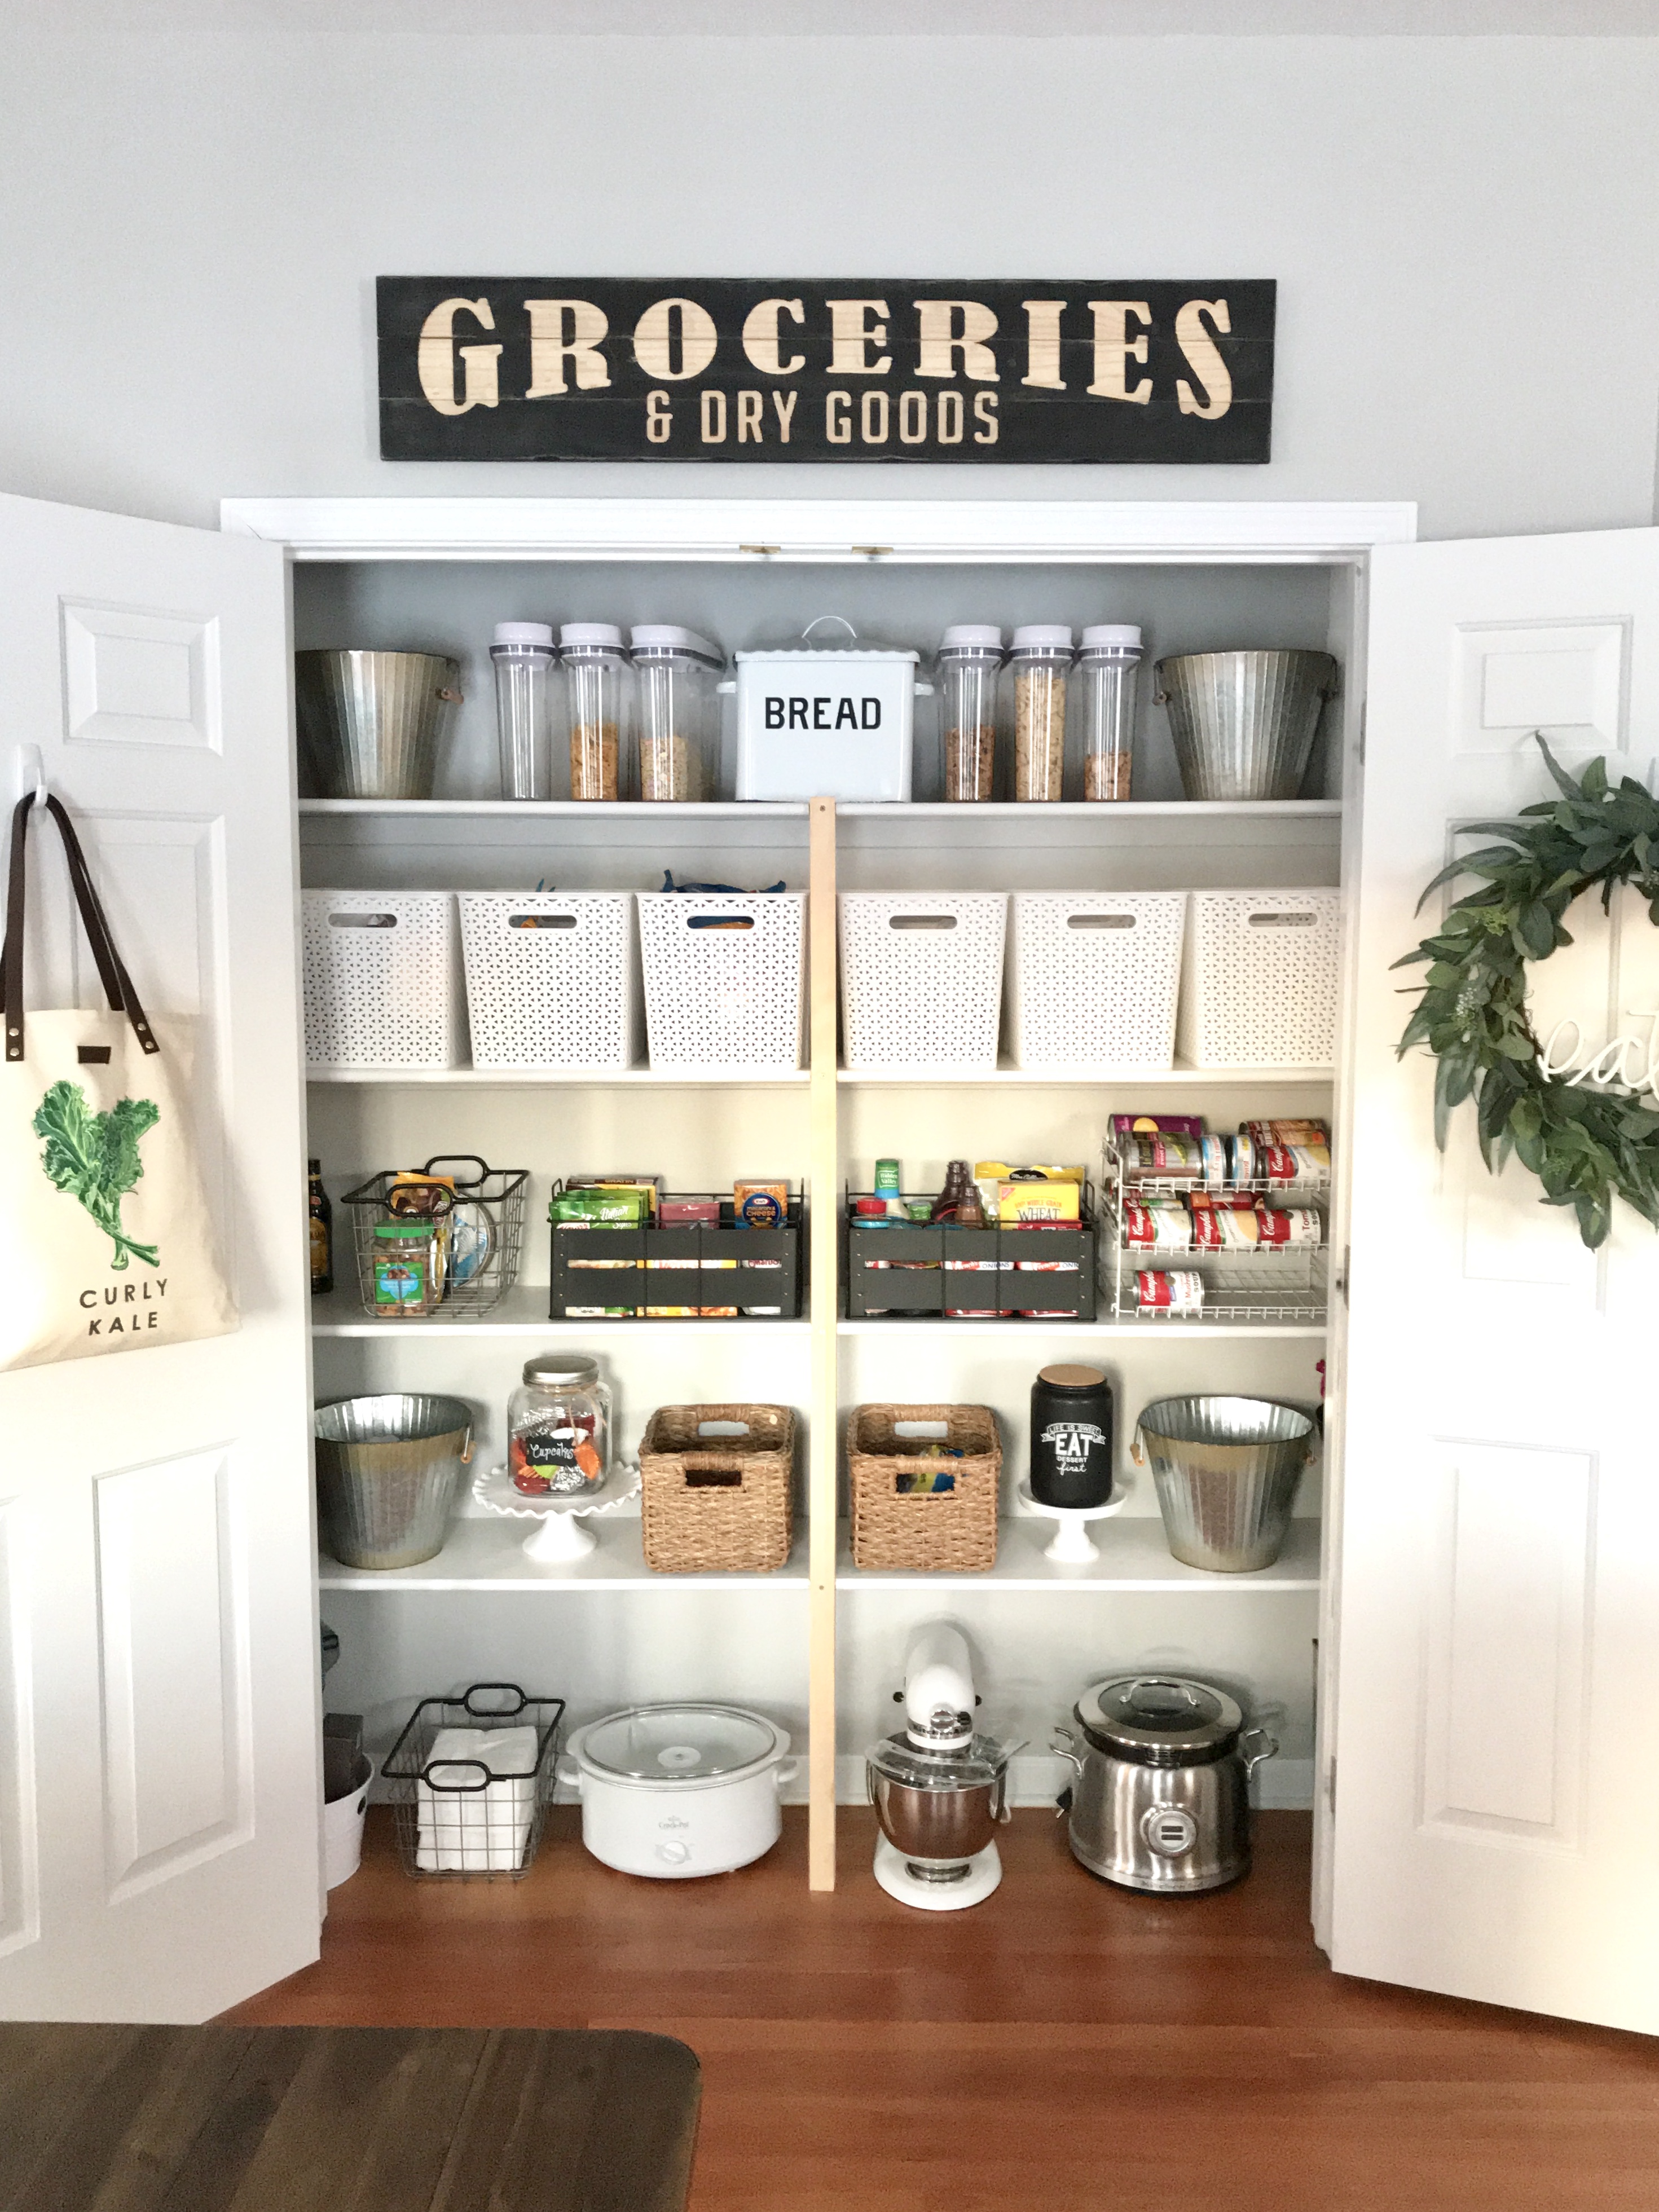
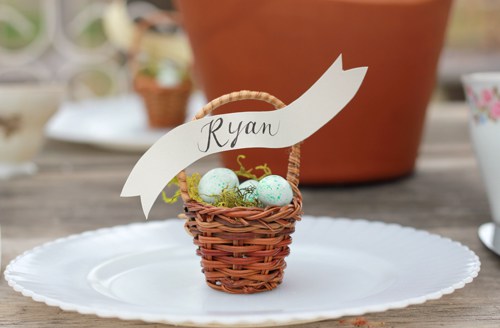
Mini Basket Place Setting by The House That Lars Built

  1. Take the guess out of what’s for dinner ~ Create menu cards for the table treating your guests to a sneak peek of what’s to come. Place one at each setting or frame a few for the table.

Five Easter Entertaining Ideas Place Setting from Matthew Mead at Miss Mustard Seed

  1. Send them home with a treat ~ Don’t let them leave the gathering empty handed! Send them home with a simple treat to remind them of the beautiful holiday you shared together. I love this charming burlap bag that can be filled with candy or even a seed packet for the spring.

Five Easter Entertaining Ideas

Easter Table Idea by Our Vintage Home Love

Happy Easter everyone!

—–

Thanks so much for sharing, Michele! This has definitely inspired me to get my Easter Entertaining in gear! Read more about Michele below and follow her on Instagram @sweetthreadsco.

Sweet Threads Blog Contributor for Ellery Designs

March 14, 2016 by: Michelle

Easter & Spring Free Printables

 Easter Free Printables by Katy Carter Design for ElleryDesigns.com
Hey! I’m Katy with Katy Carter Design contributing today. Easter is Sunday, March 27th and I am giving away a few free printables!
Printable wall decor is such an easy, inexpensive way to decorate for holidays! My family has moved frequently in the last few years and my favorite part is that printable wall art takes up minimal space and is not breakable. So when the next holiday comes around, I can pull out my printable artwork and slip them in a frame, on a decorative clipboard, or cork board.
Easter Free Printables by Katy Carter Design for ElleryDesigns.com
Click on files below to easily download by right clicking to save or print the image.
 Easter Free Printables by Katy Carter Design for ElleryDesigns.com Easter Free Printables by Katy Carter Design for ElleryDesigns.com Easter Free Printables by Katy Carter Design for ElleryDesigns.com
Enjoy the free printables and check out my Etsy shop for a few more! These are for personal use only. Please do not redistribute.
Easter Free Printables by Katy Carter Design for ElleryDesigns.com
 Sources:
Cardboard Egg – Target
Frames- local thrift shops
 —–
I just love these adorable printables and can’t wait to use them! You can follow Katy on Instagram @katy.carter and read more below.
Katy Carter Design Blog Contributor for Ellery Designs

March 8, 2016 by: Michelle

DIY Yarn Monogram Wreath for Spring

DIY Yarn Monogram Wreath by Ellery Designs

Here is an easy and fun DIY Monogram Wreath that is the perfect Spring door decoration!

DIY Monogram Yarn Wreath by Ellery Designs

What you need:
Monogram from Hobby Lobby

Yarn from Hobby Lobby

Faux Flowers (I used some that I had laying around)

Hot Glue

Wreath from Target

DIY Monogram Yarn Wreath

I simply wrapped yarn around the monogram – there is no science to it. I like the messy look so it was fun to just keep wrapping it around and around until I was pleased with it. I hot glued some faux flowers on it and then hot glued it to my wreath and voila! A pretty {and easy!} wreath for Spring! Your options are really endless! Have you started decorating yet for Spring? What are you waiting for? 🙂

March 2, 2016 by: Michelle

DIY No Sew Pillow Covers

DIY Pillow Covers by Southern Breeze Collection for ElleryDesigns.com

*Note: this post contains affiliate links. To learn more about affiliate links please visit my disclosure page.

Hi, Anna here with Southern Breeze Collections. I’m so excited to be sharing my first post as a contributor to Ellery Designs! Thank you so much for having me, Michelle!

Now, onto one of my favorite DIY projects I’ve done to date. It is easy and quick! Win, Win!

I’ve wanted a couple of new accent pillows for a while to use in my master bedroom. We’ve been working on a makeover for our master the last several weeks. As most of you probably know, accent pillows tend to be a little pricey! I knew I could make my own I just had to figure out the best way to do it.

I like to sew but don’t have a machine so I needed something that didn’t involve sewing at all. I decided to use some blank canvas material and do my own artwork on them. In order to keep from having to sew I found blank canvas tote bags at Michaels that were the perfect size!

WHAT YOU’LL NEED:

–Blank canvas bags (any size depending on the size you want your pillows) I used 13.5” x 13.5”

–Strips of sticky velcro (I got a package that contained 3ft which was perfect for my 2
pillows)

-Pillows to cover (get a little smaller than your bag size) OR poly-fil stuffing material if using the pillows inside only

-Your favorite paint, paint pens, stencils, etc. for decorating

-Paint brushes

-Scissors

I found this 3-pack of blank canvas bags at Michaels for around 10 bucks. Instead of buying the poly-fil stuffing I decided to get these pillow forms from Jo-Ann Fabrics because with my coupons I got two 12” x 12” pillow forms for only $11! The Velcro is 3ft long and was only about $4. I already had the paint, pens, and other materials. So, for around $25 I got 2 new accent pillows!

DIY Pillow Covers by Southern Breeze Collection for ElleryDesigns.com

The first thing I did was research some pillow design ideas so I’d know what I wanted to paint/write on them. This is the creative part where you can do whatever you like.

Then I took the bags and cut the handles off right at their seam.

DIY Pillow Covers by Southern Breeze Collection for ElleryDesigns.com
I put them out on my work surface and began prepping to paint/write. At this point, like I mentioned before, this is where your creativity can come out. If you don’t feel comfortable painting something free hand you can use stencils too. Those would work great to paint on your initials, last name, a quote, etc.

I like to do hand-lettering so I decided to use a pencil first to letter my quote then went back over it with my Sharpie oil-based paint pens. I also like to sketch out my writing on paper first just to make sure I get the layout the way I like.

DIY Pillow Covers by Southern Breeze Collection for ElleryDesigns.com DIY Pillow Covers by Southern Breeze Collection for ElleryDesigns.com

My style is coastal inspired so I did an abstract painting of the beach on the other one. I just blended colors for the sand, then water, then sky. Anyone can do that! 🙂

DIY Pillow Covers by Southern Breeze Collection for ElleryDesigns.com DIY Pillow Covers by Southern Breeze Collection for ElleryDesigns.com

Once you’ve finished your designs let them dry completely. Then, cut strips of Velcro to the length you need to cover the full length of the opening and stick it to the bag. You could hot glue the strips if you feel it’s not secure enough. Mine felt pretty secure, and I don’t plan on having to wash them so I just used the sticky. You can always sew on the Velcro or sew the bag closed completely if you want as well! I like easy, so I went with that! 😉

DIY Pillow Covers by Southern Breeze Collection for ElleryDesigns.com DIY Pillow Covers by Southern Breeze Collection for ElleryDesigns.com DIY Pillow Covers by Southern Breeze Collection for ElleryDesigns.com DIY Pillow Covers by Southern Breeze Collection for ElleryDesigns.comDIY Pillow Covers by Southern Breeze Collection for ElleryDesigns.com

That’s it! The painting took the longest time of all. This would all vary depending on what you decided to do. Pinterest is a great source for finding ideas on what to paint on your pillow. I definitely found some cute ideas on there; including the use of stencils, so anyone can do it. I hope you enjoyed this DIY Pillow Cover tutorial! Be sure to stop by my blog to check out my other home decor and DIY projects at Southern Breeze Collections!

DIY Pillow Covers by Southern Breeze Collection for ElleryDesigns.com DIY Pillow Covers by Southern Breeze Collection for ElleryDesigns.com

So crafty and cute, Anna! I can’t wait to give these a try! Beach themed decor is so popular right now and just love this idea! Follow Anna on Instagram @southernbreezecollections and read more about her below!

Southern Breeze Collections

  • « Previous Page
  • 1
  • …
  • 4
  • 5
  • 6
  • 7
  • 8
  • …
  • 28
  • Next Page »

FALL FEELS TEES ON SALE NOW!

FALL FEELS TEES ON SALE NOW!

Shop my FAV Hearth & Hand Products!


Stencil, stencils, wall stencil, stencil designs, stencil pattern, stenciling

Latest Pins

Youth #football coaches be like - we still havin practice! Repin if this applies to you. #youthfootball www.youthfootballonline.comLight themed transitional living room cozies up with an ivory sofa paired with gray accent chairs around a wooden and metal coffee table.Christina Henck designed this Philadelphia home to be light and airy with a modern bohemian feel. In the living room, a gold mirrored coffee table and green velvet accent chairs add a touch of glam, while the patterned accent pillows give the design dimension. Gem tones act as the grounding force for this modern classic living room. See more of this gorgeous design on henckdesign.com!Funny Pictures Of The Day - 35 PicsThis cedar wood screen adds loads of character to a back yard, is budget friendly, and gives an outdoor patio space extra privacy.Decorating your Kitchen Island for Christmas with Hobby Lobby – Ellery Designs #christmasDecorating your Kitchen Island for Christmas with Hobby Lobby – Ellery DesignsChristmas Tee, Christmas Shirt for Women, Christmas T-Shirt, Baking Tee, Christmas Apparel, Christmas Tree Shirt  - Vintage Red Unisex TeeTween Chic Bedroom Makeover – Ellery DesignsTween Chic Bedroom Makeover – Ellery DesignsDecorating for fall with Afloral – Ellery DesignsDecorating for fall with Afloral – Ellery Designs
Follow Me on Pinterest

#ElleryWear Tees ON SALE!

Our New Home Before + After

Our New Home Before + After

How to Organize Your Pantry

How to Organize Your Pantry

Linen Closet Makeover

Linen Closet Makeover

Truly Blessed Tees ON SALE!

Our Menards Commercial

Our Menards Commercial

Cozy Glam Bedroom Refresh by Ellery Designs

Cozy Glam Bedroom Refresh by Ellery Designs

Tween Chic Bedroom Makeover

DIY Planter

DIY Planter

Refresh your mantel with wallpaper

Refresh your mantel with wallpaper

Stencil Your Fireplace Tiles

Stencil Your Fireplace Tiles

Gallery Wall Ideas

Gallery Wall Ideas

Our Townhome Kitchen Remodel

Our Townhome Kitchen Remodel

#ElleryWear ON SALE NOW!

#ElleryWear ON SALE NOW!

Our Pantry Makeover

Our Pantry Makeover

Thanks for stopping by!

We hope you leave inspired for your next project! Come back soon to see what we've been up to! Have a question or want to collaborate? Let's Chat...

Looking for something?

© 2025 · Ellery Designs · website by Pretty Darn Cute Design