Ellery Designs

Decor, Design & DIY

  • Email
  • Facebook
  • Instagram
  • Pinterest
  • Home
  • Shop
  • Blog
  • Home Projects
    • New Home: Before + Afters
    • New Home: Organized Farmhouse Pantry
    • New Home: Linen Closet Makeover
    • New Home: Black + White Stripes Mantel Refresh
    • New Home: Stenciled Tile Fireplace Makeover
    • New Home: Cozy Glam Master Bedroom
    • Townhome Kitchen Remodel
    • Townhome DIY Pallet Wall
    • Townhome Faux Fireplace + Mantel Decor
    • Townhome Finished Basement
  • Party Ideas
    • Chevron Halloween Party
    • Curious George Party
    • Disney Princess Party
    • Elmo Party
    • Merry & Bright Party
    • Monster Bash
    • Monster High Party
    • Nautical Baby Girl Shower
    • Rainbow Dash Party
    • Rainbow Party
    • Watermelon Party
    • XOXO Valentine’s Party
  • e-design
  • About
    • Michelle + Ryan
    • Contact/Disclosure

November 19, 2017 by: Michelle

Winter Wonderland Holiday Mantel

This is a sponsored conversation written by me on behalf of Hobby Lobby. The opinions and text are all mine.

This is a sponsored conversation written by me on behalf of Hobby Lobby. The opinions and text for my winter wonderland styled mantel are all mine.

Happy Thanksgiving week friends! It’s almost that time to start decking the halls and I couldn’t be more excited to team up with Hobby Lobby and share some inspiration on how to decorate your holiday mantel this year and for under $100. Their AMAZING tree selection has me like woah! And so do their prices. Hobby Lobby is my favorite store when shopping for holiday decor, or any decor for that matter – who’s with me?! I decided on a Winter Wonderland theme since this would be perfect to keep up all winter long – when I first spotted those snowflake and fluffy trees, my wheels started spinning and there was no turning back!

Cost Breakdown

Winter Wonderland Sign: 50% off – $17.49

Container of White Snowflakes: 50% off – $4.99

Five Silver Snowflakes Placemats: 50% off: – $2.99 each

Two Large Silver Snowflake Trees: 50% off: – $9.99 each

Two White Faux Fur Trees: 4.99 each

One Small White and Silver Tree: 50% off – 4.99 each

Two Gray Bottle Brush Trees: 50% off: 4.99 each

White Tinsel Garland: 50% off: $5.99

Already had: Two White Candle Holders

TOTAL SPENT: $88.35

Winter Wonderland Details….

My favorite part? Those five huge snowflakes on top are actually placemats! So fun to use unique items for your mantel that you normally wouldn’t think would fit. The last item I spotted was the Winter Wonderland sign and it was off to decorate! 🙂

I used clear pushpins to add all of the snowflakes to the wall. It’s the easiest way to not destroy your walls with too many nail holes. I placed many more white snowflakes around to give it a glittery and snowy feel. Those white snowflake come in a big container of about 25 or so. Regularly priced $9.99 and 50% off – you just can’t beat it! I had a few left over and used them as ornaments on my Christmas tree.

My main key to decorating a mantel is using various heights. Try not to use all the same size trees or objects. I also love using different textures and patterns to create a visual that really attracts the eyes. I’m also big on keeping everything uniform – but that’s totally a personal preference.

I’ve also seen a lot of “ONE-DERLAND” themed first birthday parties – how fun and festive would this be for a focal point at a party?!

Don’t forget to use this coupon on your next Hobby Lobby trip! Just simply show the cashier this photo from your phone – so easy!

I hope this inspires you to create your own Winter Wonderland. What theme/style do you normally go with for Christmas? I typically decorate using the traditional red and green color scheme but I’m loving the classic look of silver and white! It’s giving me all the glam and glittery feels! Which are you – Team Winter Wonderland or Team Farmhouse Christmas?! Press play to view slideshow below….

Comments submitted may be displayed on other websites owned by the sponsoring brand.

November 16, 2017 by: Michelle

Holiday Decor Inspiration 2017

Hi friends! I gathered my favorite items to bring you some holiday decor inspiration for many different themes! Which one best suits you? By the way, none one of these are affiliate links – I’m just sharing some items that I think you may like and hopefully bring you some inspiration if you’re still deciding on a theme. All of the sources are linked below each collage.

Woodland Glam

First up is what I’m calling Woodland Glam. I even love the name! Wink, wink. Loving the dark greenery and gold which brings such a soft and whimsy feel. I was inspired for this theme when I first saw that new Hearth and Hand Wreath (#7) along with those gold bells. So simple yet so pretty – and little touches of sparkle and shine always make me happy!

 ABOVE SOURCES: 1 / 2 / 3 / 4 / 5 / 6 / 7

Buffalo Check

Next up is the ever so popular Buffalo Check/Plaid! If you follow along with me on Instagram, you know I just LOVE this theme. I personally like to mix buffalo check along with farmhouse/traditional styles. Such a fun and modern theme – I mean how cute are those deer?! You can do this theme with subtle touches – like those adorable trees with just a touch of buffalo check in the ribbon.

ABOVE SOURCES: 1 / 2 / 3 / 4 / 5 / 6 / 7

Traditional Christmas

Next, is your traditional Christmas theme. Red and green with classic decorations make a timeless and beautiful statement. Best part, it truly never goes out of style.

ABOVE SOURCES: 1 / 2 / 3 / 4 / 5 / 6 / 7

Modern Farmhouse

I’m a HUGE fan of black and white so this next one is right up my farmhouse/Magnolia loving alley. Many of these items are from Magnolia, because it just makes sense, right?!

ABOVE SOURCES: 1 / 2 / 3 / 4 / 5 / 6 / 7

Holly Jolly Glitz

Next up is the fun and festive bright red + green theme with a touch of aqua. So fun and colorful! I think the kiddos would really love this one!

ABOVE SOURCES: 1 / 2 / 3 / 4 / 5 / 6 / 7


Coastal

Lastly, is a coastal theme with pink and aqua! Pink for Christmas?! It can be done you guys! I’m LOVING this unique color scheme. While this is totally not my style, I do love the idea. I feel like you’ll be seeing a lot of pink and coral being used this holiday season.


ABOVE SOURCES:  1 / 2 / 3 / 4 / 5 / 6 / 7

Now for the question of the day! Which style is your favorite? Which style do you decorate your own home with? Let me know – would love to hear! Have a great weekend!

October 25, 2017 by: Michelle

Our New Home – Before and After

It’s been three months since we’ve moved in and we are LOVING our new home. It’s just perfect for us and we couldn’t be happier! I’m excited to share with you our favorite room transformations with some before and after photos! (Thanks to my sister Rebecca Lynne Photography for snapping these after shots.)

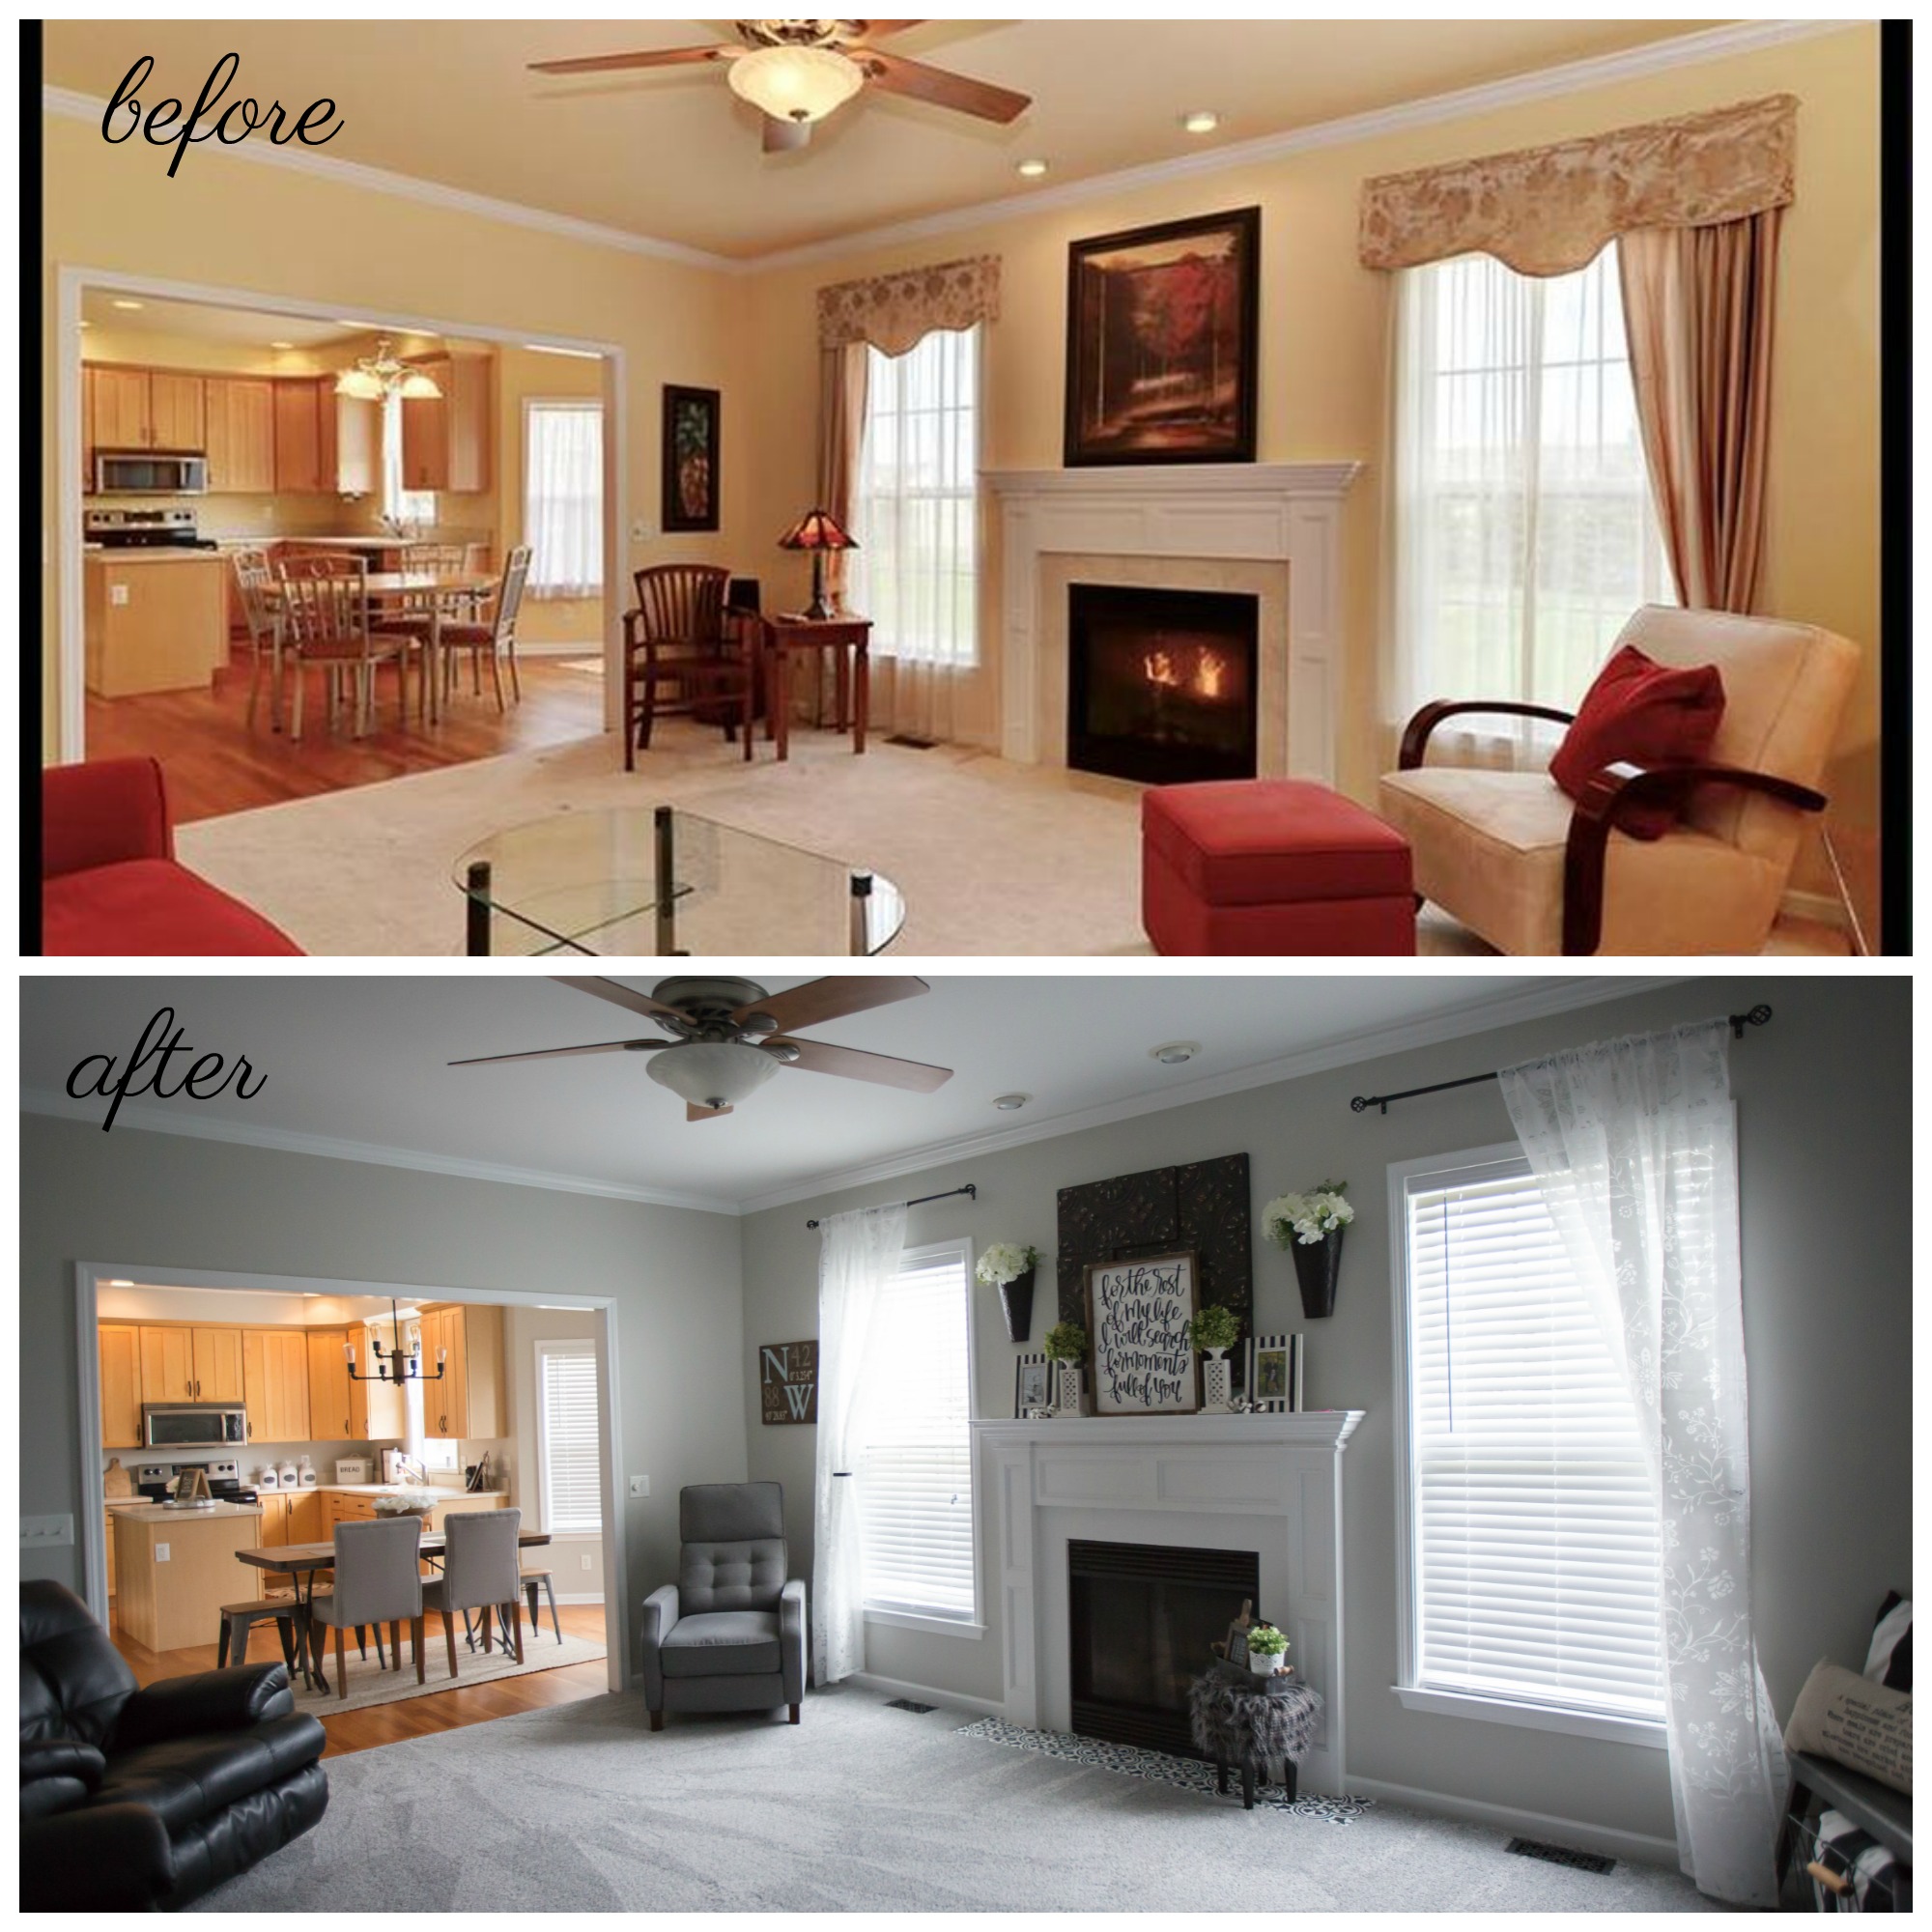
I will definitely create blog posts for each room – but for now, I wanted to do one main post dedicated to just the before and after shots of each room. Rebecca photographed each after shot as an exact replica to the listing photos – so you really get a feel for how much each space has quickly changed! Bye bye yellow, hello beautiful gray! Repose Gray by Sherwin Williams to be exact. The best gray hands down – I couldn’t love it more! There are no blue/purple undertones – it’s just a very classic very light gray. In certain lighting, it almost looks white at times.

BEFORE + AFTER #1

….the breakfast nook looking into the living room. New lighting and paint have made all the difference! Light fixture is from Menards. Our table and stools are from World Market. The two gray tufted chairs from Target. I had the farmhouse sign from our old home that I purchased at Urban Farmgirl, a local shop in Rockford, IL.

BEFORE + AFTER #2

…..the living room! We updated our fireplace with a little paint and stenciling – see detailed blog post here. We updated with a light gray carpet as we knew the white wasn’t going to last long! The new wood plank wall is an amazing focal point! It’s real wood pieces by Timberwall that you just peel and stick on – easy peasy! You can purchase these on lowes.com. Blog post coming soon with more details of this wall!

BEFORE + AFTER #3

….the dining room – and it MIGHT just be my favorite room! Lighting again is from Menards. New flooring from Floor and Decor – it’s tile that looks like wood. My buffet is from Urban Farmgirl – one of my favorite pieces in our home. New dining room table set is from Bob’s Discount Furniture. Wood shelves seen on left wall are from Lottie Love Boutique on etsy. Again, more in depth details coming to the blog soon!

BEFORE + AFTER #4

…another living room shot of our Timberwall wall! I feel like this wall alone is the biggest transformation. I mean look at that before shot – so much I could say but I will leave it alone 😉

BEFORE + AFTER 5

…..entryway. Loving our new wallpops peel and stick wallpaper. Check out more details of that here.

BEFORE + AFTER 6

….our sitting room! I just love our new light and bright space and this is one of my favorite gallery walls!

BEFORE + AFTER 7

….the kitchen! I haven’t made any HUGE changes in here yet. The new paint certainly helps make our cabinets pop instead of blending in with that yellow. I spray painted all of the hardware handles a matte black and it is such a subtle yet fun change! Black and white is my fav so I’m kinda loving our kitchen right now. We plan to update the island and definitely do a backsplash so stay tuned!

BEFORE + AFTER 8

….our daughter’s bedroom. What a difference right?! I’m loving all the pink! 🙂 This bedroom is not very large but I feel like it looks much bigger than before when it had too many furniture items crammed in one space.

BEFORE + AFTER 9

…..the Master Bedroom! I’m still working on this space (mainly the left side wall) but it has come a long way already! It’s amazing what a change in decor style can have to a space. Again, I think I did a good job at making this room feel and look bigger than it was!

BEFORE + AFTER 10

….last but not least our main floor half-bath! I kept the little white cabinet the previous owner left and had fun decorating this space! Wall color is Tidewater by Sherwin Williams.

Hope you enjoyed our before and after home tour – well I didn’t get to every room but these are 10 of my favorites! 🙂 Which is your favorite transformation? Would love to hear in the comments! It really feels like HOME to all of us now.

October 18, 2017 by: Michelle

Peel and Stick Wallpaper by WallPops

Thank you WallPops for sending me your amazing products to use in our new home. All thoughts and opinions written are 100% mine.

Peel and stick wallpaper is my new favorite thing to dress up your walls! My most favorite part? It isn’t permanent. You can easily remove if you tire of it or want to eventually want to change up the pattern. So great to use on a seasonal space, too! You may remember in our old home, we used the “Serene Cream” NuWallpaper. In our new home, we dressed up our one entryway wall with the “SHIPLAP” style peel and stick. I’m OBSESSED! Maybe because once shiplap goes out of style (like everything does) I can easily remove the wallpaper without any damage to my walls and can update using something different! With the quickly changing styles you just can’t go wrong with this! Also, I’m loving how well the shiplap looks next to the color of our walls – “Repose Gray” by Sherwin Williams.

{Above Source: New Home Sign by Joyfully Said Signs } Use code ELLERY10 to receive 10% off anything in her shop.

So I have another obsessions – decorating this cubby!! It’s my fav and it’s the first thing our guests see when they walk in our front door. As you can see below, I’m constantly changing it around and think it is such a timeless piece. I found the cubby at Urban Farmgirl – local shop in Rockford, IL. Hands down, this cubby and the wallpaper are two of the most complimented things in our new home. Nobody believes me when I tell them it’s peel and stick wallpaper! 🙂

{Above: This is our happy place sign by Joyfully Said Signs } Use code ELLERY10 to receive 10% off anything in her shop.

Below is a quick video I took as we started hanging our WallPops NuWallpaper! I highly recommend purchasing the Smoother and Utility Knife Installation Kit. We didn’t use this the first time we put up our wallpaper in the old house and this was life changing to have this time around.

Promo Code

Guess what? WallPops are giving my followers a special discount! This week only, all NuWallpaper is automatically 30% off plus free shipping for all orders over $35 AND use code ED10 at checkout to for an extra 10% off! WOW! That’s an amazing discount! ALSO, if you miss out on the sale, you can always use the “MICHELLE” code for 25% off, through the end of November! Woohoo!!

I LOVE how they have a little “How much do I need?” calculator where you can enter your square footage to determine the amount of rolls to purchase! It doesn’t get any better when they make it so easy for you!

Here’s a before and after of our new home….I just love the transformation! Bye-bye yellow, hello modern!

Hope this inspires you to dress up your walls with something that you can easily change! They have so many fun styles to choose from – loving the faux brick! I think that may be my next project!

September 11, 2017 by: Michelle

DIY Fall Wood Sign

This is a sponsored conversation written by me on behalf of Hobby Lobby. The opinions and text are all mine. I’m so excited to share this super easy (under $35) DIY fall wood sign made with all items from Hobby Lobby.

With the cooler temps here in Illinois, I’m getting the itch to decorate all things fall! Plus, I’ve been having fun decorating our new front porch and I wanted to add a little fall sign that welcomed our guests when they arrive. I had a pink summery sign in this spot and it just wasn’t going to cut it. 😉 This sign would work great indoors, on your covered porch or how cute would this be in a fall vignette?!

When I spotted the raw wood pallet sign that already had the jute rope attached – I was like YES!! I grabbed more supplies than what I ended up using since I wasn’t entirely sure the look I was going for. My first idea was to use all the typical fall colors of maroon, orange, yellow and green – but, quickly changed my mind once the wood was whitewashed and saw how simple and pretty the green, white and brown would be together! The best part – I made it myself! Don’t get me wrong, I love buying pre-made signs but this just makes me happy every time I come home and see it hanging on our front porch!

Materials

Raw Wood Pallet Sign ($13.99 on sale 30% off =$9.79)

Wood Letters ($1.49 each = $5.96)

Cottage White Wash Paint (5.99 used my 40% coupon =$3.59)

Hauser Dark Green Americana Acrylic Paint ($1.19)

Foam Brush ($3.99)

Fall Floral Bushes/Sprays (2 @2.39 = $4.78)

Bag of Pumpkins/Gourds/Pinecones ($5.99 on sale 40% off =$3.59)

Hot Glue Gun (Already had)

TOTAL: $32.89

Make Your DIY Fall Wood Sign

First, I whitewashed the pallet. I quickly painted one coat and gently wiped off with a soft towel. I didn’t want a vibrant white and this paint did the trick of just lightly covering the raw wood! I’ve never used a product like this before – I think it may be my new fav!

Next, I painted the letters green using the foam brushes – seriously only took a few minutes and dried super quick! Then I hot glued the letters on the wood pallet. Then I just placed the floral bush picks around the edge of my sign – I just bent back the stems. It really can’t get any simpler! If you know me and my DIY projects, then you know I like them to be quick and easy! I added a few extra pumpkins, gourds and pine cones around to jazz it up. A little bit goes a long way, and there’s nothing better than a hot glue gun when it comes to DIY.

Like I said, I did buy more than I actually used. I like the simplistic look of the bold hunter green and off-white. Your options are really endless when it comes to this sign since hobby lobby has TONS of different fall floral sprays/picks to choose from. Leaves, sunflowers, pumpkins, oh my! Add more pumpkins, keep it simple – whatever works best for you and your taste!

What do you think of my DIY fall wood sign? I hope this gets you excited for the season. Give it a try – it’s such a simple DIY! See what I did there?! 😉 Before you make your Hobby Lobby run, don’t forget to grab the coupon code….

August 30, 2017 by: Michelle

My favorite farmhouse light fixtures from Menards

I’m so excited to share all the details of my favorite farmhouse light fixtures, as seen in our home(s) and they are all from Menards! Menards is my favorite home improvement store when searching for new lighting. We love the “Patriot Lighting” brand best! And no, this isn’t a sponsored post – I just want to share with you where you can find these beauties because this is the one question I get most whenever I post a photo on Instagram with one of our fixtures. I wanted to be able to have one post dedicated to lighting so you all can easily find them! Now let’s get to these pretties….

Out with the old…

First, let’s start with my favorite fixtures from our kitchen remodel last May as seen in our old home.

The “Troy” fixture in our dining room was PERFECT and gave off a fun and modern farmhouse feel! Keep in mind, this is NOT a large fixture, so it worked great in our small dining room. From here on out, simply click on the photos and it will take you to the actual fixture at Menards.com. Yay! I love making it easy for you guys!

Now this fixture was my FAV!! I was so sad I had to part with it when we moved. This comes in an antique silver which didn’t go with our theme, so we simply spray painted the fixture using Rust Oleum Oil Rubbed Bronze spray paint! Easy fix!

In with the new…

Now for the fixtures I picked out for our new home. I’m OBSESSED you guys! These are such simple fixtures but are so elegant and give off just the right amount of farmhouse vibes! The “Steele” collection is what we chose and I can’t get enough! Best part – the price isn’t crazy expensive which I love. Nothing puts me down more when I find a stunning fixture and then learn it’s like $500 or something. That’s just not in this girls budget!

What do you think? Are you in on this trend? I know the farmhouse style isn’t for everyone but it’s SO me and I’m in LOVE with our new lighting – totally transforms the rooms! Be sure to follow along with me on Instagram @ellerydesigns so you can see them in action! They do occasionally go on sale too, so be on the look out! 🙂

August 21, 2017 by: Michelle

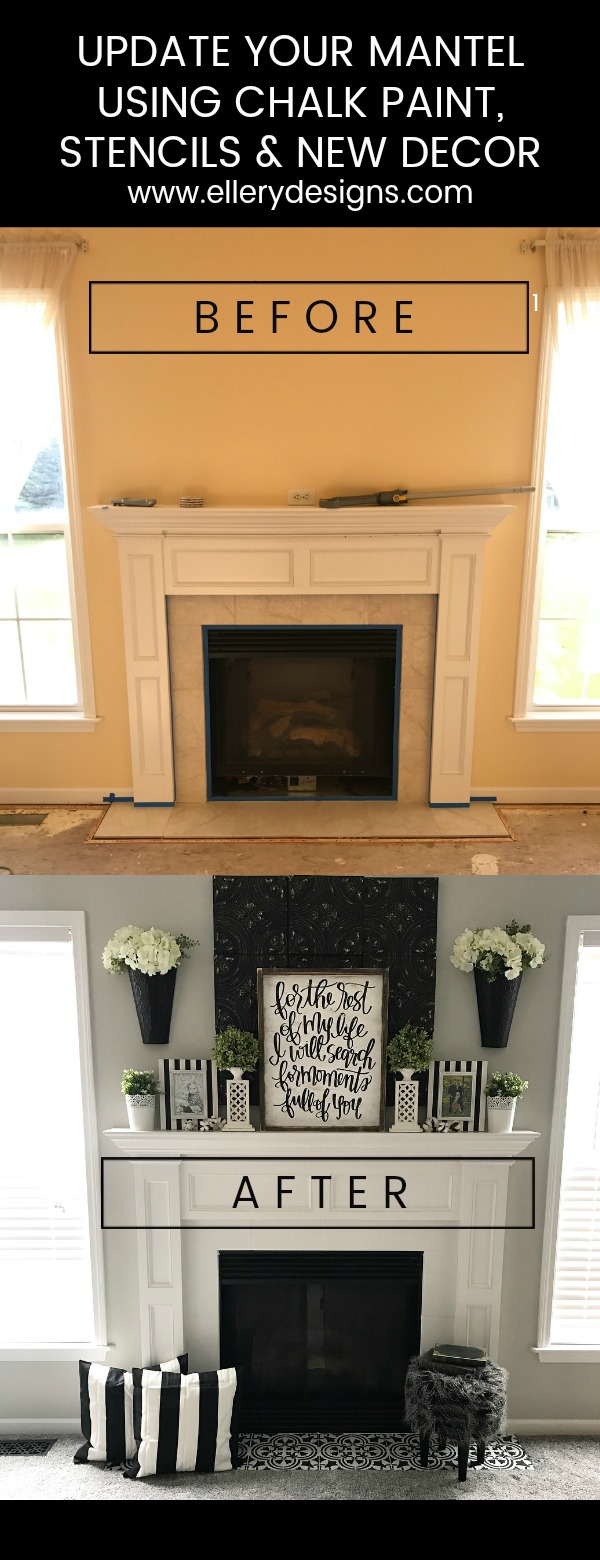
Fireplace Makeover: Stencil Tile using Chalk Paint

Hi friends! First project on the blog for our new home reveal is our stenciled tile fireplace makeover! It’s been awhile, right?! Sorry the blog has been so quiet, but if you follow along with me on Instagram (if not, what are you waiting for? @ellerydesigns) then you would know that we recently moved into a “new” home! Well, new to us! We’ve been busy with so many renovations and projects! I can’t wait to share more with you here on the blog! I promise I won’t be so quiet anymore. 🙂

DETAILS

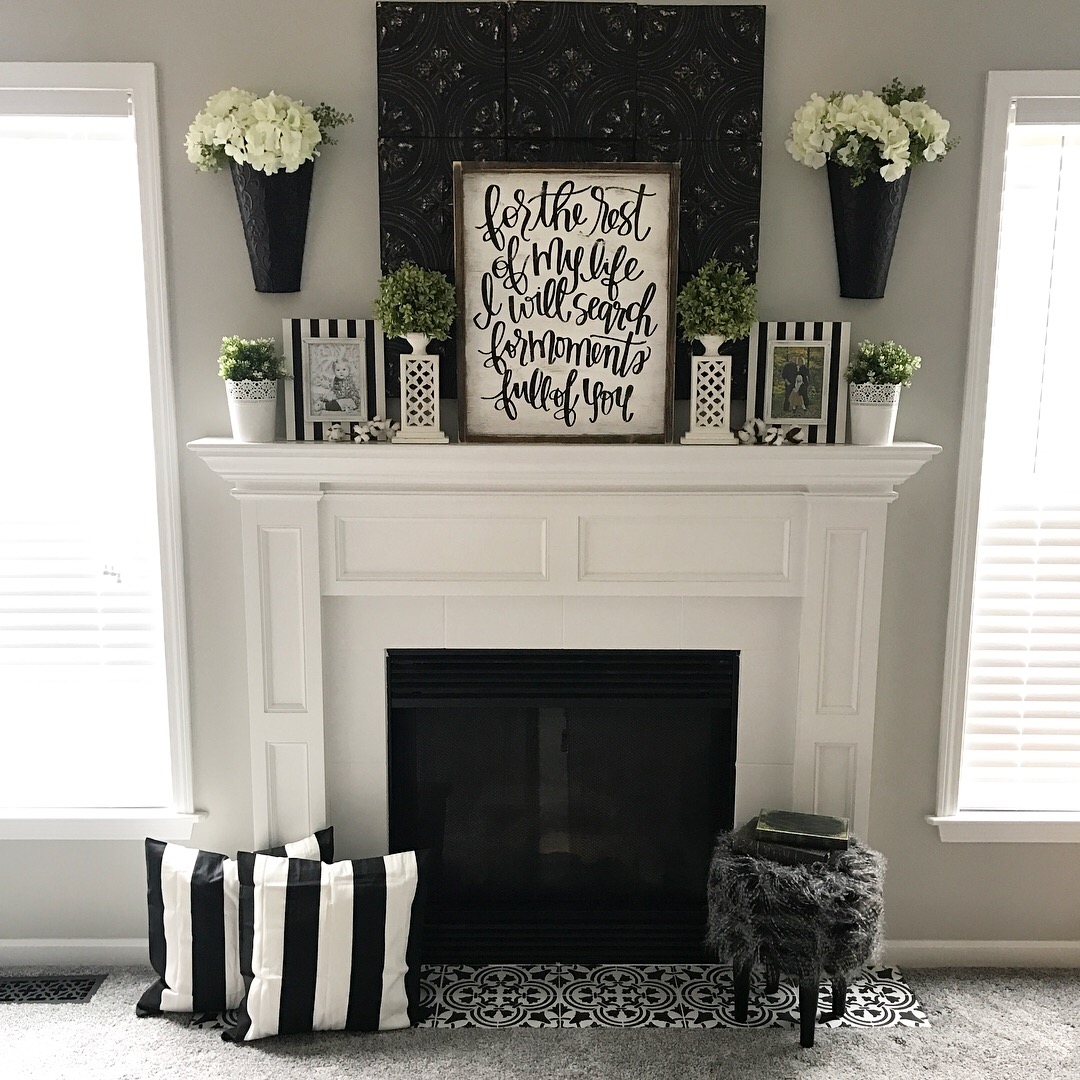
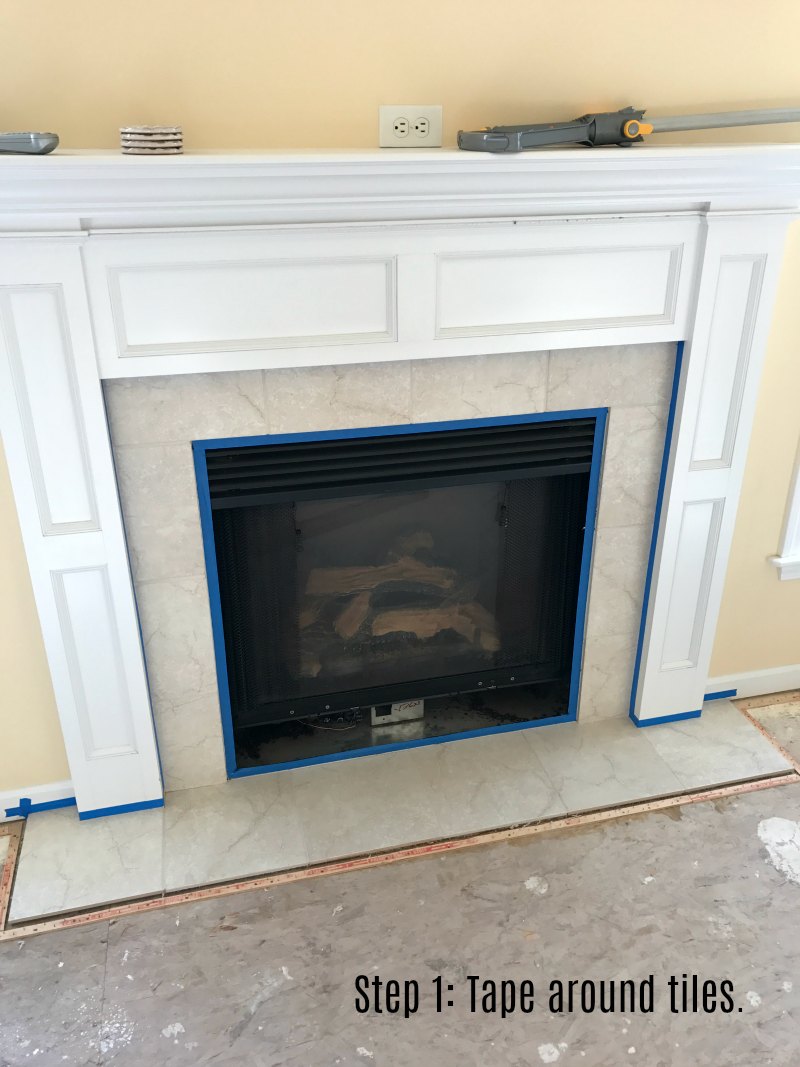
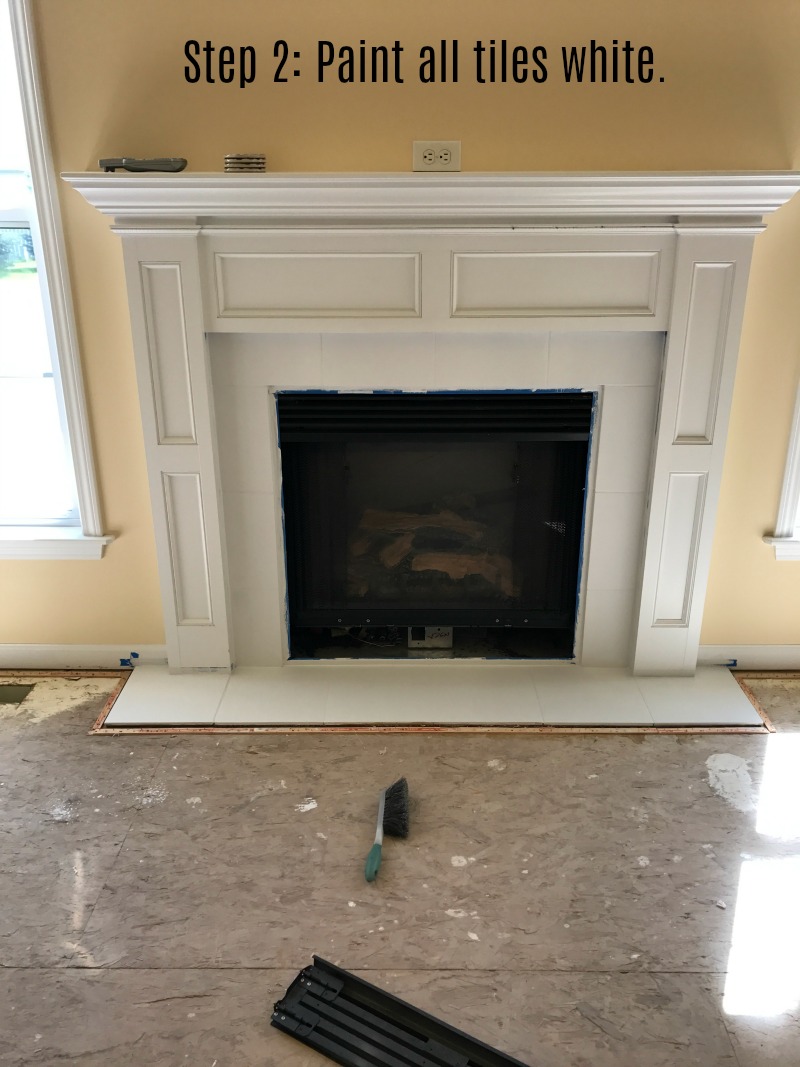
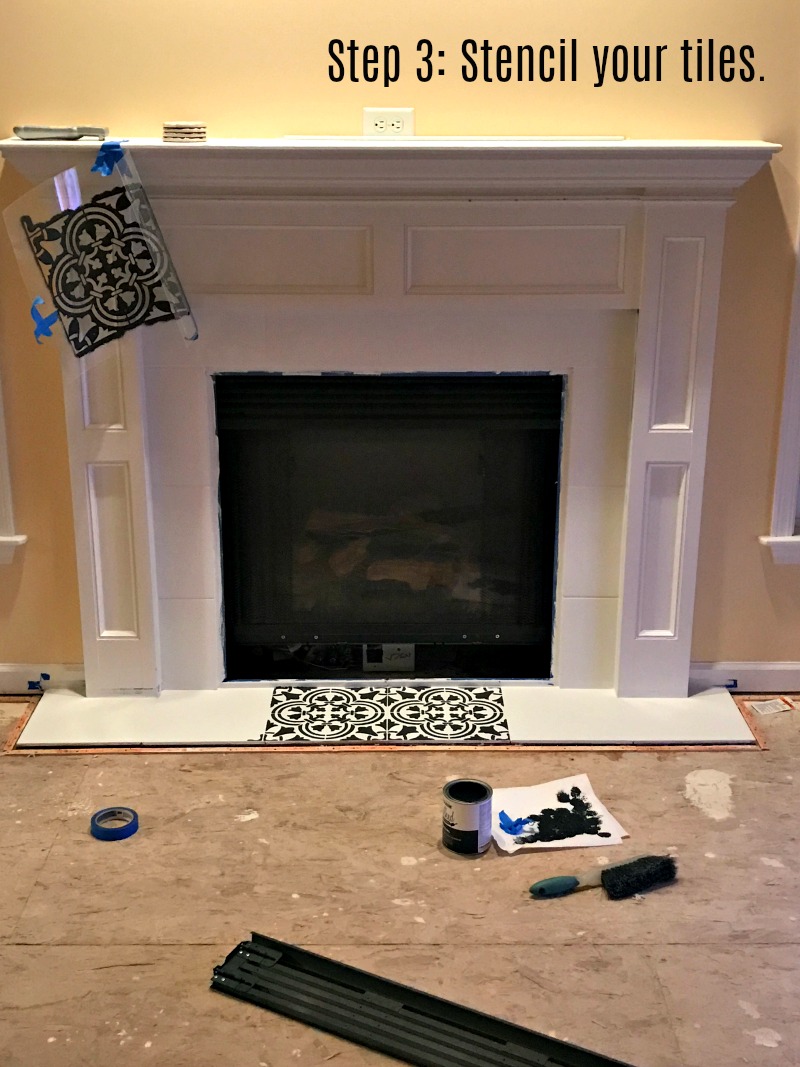
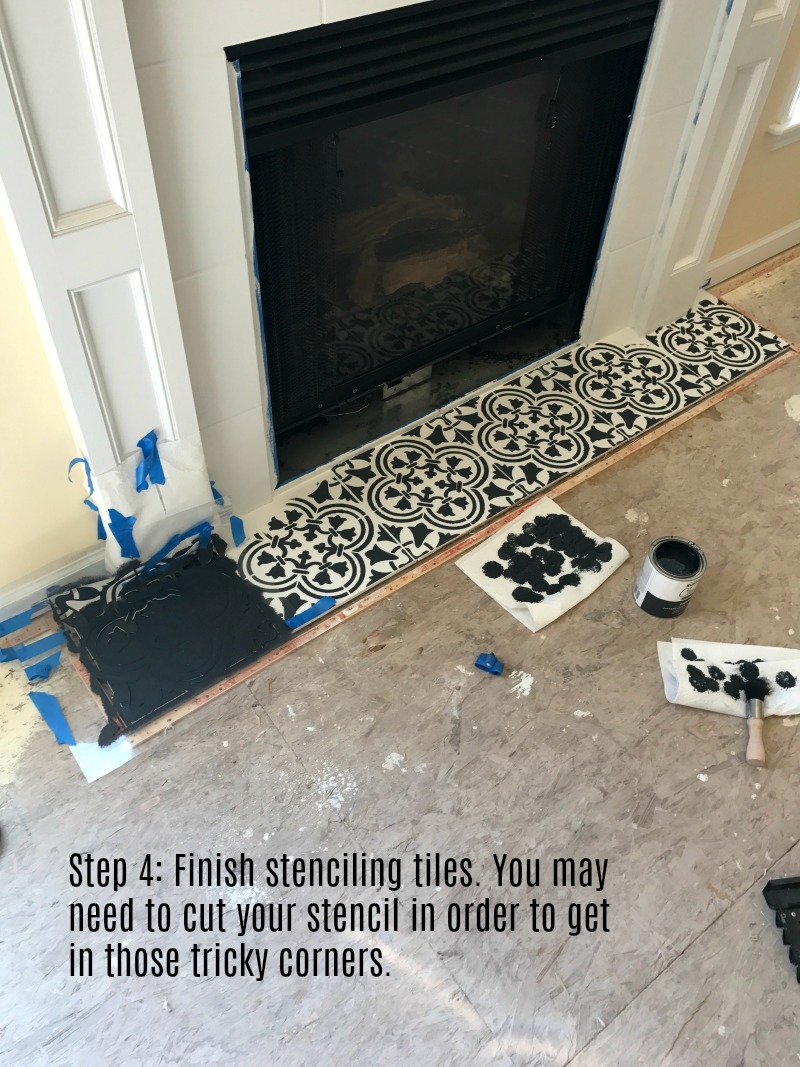
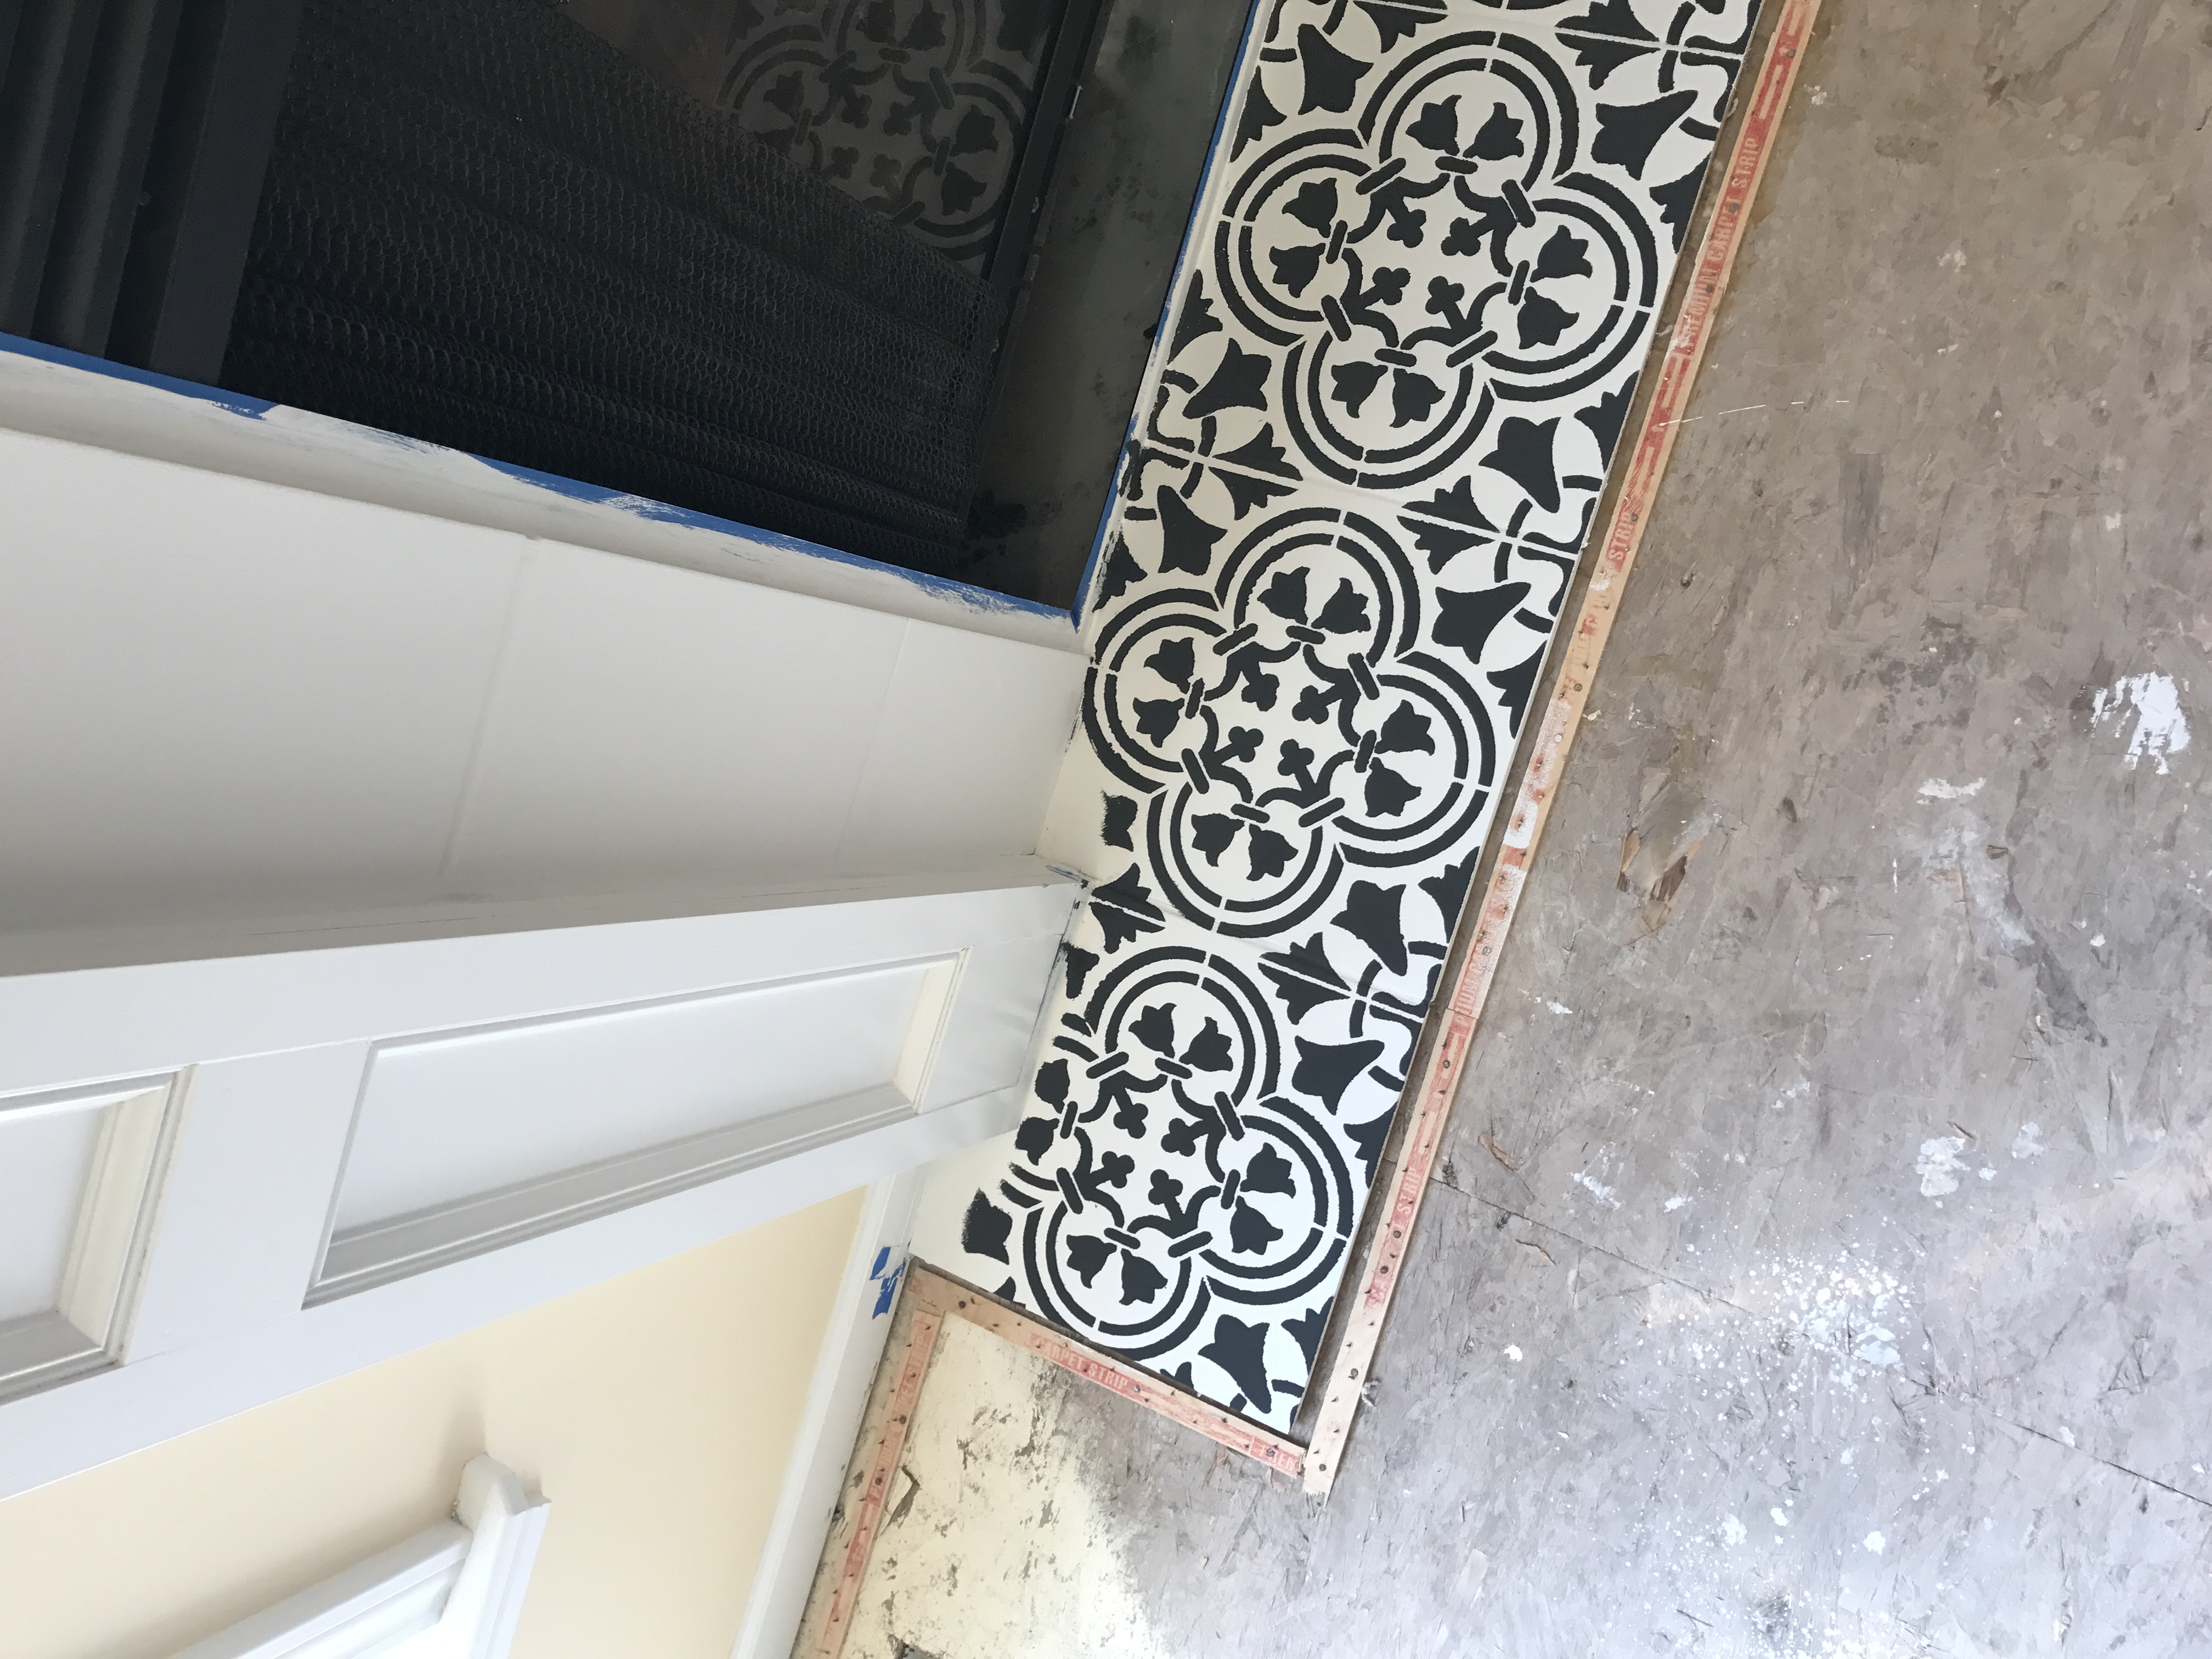
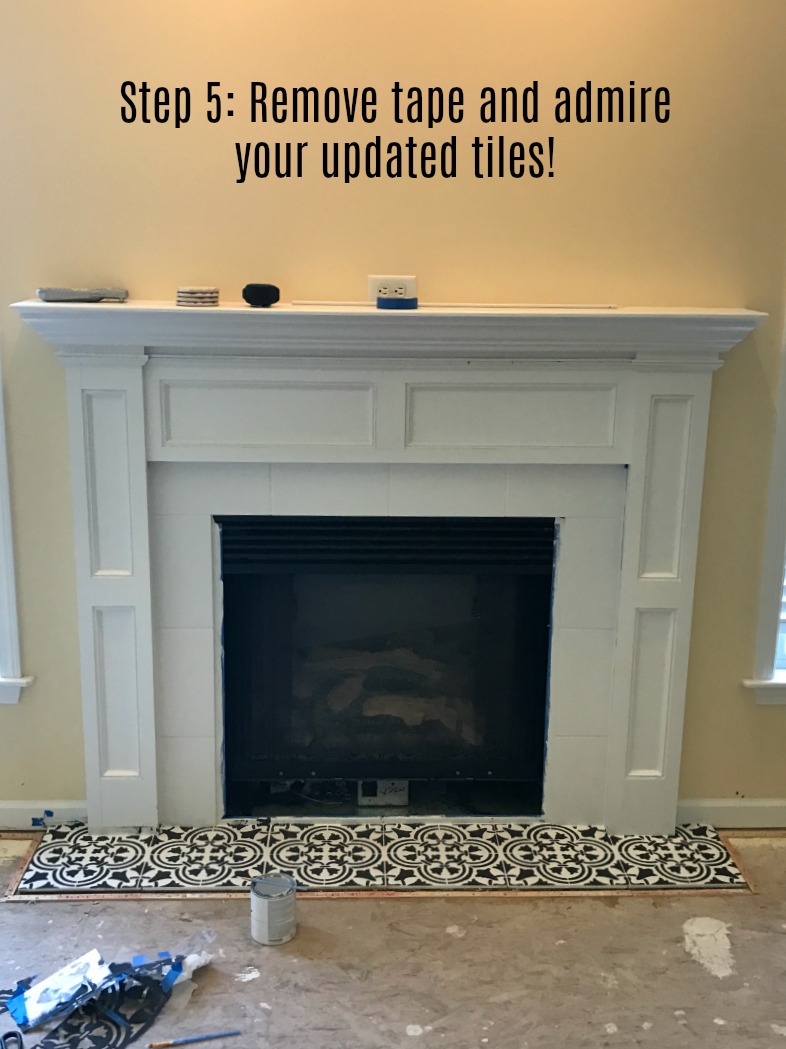
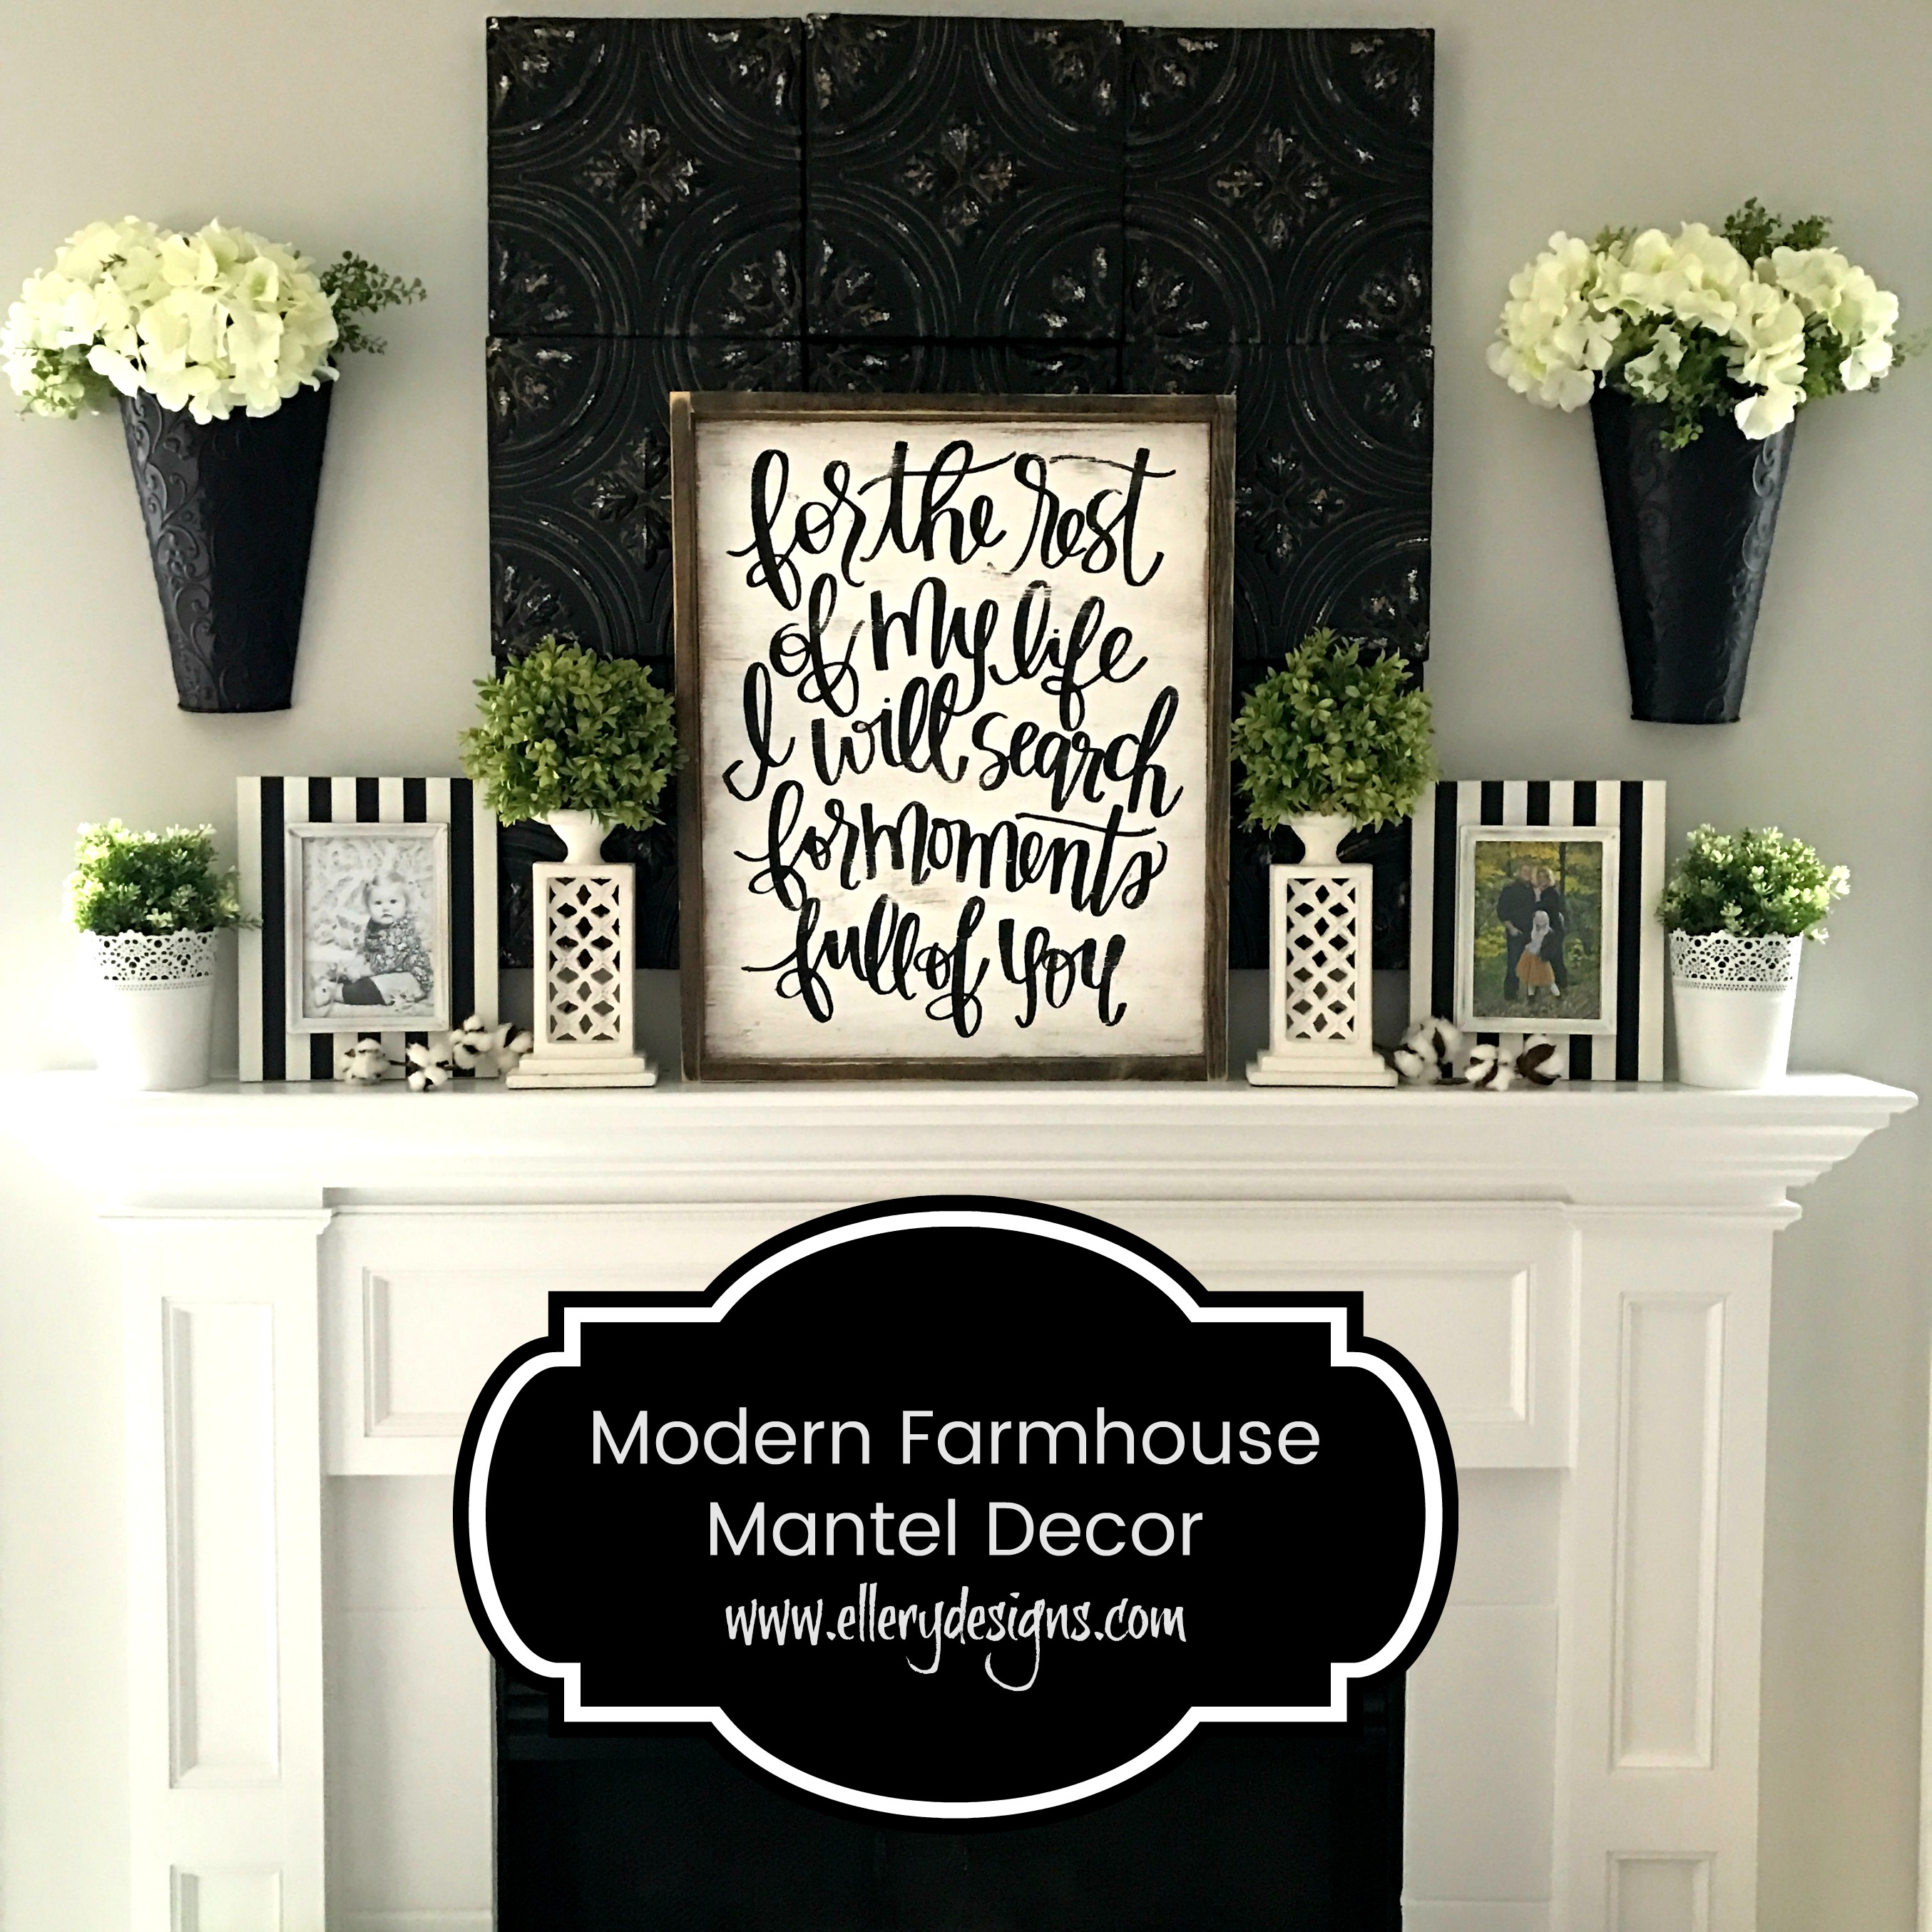
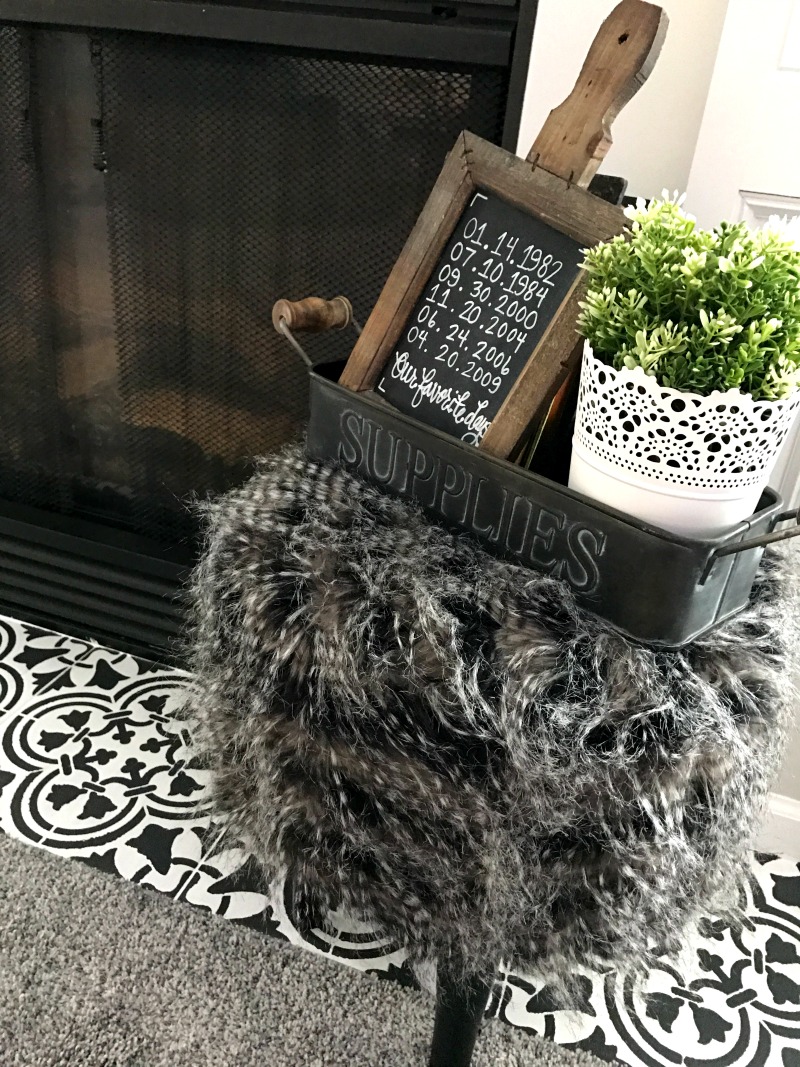
First up, on my DIY project list was a fireplace makeover and making this space a little more visually appealing. I’m so excited to have a REAL fireplace now! But the blah yellow-ish tiles were kind of an eye sore. I decided to paint the tiles white using Rust Oleum Chalk Paint in White Linen that I bought at Menards. I simply taped everything off and just painted the tiles using three coats of the white chalk paint, and I did not prime. I always paint using a brush and backroll using a small roller to eliminate brush strokes. I used the Charcoal color for the stencil part. It dries super fast so I only had to wait 5-10 minutes before moving the stencil. I bought a small/fat round brush and lightly dabbed on the stencil. I always blotted the brush on a paper towel first. I recommend not using a regular brush – you just want to lightly dab straight down so it doesn’t leak/run outside the stencil so I found the fat rounded brush, like these, worked great. Once you’re completely done, I sealed using the clear matte top coat.
I’ve seen a lot of stenciled tile DIY’s on Pinterest and Insta lately so wanted to give it a try! I will say, I hate painting and this wasn’t very easy since our tiles had odd cutouts so it was a little tricky using the stencil; so yes, that’s why I just stuck to stenciling the bottom tiles, BUT I love how it turned out! Well more like, it would have been too hard to do the rest and if I want to make a change in a few years, it will be easier to do so with just bottom ones stenciled. The stencil is from Cutting Edge Stencils. Here is the pattern I chose. There are so many cute options for your fireplace makeover!


Stencil, stencils, wall stencil, stencil designs, stencil pattern, stenciling

STEP BY STEP: STENCILING YOUR TILE


Change is a good thing….

Loving the modern farmhouse vibes this update brings to our room! A quick, subtle change but makes all the difference, right?! If you don’t know, black and white is my favorite with touches of wood elements so this fits right in with my style and I’ve received SO many compliments already! As you can see we added new carpeting and fresh paint!
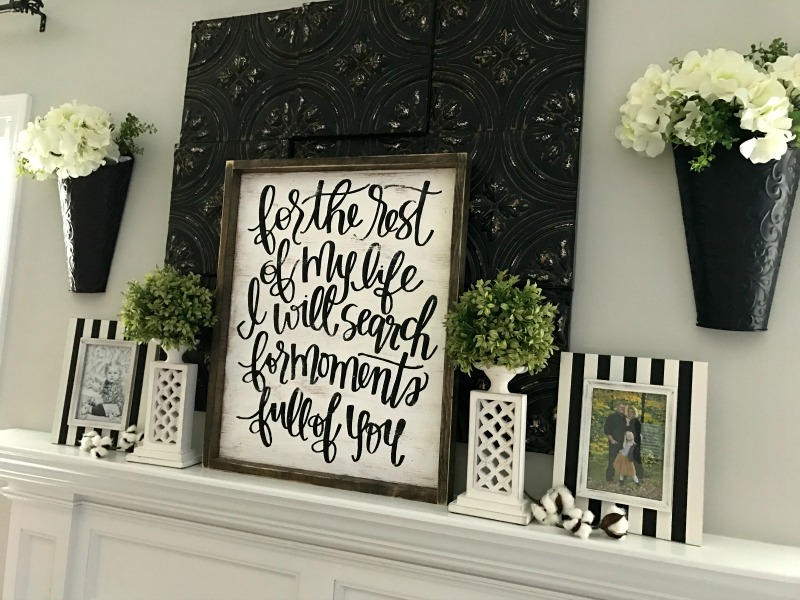
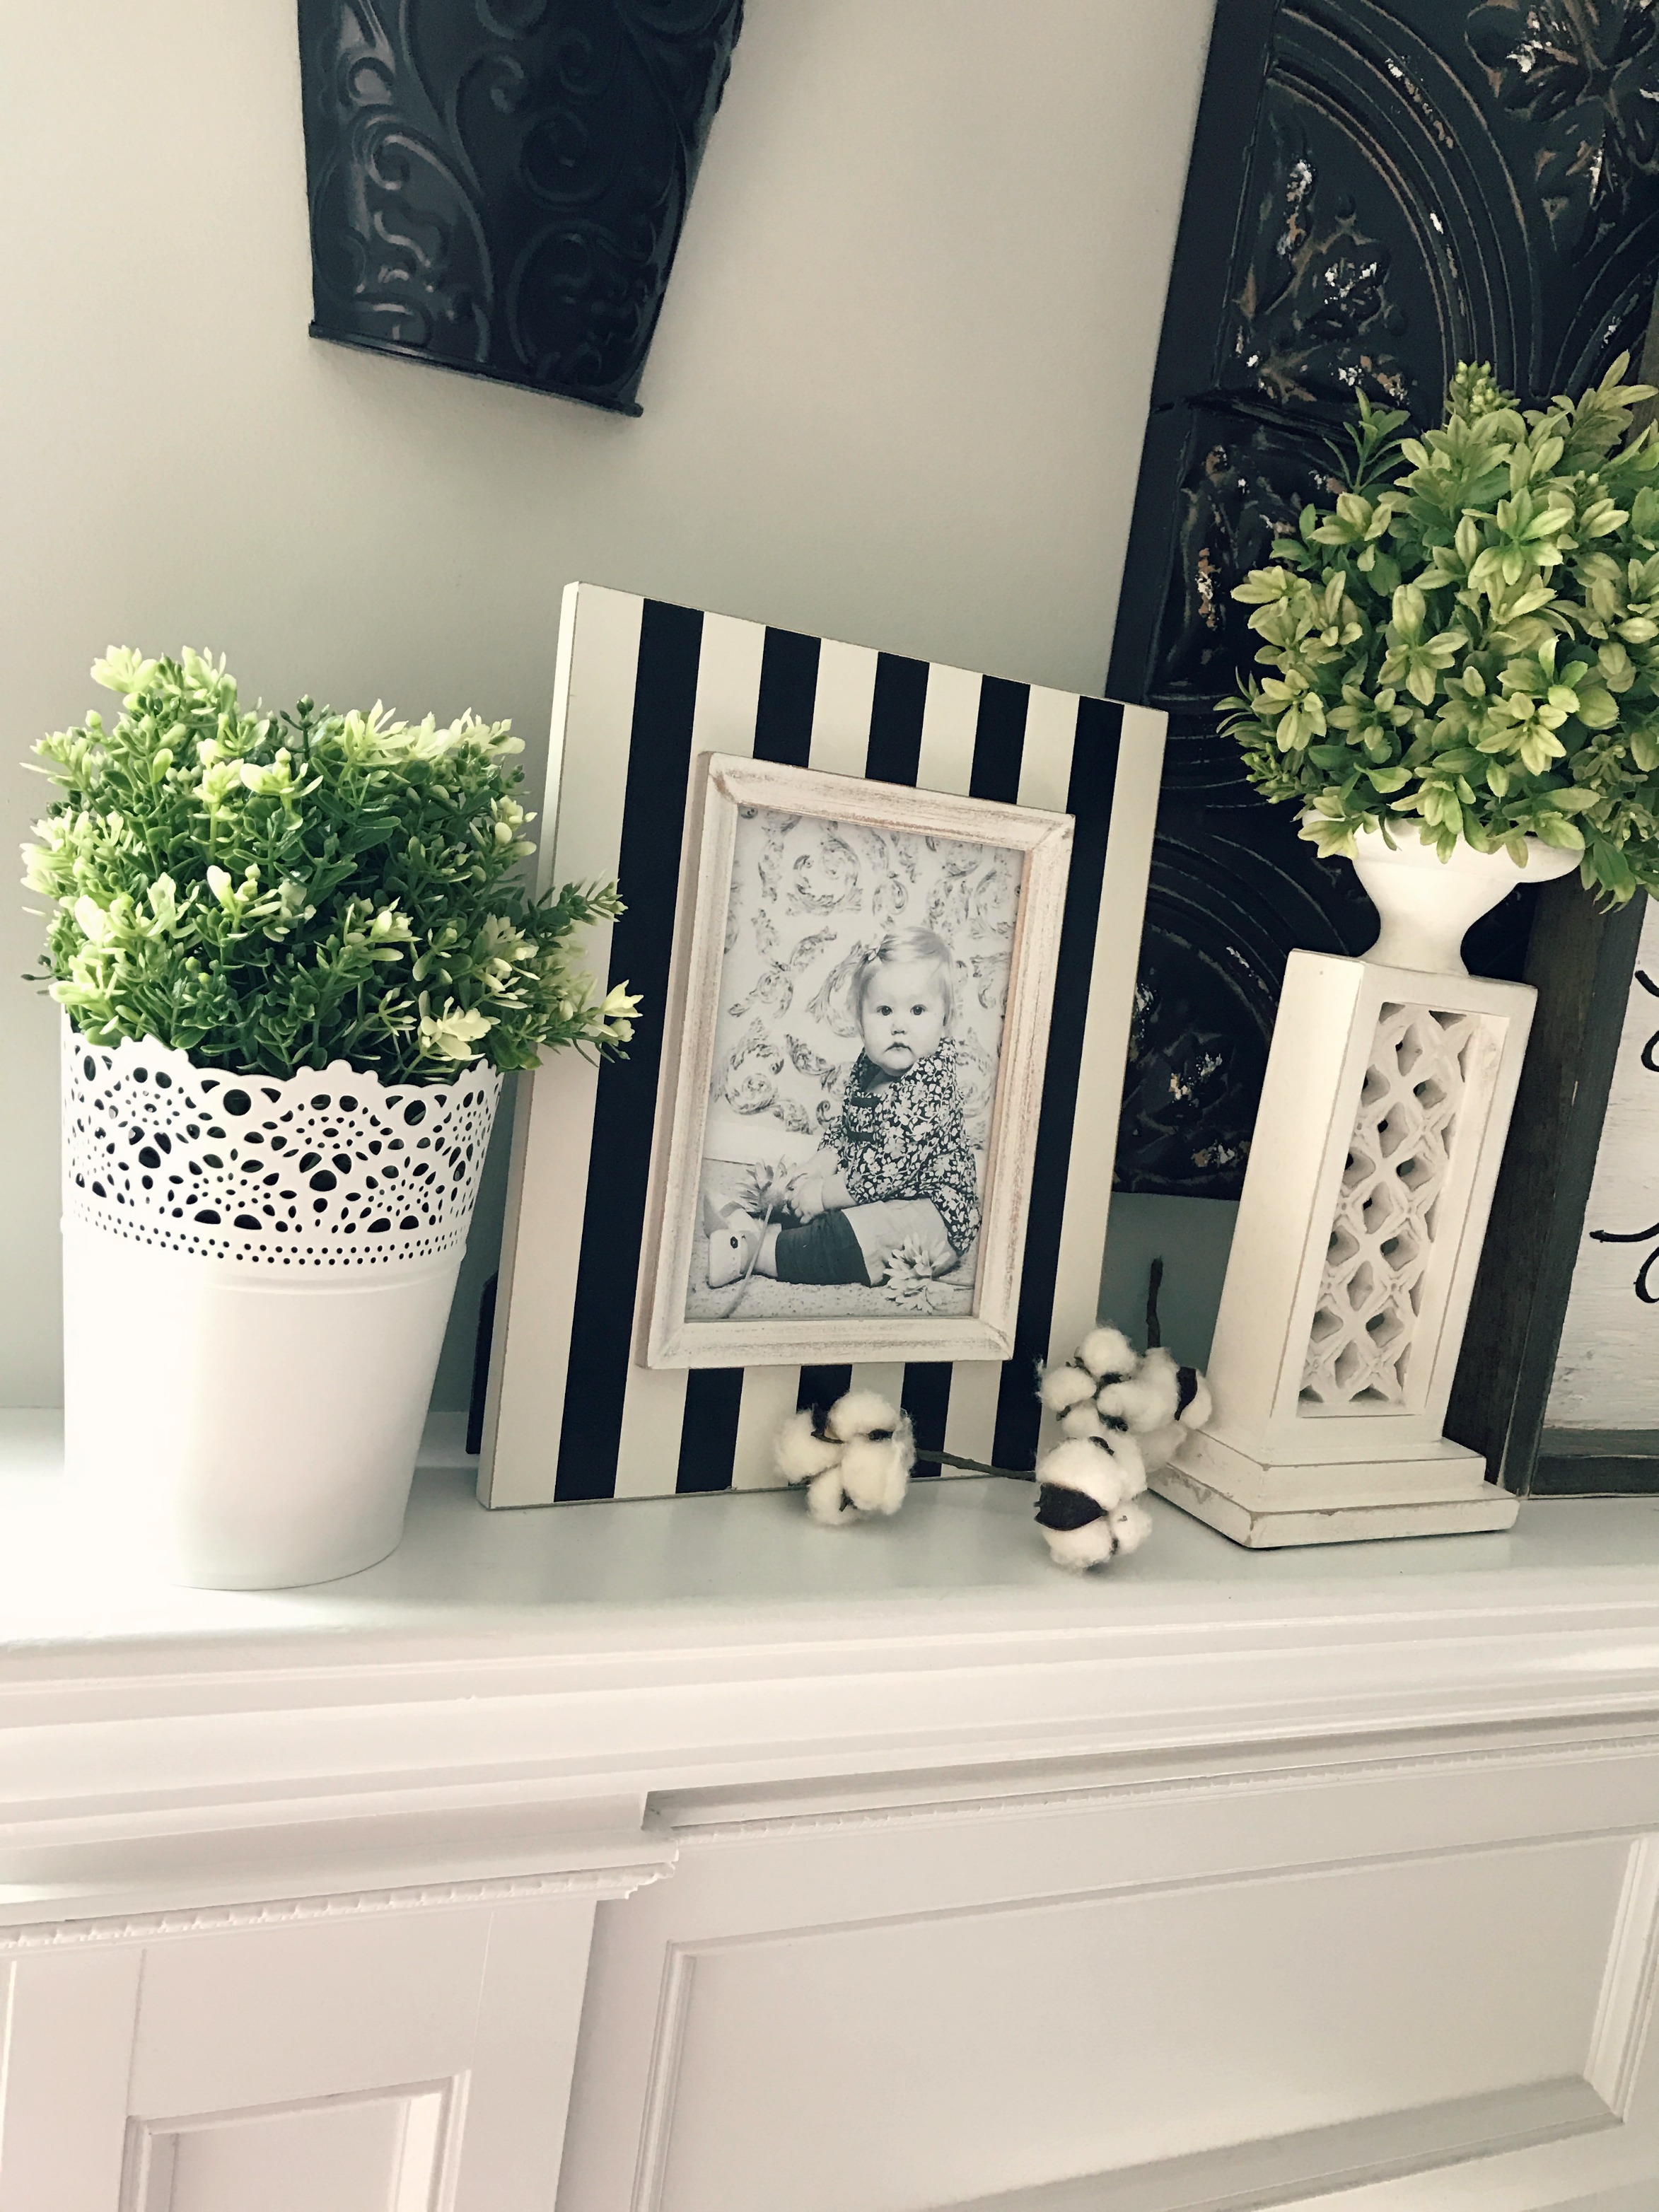
Once I was done stenciling the tile and the walls were painted, I was able to decorate. (Paint is Repose Gray by Sherwin Williams.) I was struggling with styling our new fireplace because our old faux fireplace had a big chunky mantel and this one is much smaller.  After I roamed the aisles at Hobby Lobby, I wasn’t having as hard of a time. Hobby Lobby for the win! I found everything on the mantel there, except the two small arrangements on the edge of the mantel are from IKEA. The black and white striped pillows are also from IKEA. Black and white stripes are my absolute FAVORITE so I love the modern farmhouse-y look it gives to our updated space!
 
 
Let me know what you think! Have you stenciled tile before?! Would love to hear your experience in the comments. Don’t forget to order your stencils here. They are always having such great discounts, too! One project blogged. Many to go, so stay tuned!!
XO, Michelle

May 8, 2017 by: Michelle

Our Front Porch Decor 2017

I’m so excited to share our front porch with you. Spring has sprung at the Knox home. I decided to use every color of the rainbow this year! Ryan took down our old K from last year because he wanted to replicate our new monogram planters. So he made another big K, this time using our new design with the holes in the front. You can purchase our Monogram Planters here, of course they are smaller than this giant K. 🙂

Details…

So, here’s the thing. This K ended up weighing almost 400 lbs after we planted it (we used 2.5 extra large bags of potting soil.) This baby was HEAVY. So obviously, it wasn’t going to work mounted to the siding. Our only option really was to display it sitting on our front porch in the corner and I actually like it better than it being hung because people can see it more easily 🙂

Each year, I get our flower hanging baskets from a local garden center, Prairie View Farm Market in Hampshire. They have the best selection and their baskets are GORGEOUS! They totally complete our front porch!  You won’t find anything like these at your local retail stores. We planted the large K using New Guinea Impatients found at Lowe’s. I found the cute dream sign at Michaels and the planter seen underneath it I purchased at Menards. I quickly filled with impatients and orange begonia’s also found at Menards.

We re-purposed an old standing planter box and a chippy fence to bring you the fun planter that is seen on our siding. Ryan took the legs off of the planter and simply screwed the box right into this chippy fence I’ve had for several years. I love how it turned out! The “Welcome to our home” sign is from Handcrafted Brunette.

I like to say we have the smallest front porch ever and yes, we have it jam packed with as much stuff as possible. It might be a bit much for some, but I LOVE flowers so my motto is, go big or go home! 🙂  Hope you enjoy…have you started planting yet? What are your go-to flowers? Would love to hear!

Here’s a quick slide video to see the difference from last year….


April 7, 2017 by: Michelle

Ellery Designs Monogram Planters FOR SALE!

Get your Monogram Planters – just in time for planting season! We are thrilled to announce we have teamed up with Proven Winners – #1 Plant Brand, and our new Monogram Planters are officially FOR SALE and ready to dress up your front porch! Yay!

First things first, YES! These are even better than our extra-large K you have probably seen on our front porch. Our NEW Monogram Planters are WAY easier to plant and maintain. Available in all 26 letters.

Watch the video

Check out the awesome video by Laura @ Garden Answer below. She greatly explains and shows you how to plant your letter and gives you tips on what size flowers to plant. She’s amazing! All of the beautiful, planted photos on this post are from Garden Answer.

Aren’t they so gorgeous!? Give these a few more weeks and the growth will be amazing and take over your entire letter. Set your letter on your porch, table, lay in a flower bed, or hang on your siding (which is the cleat option). These would make an amazing Mother’s Day gift as well.

Frequently Asked Questions

  1. Will my Monogram Planter rot? Absolutely not. It is made out of cedar and will last for years to come!
  2. How will this drain when I water my planter? Pre-drilled holes are seen on the back of your letter in each reservoir to allow proper draining.
  3. How do I water my planter? Lay your letter on its back. Water flowers watering can. Let sit for roughly 5-10 minutes to drain and put back in it’s designated location.
  4. What flowers should I use? As Laura mentioned in the video, 4 inch size flowers work great for these. She used pansiolas. What type of flower depends on where you plan to have your letter. If you’re using your planter in the shade, we recommend impatients as they grow rapidly and are easy to maintain.

So what do you think?! Purchase yours HERE. What letter would you choose?! Happy planting!!


March 21, 2017 by: Michelle

DIY Front Door Decoration for Spring!

This blog post is sponsored by Hobby Lobby. The opinions and text are all mine. I’m excited to share with you a very easy and fun DIY front door decoration using fun items I found at Hobby Lobby. Spring is officially here and I couldn’t be more excited! Best news – you can create this for well under $50 and it won’t take up much of your time. YAY!

I love walking around Hobby Lobby and finding an item that inspires me and gets my wheels spinning. I’m loving the fresh look of farmhouse style items and these tobacco baskets are my new favorite go-to decor item. And you can’t beat the price! So, I thought how fun could this be if I decorated it instead of the traditional use of resting on a shelf or simply hung on a wall. My favorite part is that this could be used year round if you simply change out the tulips and carrots for more summer or fall like decor. Not sure about you, but I’m all for a multi-functioning DIY!

Materials + Budget:

  1. Tobacco Basket (50% off Home Decor) $7.49
  2. Green Floral Fern (used my 40% off coupon) $7.19
  3. Faux Flowers (I used one bunch of white tulips for a classic look) $7.99
  4. Over Door Wreath Hanger $2.99
  5. Wood Letters (I spelled out “hello” and painted them white.) .99 each – total $3.96
  6. White Picket Fence $2.99 (includes four pieces)
  7. Burlap Loop Bow $2.99 (found this in the Cards & Party section)
  8. Carrot Bundle (was 40% off Easter decor) $1.79
  9. Hot Glue Gun

TOTAL COST with tax: $40.47.

Note: I originally added a few tulips to the left of the carrots, on the top of the basket, but later removed them as I liked them better on the bottom near the fence as I was going for a more simplistic look. Your options are really endless!

Make your door decoration:

  1. Attach the greenery to your basket by resting inside the weaves. I ripped off sections instead of using the entire piece to make it look more realistic. (You can secure using a hot glue gun if needed but I did not need to do this.)
  2. Attach carrot bundle to top
  3. Attach picket fence (I used two pieces and glued them together) and attach to your tobacco basket using hot glue.
  4. Attach bow to fence using the twisty wire that was already on the bow.
  5. Paint or decorate your letters and adhere to basket using hot glue.
  6. Pluck off flowers and add them in behind the fence to look like a little tulip garden. (Again, you can secure using hot glue, but I did not need to do this. I wasn’t kidding when I said this was a simple project! 🙂
  7. Add door hanger to back of your basket and hang on your door!

So what do you think? I’m all about easy projects and I’m so excited about my new front door decoration! I love the farmhouse vibes and love the low cost even more. Such a fun way to decorate a tobacco basket. Head to Hobby Lobby or simply click on the links above to make yourself a pretty and fun springtime decoration for your front door. Don’t forget to use the coupon below! All you have to do is show the cashier this photo.

This is a sponsored conversation written by me on behalf of Hobby Lobby. The opinions and text are all mine.

  • « Previous Page
  • 1
  • …
  • 12
  • 13
  • 14
  • 15
  • 16
  • …
  • 39
  • Next Page »

FALL FEELS TEES ON SALE NOW!

FALL FEELS TEES ON SALE NOW!

Shop my FAV Hearth & Hand Products!


Stencil, stencils, wall stencil, stencil designs, stencil pattern, stenciling

Latest Pins

Youth #football coaches be like - we still havin practice! Repin if this applies to you. #youthfootball www.youthfootballonline.comLight themed transitional living room cozies up with an ivory sofa paired with gray accent chairs around a wooden and metal coffee table.Christina Henck designed this Philadelphia home to be light and airy with a modern bohemian feel. In the living room, a gold mirrored coffee table and green velvet accent chairs add a touch of glam, while the patterned accent pillows give the design dimension. Gem tones act as the grounding force for this modern classic living room. See more of this gorgeous design on henckdesign.com!Funny Pictures Of The Day - 35 PicsThis cedar wood screen adds loads of character to a back yard, is budget friendly, and gives an outdoor patio space extra privacy.Decorating your Kitchen Island for Christmas with Hobby Lobby – Ellery Designs #christmasDecorating your Kitchen Island for Christmas with Hobby Lobby – Ellery DesignsChristmas Tee, Christmas Shirt for Women, Christmas T-Shirt, Baking Tee, Christmas Apparel, Christmas Tree Shirt  - Vintage Red Unisex TeeTween Chic Bedroom Makeover – Ellery DesignsTween Chic Bedroom Makeover – Ellery DesignsDecorating for fall with Afloral – Ellery DesignsDecorating for fall with Afloral – Ellery Designs
Follow Me on Pinterest

#ElleryWear Tees ON SALE!

Our New Home Before + After

Our New Home Before + After

How to Organize Your Pantry

How to Organize Your Pantry

Linen Closet Makeover

Linen Closet Makeover

Truly Blessed Tees ON SALE!

Our Menards Commercial

Our Menards Commercial

Cozy Glam Bedroom Refresh by Ellery Designs

Cozy Glam Bedroom Refresh by Ellery Designs

Tween Chic Bedroom Makeover

DIY Planter

DIY Planter

Refresh your mantel with wallpaper

Refresh your mantel with wallpaper

Stencil Your Fireplace Tiles

Stencil Your Fireplace Tiles

Gallery Wall Ideas

Gallery Wall Ideas

Our Townhome Kitchen Remodel

Our Townhome Kitchen Remodel

#ElleryWear ON SALE NOW!

#ElleryWear ON SALE NOW!

Our Pantry Makeover

Our Pantry Makeover

Thanks for stopping by!

We hope you leave inspired for your next project! Come back soon to see what we've been up to! Have a question or want to collaborate? Let's Chat...

Looking for something?

© 2026 · Ellery Designs · website by Pretty Darn Cute Design